NamedManager : une interface web agréable pour administrer Bind

From Deimos.fr / Bloc Notes Informatique
Jump to: navigation, search
NamedManager

Software version 1.5.1
Operating System Debian 7
Website Namedmanager Website
Last Update 14/04/2013
Others

1 Introduction

Namedmanager[1] est une interface graphique pour gérer vos enregistrements DNS. Elle a été correctement pensée pour faciliter l'administration, comme par exemple l'ajout automatique d'un enregistrement PTR au renseignement d'un enregistrement A, par simple checkbox.

L'interface est également capable de gérer plusieurs serveurs DNS et centraliser les logs de ceux ci.

2 Prérequis

Nous allons avoir besoin de plusieurs éléments. J'ai donc choisis :

  • Serveur web : Nginx avec SSL + PHP-FPM
  • Base de données : MariaDB

2.1 Nginx

Pour l'installation, on est sur Debian donc c'est toujours aussi simple :

Command aptitude
aptitude install nginx

Puis on va le démarrer :

Command aptitude
/etc/init.d/nginx start

2.1.1 SSL

Dans un premier temps, on va générer des clefs SSL :

Command
mkdir -p /etc/nginx/ssl
cd /etc/nginx/ssl
openssl req -new -x509 -nodes -out server.crt -keyout server.key

Puis nous allons modifier notre configuration Nginx (a vous d'adapter selon vos besoins) :

Configuration File /etc/nginx/sites-enabled/default
server {
	listen   443;
 
        ssl on;
        ssl_certificate /etc/nginx/ssl/server.crt;
        ssl_certificate_key /etc/nginx/ssl/server.key;
        ssl_session_timeout 5m;
        access_log  /var/log/nginx/dns.access.log;
 
	root /usr/share/nginx/www;
	index index.php;
 
	server_name dns.deimos.fr; 
	location / {
		try_files $uri $uri/ /index.html;
	}
 
	# pass the PHP scripts to FastCGI server listening on 127.0.0.1:9000
	#
	location ~ \.php$ {
		fastcgi_pass unix:/var/run/php5-fpm.sock;
		fastcgi_index index.php;
		include fastcgi_params;
	}
}

2.2 PHP-FPM

Command
aptitude install php5-fpm

2.3 MariaDB

To install MariaDB, it's unfortunately not embedded in Debian, so we'll add a repository. First of all, install a python tool to get aptkey :

Command aptitude
aptitude install python-software-properties

Then let's add this repository (https://downloads.mariadb.org/mariadb/repositories/) :

Command
apt-key adv --recv-keys --keyserver keyserver.ubuntu.com 0xcbcb082a1bb943db
add-apt-repository 'deb http://mirrors.linsrv.net/mariadb/repo/10.0/debian wheezy main'

We're now going to change apt pinning to prioritize MariaDB's repository :

Configuration File /etc/apt/preferences.d/mariadb
Package: *
Pin: release o=MariaDB
Pin-Priority: 1000

Et on installe MariaDB :

Command aptitude
aptitude update
aptitude install mariadb-server


Puis nous allons ajouter les derniers packages nécessaire :

Command aptitude
aptitude install php5-cli php5-mysql

3 Installation

Notes Notes
Si votre serveur DNS se trouve sur la même machine que l'interface graphique, alors il faudra l'installer :
Command aptitude
aptitude install bind9


Nous allons avoir besoin de ces utilitaires pour faire fonctionner l'interface web :

Command aptitude
aptitude install bind9utils php-soap

Nous allons récupérer la dernière version , puis la décompresser :

Command
cd /tmp
wget https://projects.jethrocarr.com/p/oss-namedmanager/downloads/get/namedmanager-1.5.1.tar.bz2
tar -xjf namedmanager-1.5.1.tar.bz2
cd namedmanager-1.5.1

Nous allons mettre en place les outils permettant l'intégration avec bind :

Command cp
mkdir /usr/share/namedmanager
cp -Rf bind /usr/share/namedmanager
cp /usr/share/namedmanager/bind/include/{sample-config.php,config-settings.php}
mkdir /etc/namedmanager
ln -s /usr/share/namedmanager/bind/include/config-settings.php /etc/namedmanager/config-bind.php

Puis la crontab :

Command cp
cp resources/namedmanager-bind.cron /etc/cron.d/namedmanager-bind

Nous allons également mettre en place un service de logpush qui nous permettra de centraliser les logs :

Command
cp resources/namedmanager_logpush.rcsysinit /etc/init.d/namedmanager_logpush
update-rc.d -f namedmanager_logpush defaults

Pour finir, nous créons les fichiers nécessaire au bon fonctionnement de l'interface web en assignant les bons droits :

Command
touch /etc/bind/named.namedmanager.conf
mkdir /etc/bind/zones
chown www-data:bind /etc/bind/named.namedmanager.conf /etc/bind/zones
chmod 775 /etc/bind/named.namedmanager.conf /etc/bind/zones

4 Configuration

4.1 Base de données

Maintenant, nous allons initialiser la base de données :

Command mysql
mysql -uroot -p < sql/version_20121208_install.sql

Warning WARNING
Contrairement à des imports classiques, celui ci créer en même temps la base de données appelée 'namedmanager'

et mettre les bons droits (ajustez selon vos besoins) :

Command mysql
GRANT USAGE ON * . * TO 'namedmanager'@'%' IDENTIFIED BY 'password';
GRANT SELECT , INSERT , UPDATE , DELETE , CREATE , DROP , INDEX , ALTER , CREATE TEMPORARY TABLES, LOCK TABLES ON `namedmanager` . * TO 'namedmanager'@'%';
flush privileges;

4.2 Serveur web

Nous allons nous occuper de la partie web. Personnellement, j'ai une machine dédiée à gérer mes DNS sur laquelle je ne veux pas de virtualhosts. Donc je met tout à la racine de mon serveur, mais vous n'êtes pas obligé de faire comme moi non plus. Puis nous allons créer le fichier de configuration et le mettre dans /etc :

Command cp
cp -Rf htdocs/* /usr/share/nginx/www/
chown -Rf www-data. /usr/share/nginx/www/
cp htdocs/include/sample-config.php /usr/share/nginx/www/include/config-settings.php
ln -s /usr/share/nginx/www/include/config-settings.php /etc/namedmanager/config.php

Editez votre configuration pour qu'elle ai les bonnes informations sur la base de données :

Configuration File /etc/namedmanager/config.php
[...]
/*
    Database Configuration
*/
$config["db_host"] = "localhost";           // hostname of the MySQL server
$config["db_name"] = "namedmanager";        // database name
$config["db_user"] = "namedmanager";        // MySQL user
$config["db_pass"] = "password";            // MySQL password (if any)
[...]

Avant de passer à la suite, il est temps de redémarrer tous les services qui ont été modifiés :

Command
service php5-fpm restart
service nginx restart
service cron restart

4.3 Bind et clé API

Nous allons intégrer la configuration de NamedManager à Bind :

Configuration File /etc/bind/named.conf
// This is the primary configuration file for the BIND DNS server named.
//
// Please read /usr/share/doc/bind9/README.Debian.gz for information on the
// structure of BIND configuration files in Debian, *BEFORE* you customize
// this configuration file.
//
// If you are just adding zones, please do that in /etc/bind/named.conf.local
 
include "/etc/bind/named.conf.options";
include "/etc/bind/named.conf.local";
include "/etc/bind/named.conf.default-zones";
include "/etc/bind/named.namedmanager.conf";

Redémarrez ensuite Bind.

Générerons une clé API (vous pouvez utiliser la méthode que vous souhaitez ou faire comme moi) :

Command date
> date +%s | sha256sum | base64 | head -c 32 ; echo
YmI3ZGRlYWY3NTk4ZDAzMGJmYWE1NDdh

Éditons ensuite le fichier de configuration suivant et adaptez le selon vos besoins :

Configuration File /etc/namedmanager/config-bind.php
<?php
/*
    Sample Configuration File
    Copy this file to config-settings.php
    This file should be read-only to the user whom the bind configuration scripts are running as.
*/
 
/*
    API Configuration
*/
$config["api_url"]          = "https://dns.deimos.fr";              // Application Install Location$config["api_server_name"]  = "dns.deimos.fr";                     // Name of the DNS server (important: part of the authentication process)$config["api_auth_key"]     = "YmI3ZGRlYWY3NTk4ZDAzMGJmYWE1NDdh";  // API authentication key 
 
/*
    Log file to find messages from Named. Note that:
    * File should be in syslog format
    * Named Manager uses tail -f to read it, this can break with logrotate - make sure that either "copytruncate" mode is used, or tail processes are killed
*/
$config["log_file"]     = "/var/log/syslog"; 
/*
    Lock File
    Used to prevent clashes when multiple instances are accidently run.
*/
$config["lock_file"]        = "/var/lock/namedmanager_lock";
 
/*
    Bind Configuration Files
 
    Theses files define what files that NamedManager will write to. By design, NamedManager does
    not write directly into the master named configuration file, but instead into a seporate file
    that gets included - which allows custom configuration and zones to be easily added without
    worries of them being over written by NamedManager.
*/
$config["bind"]["version"]      = "9";                  // version of bind (currently only 9 is supported, although others may work)
$config["bind"]["reload"]       = "/usr/sbin/rndc reload";      // command to reload bind config & zonefiles
$config["bind"]["config"]       = "/etc/bind/named.namedmanager.conf";   // configuration file to write bind config too$config["bind"]["zonefiledir"]      = "/etc/bind/zones";            // directory to write zonefiles too                                        // note: if using chroot bind, will often be /var/named/chroot/var/named/
$config["bind"]["verify_zone"]      = "/usr/sbin/named-checkzone";      // Used to verify each generated zonefile as OK
$config["bind"]["verify_config"]    = "/usr/sbin/named-checkconf";      // Used to verify generated NamedManager configuration
 
// force debugging on for all users + scripts
// (note: debugging can be enabled on a per-user basis by an admin via the web interface)
//$_SESSION["user"]["debug"] = "on";
?>

4.4 Interface web

Maintenant, vous pouvez accéder en https sur votre serveur (moi c'est : https://dns.deimos.fr) avec les identifiants suivants :

  • Login : setup
  • Password : setup123

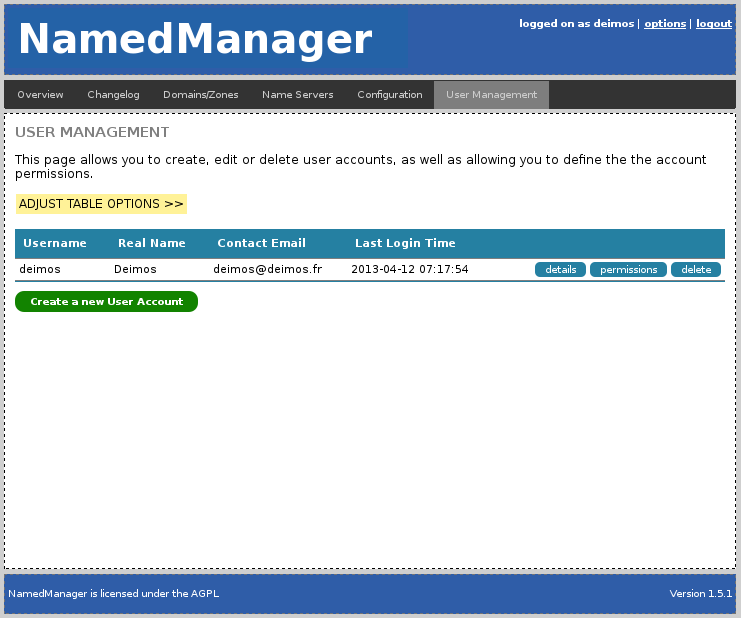
4.4.1 Création d'un utilisateur

Allez dans la partie "User Managment", créez vous un nouveau compte en lui donnant les privilèges admin, testez le et supprimez le compte setup ou changez lui le mot de passe. Vous devriez ensuite voir apparaitre uniquement votre utilisateur :

Namedmanager user crate.png

4.4.2 Clé API

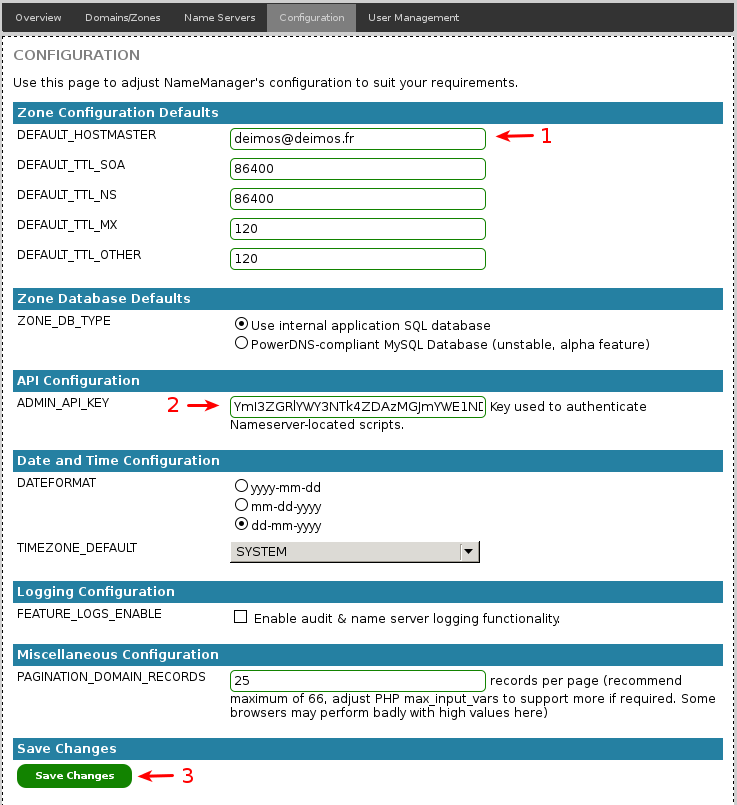
Allez dans "Configuration" de l'interface pour mettre cette clé :

Namedmanager api key.png

  1. Mettez l'adresse email de contact
  2. Entrez la clé précédemment générée
  3. Sauvegardez les changements

4.4.3 Finalisation et synchronisation

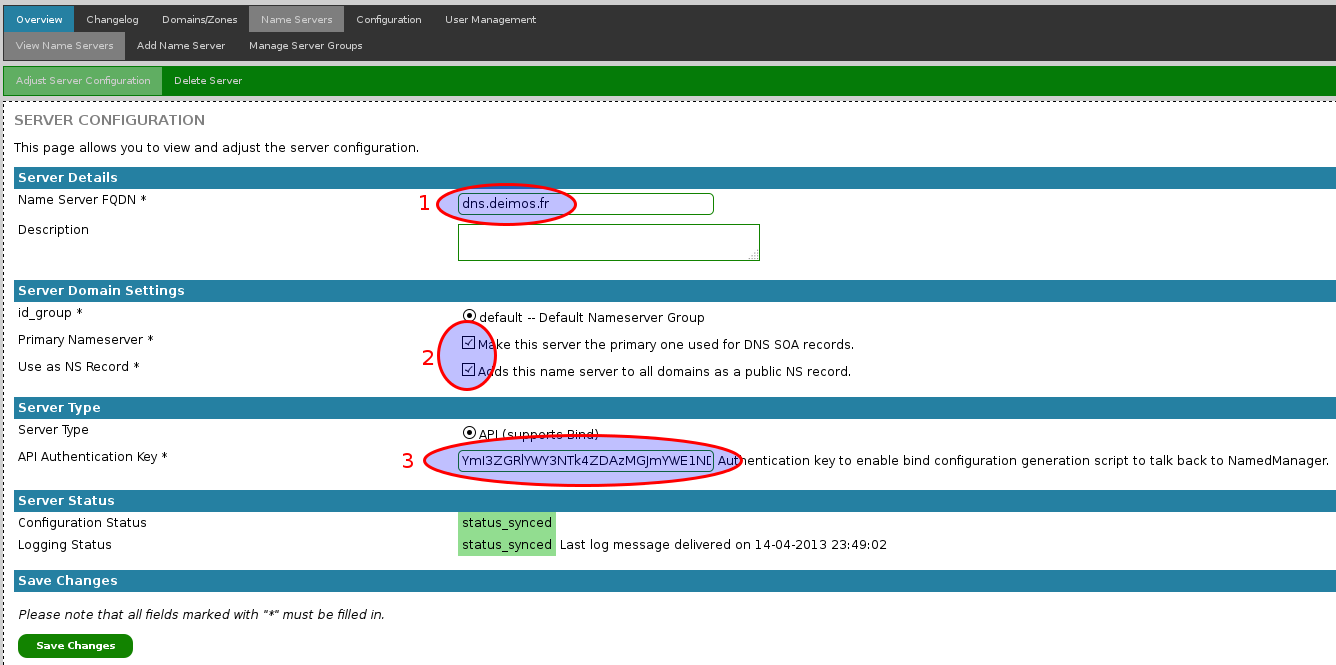
Il est maintenant temps d'ajouter un serveur DNS depuis l'interface graphique ! Faites le une fois en ajoutant la clef API etc...

Namedmanager add dns.png

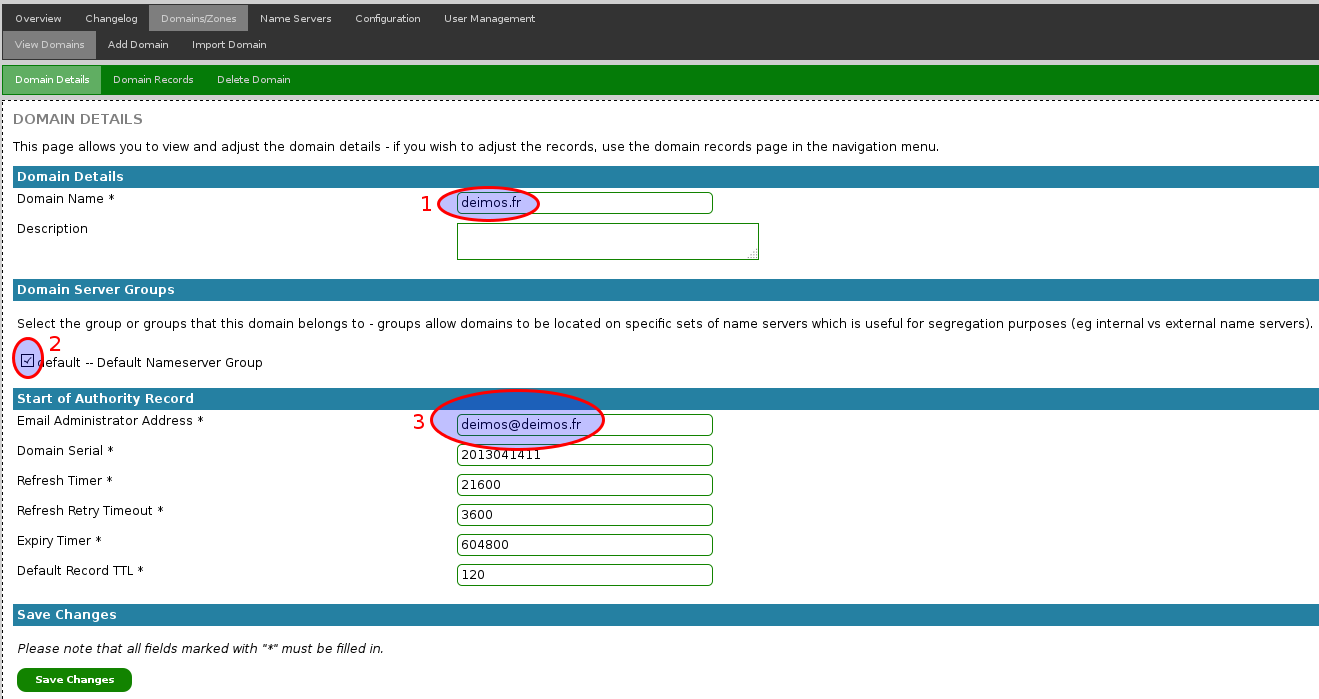
Maintenant ajoutez un domaine :

Namedmanager add zone.png

et synchronisez le tout :

Command php
php -q /usr/share/namedmanager/bind/namedmanager_bind_configwriter.php

Notes Notes
Lancez la commande 5 fois de suite, j'ai rencontré quelques soucis la première fois

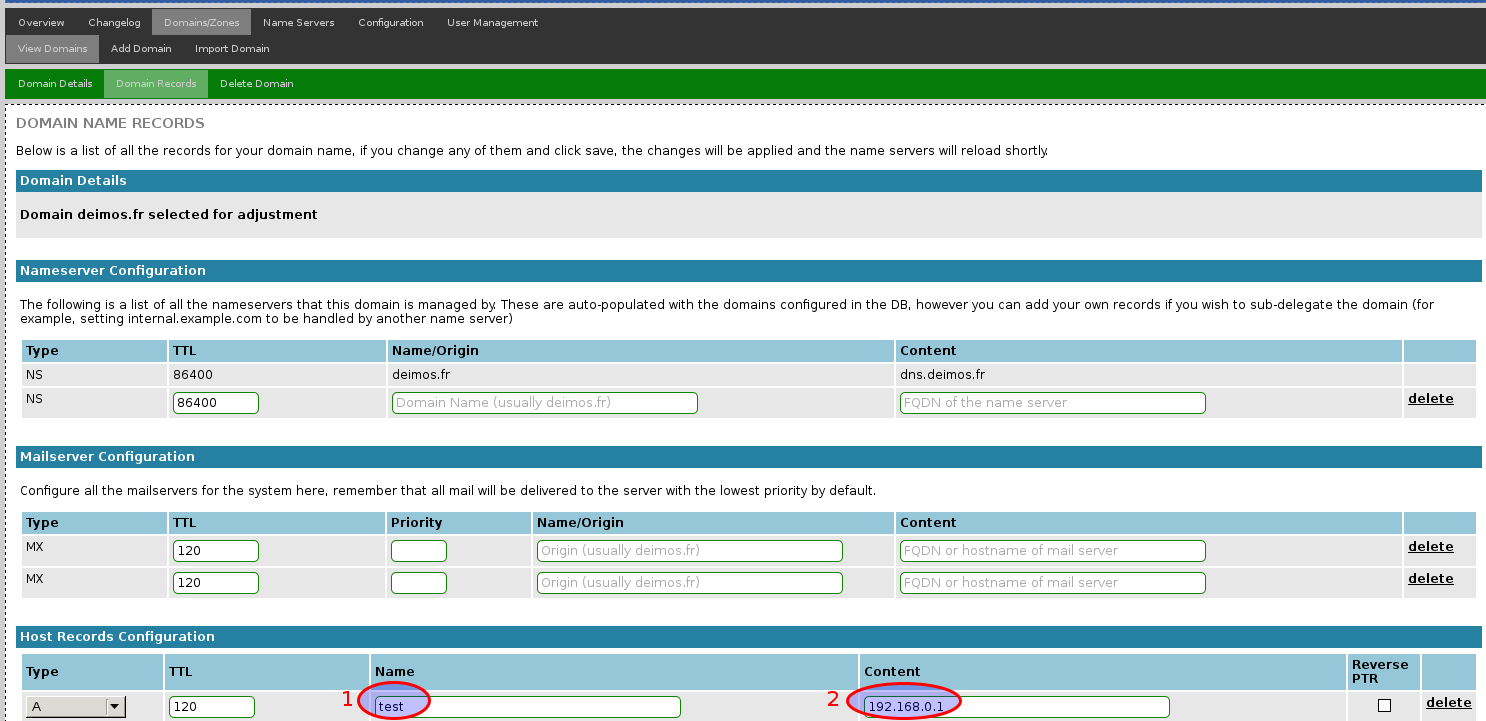
Tout est normalement fonctionnel maintenant :-), vous pouvez ajouter des enregistrements :

Namedmanager add record.png

5 FAQ

5.1 Pourquoi mes changements ne fonctionnent pas même après un reboot de bind ?

Regardez vos logs ! Si vous avez des messages du type :

Command tail
> tail -50 /var/log/syslog
Apr 14 23:10:01 ZG001187 named[6340]: zone 0.168.192.in-addr.arpa/IN: loading from master file 0.168.192.in-addr.arpa.zone failed: file not found
Apr 14 23:10:01 ZG001187 named[6340]: zone 0.168.192.in-addr.arpa/IN: not loaded due to errors.
Apr 14 23:10:01 ZG001187 named[6340]: zone 255.in-addr.arpa/IN: loaded serial 1
Apr 14 23:10:01 ZG001187 named[6340]: zone deimos.fr/IN: loading from master file deimos.fr.zone failed: file not found
Apr 14 23:10:01 ZG001187 named[6340]: zone deimos.fr/IN: not loaded due to errors.

Vérifiez votre fichier de configuration généré par NamedManager. A l'heure ou j'écris ces lignes j'ai soumis le patch et suis en attente d'intégration, je me suis trouvé avec cette erreur :

Configuration File /etc/bind/named.namedmanager.conf
//
// NamedManager Configuration
//
// This file is automatically generated any manual changes will be lost.
//
zone "deimos.fr" IN {
        type master;
        file "deimos.fr.zone";        allow-update { none; };
};

Il manque le path complet du fichier de zones pour que cela fonctionne correctement. Pour remédier à ce problème, modifiez la ligne 246 de ce fichier par ceci :

Configuration File /usr/share/namedmanager/bind/include/application/inc_bind.php
                if ($this->domains)
                {
                        foreach ($this->domains as $domain)
                        {
                                fwrite($fh, "zone \"". $domain["domain_name"] ."\" IN {\n");
                                fwrite($fh, "\ttype master;\n");
                                fwrite($fh, "\tfile \"". $GLOBALS["config"]["bind"]["zonefiledir"] . $domain["domain_name"] .".zone\";\n");                                fwrite($fh, "\tallow-update { none; };\n");
                                fwrite($fh, "};\n");
                        }
                }

Puis sauvegardez via l'interface de nouveau vos domaines (même sans faire de modifications) et relancez la commande exécutée au cron :

Command php
php -q /usr/share/namedmanager/bind/namedmanager_bind_configwriter.php

Maintenant le fichier /etc/bind/named.namedmanager.conf contient le full path et vous pouvez redémarrer bind avec vos zones correctement chargées.
6 References

  1. ^ https://projects.jethrocarr.com