Xen with Bonding + VLAN Tagging
Introduction
As powerful and flexible as it may be, Xen’s network configuration often feels like an obstacle course as soon as you stray a bit from the beaten path.
Recently, I had to set up a Xen-based solution in a somewhat special network topology. Each server where Xen was deployed had 2 ethernet adapters, each with 2 gigabit ethernet interfaces. The goal was to maximize the use of the different ethernet interfaces while providing both fault tolerance and load balancing. To make things even more interesting, the network was segmented into VLANs, each VLAN segmenting the network by function (DMZ, LAN, ADMIN, etc.).
The different points that interest us here at the system administration level are:
- Channel Bonding
- VLAN Tagging
- Bridging
After some research on the web, you quickly realize that you will need to create your own network script for Xen. Shame on me, I didn’t really feel capable of doing that (too complicated/I don’t know python/it’s still too obscure for me). So I decided to move the problem from Xen to the host operating system, with most of the configuration happening at the OS level (in this case a Debian Etch), with Xen simply using what already exists.
The final goal is as follows:
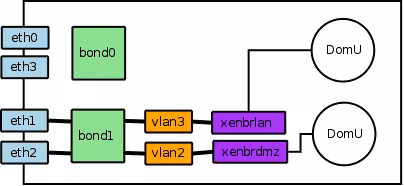
Don’t worry about bond0, we’re only interested in bond1, eth1, and eth2 here.
Channel Bonding Configuration
First, we need to configure and load the bonding module. In Debian, go to /etc/modprobe.d/arch/i386 (even if you’re on an x86_64 architecture):
| |
Yes, I know I’m only specifying the configuration for bond0 here. However, by changing the value of max_bonds, you configure the number of interfaces you want. Despite what is specified in the bonding.txt.gz file of the Linux documentation (aptitude install linux-doc), I was not able to have a per-interface configuration. The kernel is the default one provided with Debian Etch.
Configuration of the bond1 Interface
Next, we need to edit the /etc/network/interfaces file as follows:
| |
Nothing too complicated here. Note a few things though:
- You need to install the ifenslave-2.6 package.
- I use the pre-up directive instead of up which is more commonly found. I had some weird behaviors with the latter (like interfaces not coming up).
- No IP configuration is specified. We’re staying at layer 2 of the OSI model.
At this point, you can start playing with bringing your bond1 interface up and down:
ifup bond1
ifdown bond1
VLAN
On top of this bond1 interface, we’ll now set up one interface per VLAN. First, you need to install the vlan package:
| |
Note again the use of the pre-up directive (it’s really the only one that worked for me) and the loading of the module handling VLAN (802.1Q standard).
Creating Bridges for DomUs
First, it’s important to understand that a software bridge under Linux works exactly the same way as a physical switch. In everyday life (of an IT person), what we’re doing here is equivalent to:
- Taking a switch
- Plugging network cables into it
- Obviously, each cable is connected to a computer
In my particular case, I need to create 2 bridges: one over the DMZ VLAN, the other over the LAN VLAN:
| |
Note that like any respectable switch, our xenbrlan and xenbrdmz bridges don’t need an IP address (it’s a layer 2 device) to function. At this point, you can play with bringing your bridges up and down on the fly:
ifup xenbrlan xenbrdmz
ifdown xenbrlan xenbrdmz
Configuring Xen
The only small difficulty here is to create a little script that will allow the use of 2 different bridges. To do this, we’ll create a file /etc/xen/script/my-network-bridge as follows:
| |
You’ll also need to tell Xen to use our script instead of the default one. To do this, go to the xend-config.sxp file and replace (network-script network-bridge) with (network-script 'my-network-bridge').
All that’s left is to specify in the configuration of each DomU the bridge you want to use:
vif = ['mac=02:00:00:00:00:01, bridge=xenbrdmz']You can now start your VMs :-)
Resources
Last updated 27 Jan 2008, 11:48 +0200.