Varnish: a website accelerator
![]()
| Software version | Varnish 2 |
| Operating System | Debian 6 |
| Website | Varnish Website |
Introduction
Varnish is a cache server for Web servers. It makes websites much faster. It can also perform load balancing across multiple backend web servers or act as a reverse proxy. Basically, we place it in front of web servers to intercept requests, cache what is generated by the backends, and serve the generated content from its cache. But its functionality can go much further.
Varnish is configured simply with two types of files. The Varnish configuration file where we define certain internal parameters and the VCL files that allow you to configure Varnish's behavior via a kind of programming language.
The principle of Varnish is based on the following state machine:
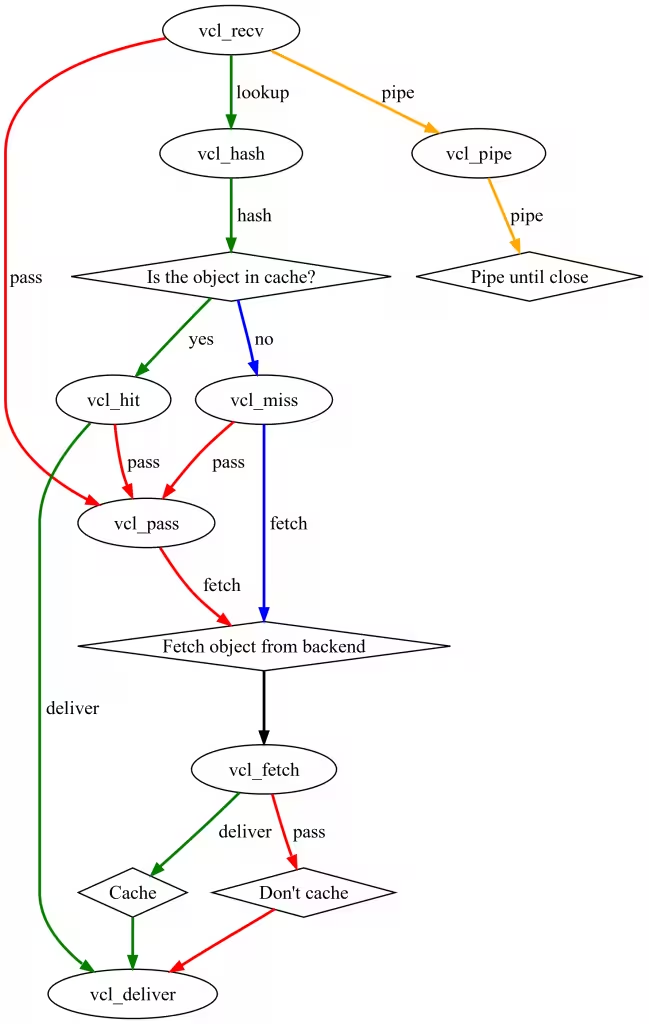
Varnish allows you to intervene at each state level to perform operations on HTTP or on itself. It's this fine-grained intervention that makes Varnish both fast and comprehensive.
A client making a request for a resource that is not in cache will follow this path:

If this resource is requested again, the path followed changes because the resource is now cached:

All these steps are symbolized in VCL by "standard procedures" (vcl_recv, vcl_fetch, vcl_deliver, etc.). All these procedures can be overridden, and we can also declare our own procedures that will be called in the standard procedures. The VCL language does not tolerate any orphaned code; everything declared must be used.
Installation
On Debian... always simple:
Configuration
The basics
VCLs
First, if Varnish is running on the same machine as your web server, point your current web server to another port (8080 for example), then restart it to apply the new configuration.
Now we'll modify the Varnish configuration to tell it which backend server to use. Adapt these lines to your configuration:
- 127.0.0.1: the web server to which Varnish should redirect traffic
- 8080: the port of the web server in question
The daemon
Cache on disk
Next, we'll modify the Varnish server configuration to give it some additional information:
- -a: the port on which the Varnish server will listen
- -b: the web server to which Varnish should redirect traffic
- -s: the 1GB cache file located on disk (lower performance than RAM)
Cache in RAM
You might want your cache to be in RAM for even better access! This is entirely possible :-). I've taken the opportunity to add a few elements to optimize everything:
- -a: the port on which the Varnish server will listen
- -b: the web server to which Varnish should redirect traffic
- -p thread_pools: insert the number of cores on your machine
- -p thread_pool_min (default: 5): Idle threads are harmless. This number is multiplied by the number of thread pools you have, and the total should be about what you need to run on a normal day.
- -p thread_pool_max (default 1000): The maximum number of threads is limited by available file descriptors, however, setting it too high won't increase performance. Having idle threads is reasonably harmless, but don't increase this number above 5000 or you risk having problems with file descriptors or worse.
- -p thread_pool_add_delay=2 (default 20ms): Reducing the add_delay option allows you to create threads faster, which is essential, especially at startup to avoid filling the queue and dropping requests.
- -p session_linger: to avoid context switching when bursting the CPU.
- -s malloc: probably the most interesting option here, allows using cache in RAM. Ideally, take 80% of your memory if possible.
Then comment out the VCL block since we've just replaced it:
Then restart Varnish:
And you're done :-)
The Cache
Varnish offers both memory cache and disk cache. But you have to make a choice, the two cannot be combined. The cache accepts pretty much everything that passes through Varnish (HTML pages, static files, JSON data streams, etc.), as long as the object is declared as cacheable and has a TTL.
The cache is populated just after the "Fetch" step, which is right after retrieving the data from the backend. This is where we make all the modifications to the HTTP header of the cached resource. Making these modifications at the "Fetch" level ensures a clean cache entry (not having multiple cache entries because the same resource will have a different payload). Additionally, the object is stored in the cache with its HTTP header, so it's more efficient to process the header once and for all and serve it with the object.
As we'll see later, object compression also affects cache performance. It's preferable to store a compressed object and let Varnish deliver it compressed or not depending on the "Accept-Encoding" header.
Correctly defining the TTL of an object to manage cache-control is an important element of Varnish. We can control the cache precisely by defining the TTL for a resource type or for a URL, for example:
Here we're asking Varnish to cache for 60 seconds everything coming from the "backend_S3" backend, and everything else will be cached for two hours.
The cache can be managed in two different ways:
- Via HTTP calls using the PURGE method and managing ACLs to secure the call.
- Via "Bans" that can be included in the VCL or performed through varnishadm.
Compression
Since version 3.0, Varnish has the ability to compress and decompress resources. This feature is important for 3 reasons:
- Save bandwidth between the backend and Varnish.
- Save space in Varnish's cache, especially when it's in memory.
- Save bandwidth between Varnish and the Client.
It can be simply activated by harmonizing the "Accept-Encoding" header and setting the "do_gzip" variable at the backend level or in the backend response. For the rest, Varnish will adapt the response (compressed object or not) to the client based on the "Accept encoding" of the request. It's obviously clear that the compression strategy should be adapted to the object type. We won't compress an already compressed object (gif, jpg, etc.) :).
Load Balancing
Varnish can handle backends from all horizons. With increasingly loaded sites, it is capable of offering load balancing functionality. Varnish has 3 types of load balancing called "Directors":
- RoundRobin
- Client (allows sticky sessions on any header element).
- Random (available... but whether it's useful is another story).
Varnish knows how to handle the eviction of a backend when it's unavailable. This feature is even more useful when we activate the "probe" on backends.
Varnish also has a mechanism to completely compensate for the failure of a backend or a Director. We call this "Grace mode" or "Saint mode". These terms hide the possibility of serving cached content even x minutes after the TTL in case of non-response from a server. It can also route a request to another server that is responding correctly when the initial target server gives HTTP 500 responses due to too much load, for example.
Reverse Proxy
We've seen that Varnish is positioned in front of our entire infrastructure. It will allow us to completely mask the deployed architecture by using all the power of the Reverse Proxy it provides.
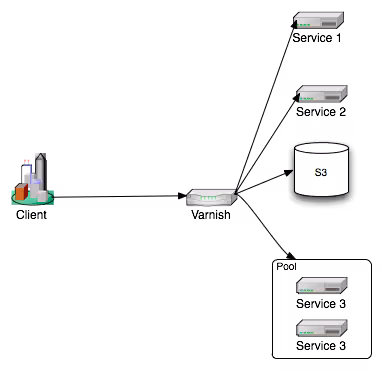
In fact, it allows us to completely decouple the organization of the calling URIs from the organization of their processing on the infrastructure.
Here's an example of a client request that we manage to route with Varnish to a public S3 bucket named "ressources", and the routing takes into account what is in the host name of the request:
Securing and HTTP Cleanup
The HTTP protocol allows using several types of methods (GET, POST, DELETE, etc.). These methods can be used in different ways to trigger specific actions (in the case of REST services) on services hosted on the backend servers. However, HTTP protection for this kind of service is quite tedious on the application server side. Varnish will allow us to precisely filter what should pass through and for what use. We will therefore limit side effects.
Imagine that we have a service accessible only in GET /service1/ and a second /service2/ accessible in GET and POST; we would write something like this:
In this example, we systematically forbid anything that is not a GET or POST method. Then for a URL that starts with /service2, we go to the routine that will process the payload for this service. Then we ban the POST method and we process URLs with /service1, and finally we ban the rest.
With this method, no unplanned request can reach a backend. We have two advantages:
- The code to handle edge cases will be simpler.
- A majority of errors will not reach the backend, so they won't cause any exceptions or saturation.
In a second scenario, it may be interesting to normalize HTTP headers. Take the example of Accept-Encoding. Varnish recommends normalizing it like this:
Simply to avoid creating different cache entries for the same payload just because all clients don't write this header the same way.
We can also remove certain headers that might give too much information about the infrastructure. For S3 for example, we'll pass these commands in the fetch:
Or set more personal headers:
The last little thing to think about for cleaning is setting a correct content-type for all resources. This operation is done in the same way as for cleaning headers by setting "set beresp.http.Content-Type" by resource group.
Through these features, Varnish is able to ensure the orchestration of high availability for an architecture. It can detect failing backends and even replace them by relying on its cache. It will protect them by handling a large part of 404 error management.
Standardization of Access Logs
The "varnishd" process doesn't produce any logs. It simply writes information to shared memory segments. These segments are consumed by tools like varnishadm, varnishlog, or varnishncsa. It's mainly varnishncsa that interests us. This is the process that reads the information and creates a log file in NCSA format.
The advantage here is enormous. We can offload application servers and front HTTP from producing these logs. Moreover, these logs will be less scattered (although with the use of syslog-ng this isn't a problem). Finally, the logs will all be standardized whether they are on Apache, Tomcat, JBoss, or even lighttp and NginX. We can therefore only think about what treatments we want to apply to them and no longer spend time reformatting everything. This consideration makes all the sense when you start reaching several gigabytes of access logs per day.
Since version 3.0, Varnishncsa allows us to not follow the NCSA standard and leaves us the choice of output format.