Setting up Xen
Introduction
Xen allows multiple operating systems (and their applications) to run in isolation on the same physical machine. Guest operating systems share the host machine's resources.
Xen is a "paravirtualizer" or "hypervisor" for virtual machines. Guest operating systems are "aware" of the underlying Xen system and need to be "ported" (adapted) to work on Xen. Linux, NetBSD, FreeBSD, and Plan 9 can already run on Xen.
Xen 3 can also run unmodified systems like Windows on processors that support VT technology.
With Intel Vanderpool and AMD Pacifica technologies, this porting will soon no longer be necessary, and all operating systems will be supported.
The x86, x64, IA-64, PowerPC, and SPARC architectures are supported. Multiprocessor (SMP) and partially Hyper-Threading are supported.
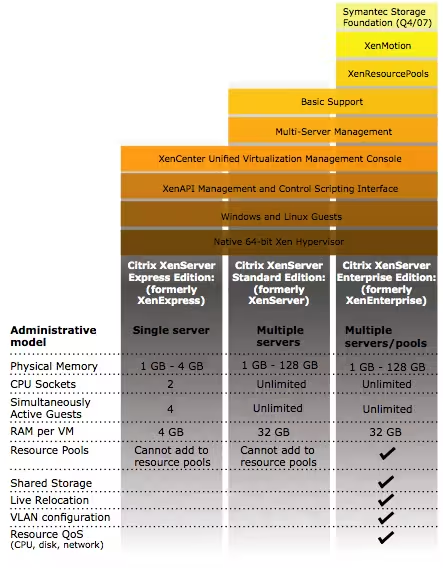
Some might ask, why not use XenExpress or a paid version to get additional functionality? Apart from having support, there's no real reason except for having a nice graphical interface to manage your VMs.
In my opinion, unless you're managing a park of 100 physical machines, the paid version is not really necessary. Here are the differences from the Citrix DataSheet (01/26/2008):
The version we'll install below has no restrictions and is free :-). On the other hand, you'll spend more time on configuration than with a GUI, that's for sure! It's up to you to see what you really need.
Installation
32 bits
It's very easy to install Xen on Debian:
And if you also need to install Windows, then add this:
64 bits
It's very easy to install Xen on Debian:
And if you also need to install Windows, then add this:
Configuration
Kernel
To configure the kernel, we'll use certain directives to ensure that dom0_mem never takes more than 512 MB of memory. This is to leave all available space for our domUs:
The "max_loop=64" directive ensures that we won't run out of loopback devices, which are heavily used by Xen. This is a classic error and can be recognized by this type of message:
Modules
We'll also load the loop module and set it to 64 as above
Network
Configuration of the interface
Physical Interface
Let's set up a bridge interface, /etc/network/interfaces:
We bridge on eth1 because we only have one public IP on this machine. It is therefore out of the question to bridge on the public interface eth0. You'll need to create a dummy0 interface (simulated) if you only have a single physical interface.
It is also strongly recommended to create a dummy interface to avoid any POSTROUTING problems with Iptables and network slowdowns:
To see bridges:
Dummy Interface
Modify the /etc/network/interfaces file:
You can check your bridges with this command:
Bridge Mode
The "Bridge" mode is set up by the script /etc/xen/scripts/network-bridge. Here's how it works:
- Creation of the new Bridge "xenbr0"
- Stopping the "real" network card "eth0"
- Copying the MAC and IP addresses from "eth0" to a virtual network interface "veth0"
- Renaming "eth0" to "peth0"
- Renaming "veth0" to "eth0"
- Attaching "peth0" and "vif0.0" to the bridge "xenbr0"
- Starting the bridge interfaces "xenbr0", "peth0", "eth0" and "vif0.0"
To enable bridge mode, edit the file /etc/xen/xend-config.sxp and uncomment:
Edit this file /etc/xen-tools/xen-tools.conf and put this:
Linux
To create an image with debootstrap (Debian for example), use the file /etc/xen-tools/xen-tools.conf. When you've edited it as desired, you can create the appropriate image. Here are some examples:
Windows
For Windows, don't expect amazing performance in terms of network and disk, because until the PV drivers are released from the commercial versions (even Xen Express), performance will remain poor (e.g., network: 1.5 MB/s max).
Nevertheless, if this is sufficient for you, insert this to create a 4 GB file:
Then configure what's needed below to make it work:
Change the vcpu option depending on the number of cores available on your machine.
All that's left is to start the install:
BSD
For disk images, here are the supported formats:
Additional Options
Here are some additional options that can be very useful...
VNC Server at VM Boot
To launch a VNC server when booting a VM, add these lines to your VM config file (here: /etc/xen/WindowsXP.cfg):
Then edit /etc/xen/xend-config.sxp and add this:
You may need a package for this to work:
Different Boot Devices
- To load a hard disk from an image for Windows:
- Load a CD from a drive for Windows:
- Load an ISO image:
hda: must match your cdrom's udev!
- Load a CD from a drive:
hda: must match your cdrom's udev!
Limitations
CPU allocation: more/less:
Hot increase of used memory:
Don't forget to modify the virtual server configuration file that also contains the memory size.
Migration
Memory migration from the source server:
Launching a Virtual Machine
To start a machine, nothing could be simpler:
The -c option is used to get control immediately after execution.
If you don't use -c, you can get a console like this:
If you want to exit the console:
Then you can check the status:
FAQ
4gb seg fixup, process syslogd (pid 15584), cs:ip 73:b7ed76d0
The guest kernel, which is a master vserver, gives a number of insults. The solution is indicated here:
http://bugs.donarmstrong.com/cgi-bin/bugreport.cgi?bug=405223
It involves installing libc6-xen and doing mv /lib/tls /lib/tls.disabled on the guest vservers.
Error: Device 2049 (vbd) could not be connected. Hotplug scripts not working
This message is obtained when launching a DomU (xm create toto.cfg). One cause could be the non-existence of one of the DomU partitions. If you use LVM, check that the volumes exist.
Error: Device 0 (vif) could not be connected. Backend device not found
This is probably because your Xend network is not configured. To fix this, replace the line in your /etc/xen/xend-config.sxp file:
with
Don't forget to restart xend:
re0: watchdog timeout
This is all we got when we chose the rtl8139 NIC driver for a NetBSD or OpenBSD domU.
Finally, it's a response from Manuel Bouyer on port-xen that gives the solution:
Disable re*! It's then rtk* that takes over, and there, no timeout, latency, or other malfunction, "it just works".
Resources
- http://www.cl.cam.ac.uk/research/srg/netos/xen/readmes/user/
- Xen Documentation
- Paravirtualization with Xen
- Xen Setting up a Perfect Server
- Xentools Documentation (Xen-Shell and Argo)
- XenExpress Documentation
- Xen for Debian Documentation
- How To Make Your Xen-PAE Kernel Work With More Than 4GB RAM
- Documentation on Heartbeat2 Xen cluster with drbd8 and OCFS2
- XEN On An Ubuntu - High Performance
- NetBSD Xen Guide
- XEN and disk space optimization
- Consolidation issues and achievement of service level objectives (SLO) with Xen
- How To Run Fully-Virtualized Guests (HVM) With Xen 3 2 On Debian Lenny
- Xen Live Migration Of An LVM-Based Virtual Machine With iSCSI On Debian Lenny
- Creating A Fully Encrypted Para-Virtualised Xen Guest System Using Debian Lenny