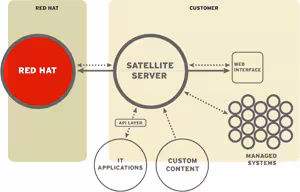
A Red Hat Satellite server is a solution that allows you to automatically deploy Red Hat OS via PXE/DHCP. You can then manage different installation profiles, manage updates, and perform a variety of simplified administrative tasks.
If you don't have the money or simply want to create a lab, you can use its free equivalent: Spacewalk (hence the logo).
Make sure that all future clients (as well as the server) have access to the DNS server!!! In our case, the server will be called 'satellite-master', and it's very important that it remains accessible by any server with this name, otherwise PXE will not work.
Installation
Satellite Master
To install it, it's quite simple - there's an installer that does everything. However, you'll need the Red Hat DVD for dependencies (I recommend a local repository), and to copy the Satellite installer locally (/home/sat in my case).
Note: use the '--disconnected' option if you are behind a proxy during installation.
We're going to install a DHCP server to be able to push OS via PXE/TFTP (already done by the Satellite installer). If you already have a DHCP server, go directly to the configuration.
# dhcpd.conf## Sample configuration file for ISC dhcpd## option definitions common to all supported networks...optiondomain-name"deimos.fr";optiondomain-name-serversns1.deimos.fr,ns2.deimos.fr;default-lease-time600;max-lease-time7200;# Use this to enble / disable dynamic dns updates globally.ddns-update-stylenone;allowbooting;allowbootp;# If this DHCP server is the official DHCP server for the local# network, the authoritative directive should be uncommented.authoritative;# Use this to send dhcp log messages to a different log file (you also# have to hack syslog.conf to complete the redirection).log-facilitylocal7;# No service will be given on this subnet, but declaring it helps the# DHCP server to understand the network topology.subnet10.102.2.32netmask255.255.255.224{optionrouters10.102.2.63;optionsubnet-mask255.255.255.224;optiondomain-name-servers192.168.0.69;range10.102.2.3310.102.2.62;next-server10.102.2.1;filename"pxelinux.0";}subnet10.102.2.64netmask255.255.255.224{optionrouters10.102.2.65;optionsubnet-mask255.255.255.224;optiondomain-name-servers192.168.0.69;range10.102.2.6610.102.2.94;next-server10.102.2.1;filename"pxelinux.0";}# This is a very basic subnet declaration.#subnet 10.254.239.0 netmask 255.255.255.224 {# range 10.254.239.10 10.254.239.20;# option routers rtr-239-0-1.deimos.fr, rtr-239-0-2.deimos.fr;#}# This declaration allows BOOTP clients to get dynamic addresses,# which we don't really recommend.#subnet 10.254.239.32 netmask 255.255.255.224 {# range dynamic-bootp 10.254.239.40 10.254.239.60;# option broadcast-address 10.254.239.31;# option routers rtr-239-32-1.deimos.fr;#}# A slightly different configuration for an internal subnet.#subnet 10.5.5.0 netmask 255.255.255.224 {# range 10.5.5.26 10.5.5.30;# option domain-name-servers ns1.internal.deimos.fr;# option domain-name "internal.deimos.fr";# option routers 10.5.5.1;# option broadcast-address 10.5.5.31;# default-lease-time 600;# max-lease-time 7200;#}# Hosts which require special configuration options can be listed in# host statements. If no address is specified, the address will be# allocated dynamically (if possible), but the host-specific information# will still come from the host declaration.#host passacaglia {# hardware ethernet 0:0:c0:5d:bd:95;# filename "vmunix.passacaglia";# server-name "toccata.fugue.com";#}# Fixed IP addresses can also be specified for hosts. These addresses# should not also be listed as being available for dynamic assignment.# Hosts for which fixed IP addresses have been specified can boot using# BOOTP or DHCP. Hosts for which no fixed address is specified can only# be booted with DHCP, unless there is an address range on the subnet# to which a BOOTP client is connected which has the dynamic-bootp flag# set.# You can declare a class of clients and then do address allocation# based on that. The example below shows a case where all clients# in a certain class get addresses on the 10.17.224/24 subnet, and all# other clients get addresses on the 10.0.29/24 subnet.#class "foo" {# match if substring (option vendor-class-identifier, 0, 4) = "SUNW";#}#shared-network 224-29 {# subnet 10.17.224.0 netmask 255.255.255.0 {# option routers rtr-224.deimos.fr;# }# subnet 10.0.29.0 netmask 255.255.255.0 {# option routers rtr-29.deimos.fr;# }# pool {# allow members of "foo";# range 10.17.224.10 10.17.224.250;# }# pool {# deny members of "foo";# range 10.0.29.10 10.0.29.230;# }#}
Then I'll declare the interfaces on which the dhcpd service should listen:
Use PAM to authenticate via LDAP, Kerberos, and other network-based authentication systems.
Note: The password fields above are not required when this box is checked; however, you can enter a password that will only work when PAM authentication for this user's account is disabled.
Usage
Creating the admin account
To connect to the web interface, it's very simple, go to HTTPS on your server (https://satellite-master):
Then fill in the information and click "Create Account".
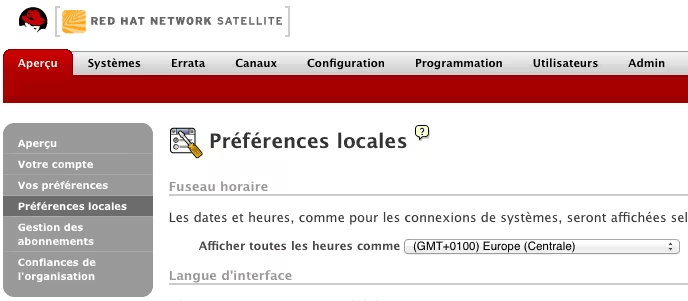
Configuring the timezone
To configure the timezone, it's done in the graphical interface:
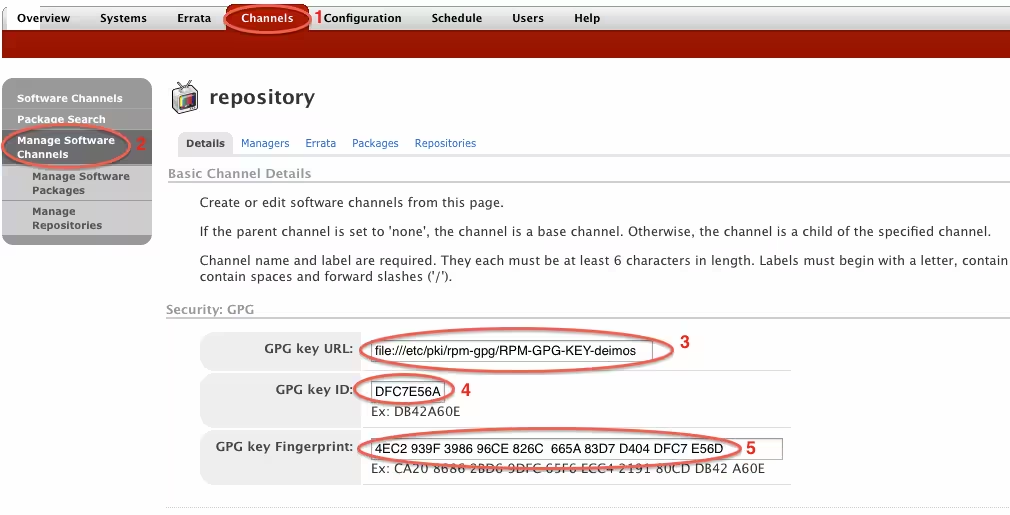
Adding a custom repository
Create your repository in the "Custom Channels" and set the Red Hat version as parent if you want to add additional packages and keep the standard packages available on Red Hat.
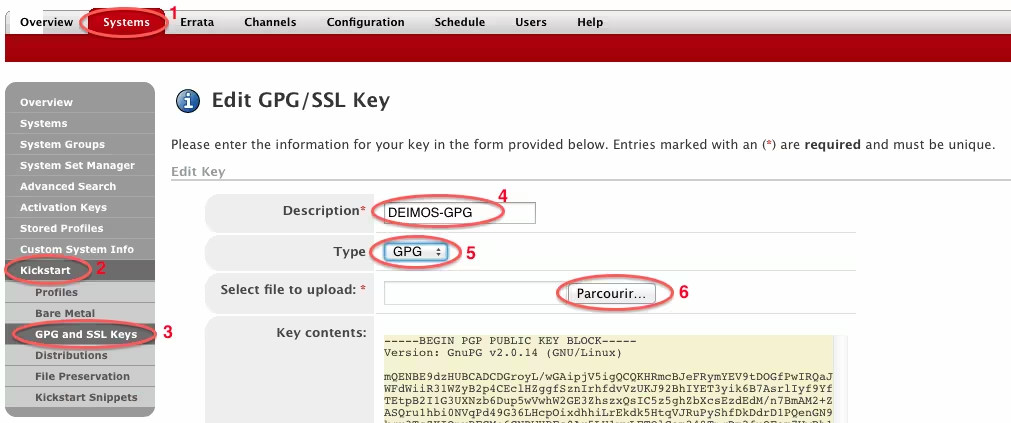
Prerequisites (GPG)
We'll need to generate a GPG key to sign our packages:
Automating and simplifying package signing and adding
If you don't want to have to constantly type your credentials, passphrase etc... every time you set up new packages, I created a small Python tool to save time:
#!/usr/bin/env python# Made by Pierre Mavro 14/03/2012# Version : 0.1# This script permit to automate in a non secure way, new packages for a custom repository on Red Hat Satellite# Require : pexpectimportgetopt,os,sys,glob,pexpectfromstringimportTemplate# Helpcmd_name=sys.argv[0]defhelp(code):printcmd_name,"[-h] [-r] [-s] [-l] [-p] [-d]"str=""" -h, --help Show this help -s, --passphrase Passphrase to sign packages -r, --repository Select wished repository to push the packages -l, --login Red Hat Network username -p, --password Red Hat Network password -f, --folder folder were new packages should be added (default: /tmp/packages) -d, --debug Debug mode"""printstrsys.exit(code)classbcolors:OK='\033[92m'FAIL='\033[91m'END='\033[0m'defdisable(self):self.OK=''self.FAIL=''self.END=''# Sign and push functiondefsign_push(passphrase,repository,login,password,folder,debug):# Package signingdefsign(rpm_files,passphrase,folder,debug,charspacing):if(debug==1):print80*'='+"\n"print'[+] Signing packages :'# Sign all packagesforpackageinrpm_files:# Formatingcharspace=Template("{0:<$space}")printcharspace.substitute(space=charspacing).format(' - '+package+'...'),# Launch resignchild=pexpect.spawn('rpm --resign '+package)if(debug==1):child.logfile=sys.stdoutchild.expect('Enter pass phrase|Entrez la phrase de passe')child.sendline(passphrase)if(debug==1):child.logfile=sys.stdoutchild.expect(pexpect.EOF)child.close()# Check return statusif(child.exitstatus==0):print'[ '+bcolors.OK+'OK'+bcolors.END+' ] 'else:print'[ '+bcolors.FAIL+'FAIL'+bcolors.END+']'# Package pushdefpush(rpm_files,repository,login,password,folder,debug,charspacing):if(debug==1):print80*'='+"\n"print'[+] Adding packages to satellite server :'forpackageinrpm_files:# Formatingcharspace=Template("{0:<$space}")printcharspace.substitute(space=charspacing).format(' - '+package+'...'),# RPM push commandchild=pexpect.spawn('rhnpush --force --no-cache -c '+repository+' '+package)if(debug==1):child.logfile=sys.stdoutchild.expect('Red Hat Network username')child.sendline(login)child.expect('Red Hat Network password')child.sendline(password)if(debug==1):child.logfile=sys.stdoutchild.expect(pexpect.EOF)child.close()# Check return statusif(child.exitstatus==0):print'[ '+bcolors.OK+'OK'+bcolors.END+' ] 'else:print'[ '+bcolors.FAIL+'FAIL'+bcolors.END+' ]'# Get rpm files listrpm_files=glob.glob(folder+'/*.rpm')if(debug==1):print80*'='+"\n"+'RPM found :'if(debug==1):printrpm_files# Check if RPM were foundif(len(rpm_files)==0):print"No RPM were found in "+foldersys.exit(2)# Get maximum rpm size for visual answers (OK/FAIL)charspacing=0forpackageinrpm_files:count=len(package)if(count>charspacing):charspacing=countcharspacing+=10# Sign packagessign(rpm_files,passphrase,folder,debug,charspacing)# Push packagespush(rpm_files,repository,login,password,folder,debug,charspacing)# Maindefmain(argv):try:opts,args=getopt.getopt(argv,'hs:r:l:p:f:d',["passphrase=","repository=","login=","password=","folder=","help"])exceptgetopt.GetoptError:# Print help and exitprint"Unknow option, bad or missing argument\n"help(2)# Initialize vars# GPG passphrase for package sign inpassphrase=Nonerepository=Nonelogin=Nonepassword=Nonefolder='/tmp/'debug=0# Check optsforopt,arginopts:ifoptin("-h","--help"):help(0)sys.exit(0)elifoptin("-s","--passphrase"):passphrase=str(arg)elifoptin("-r","--repository"):repository=str(arg)elifoptin("-l","--login"):login=str(arg)elifoptin("-p","--password"):password=str(arg)elifoptin("-f","--folder"):folder=str(arg)elifoptin("-d","--debug"):debug=1else:print"Unknow option, please see usage\n"help(2)# Checksif(passphraseorrepositoryorloginorpassword)isNone:print"Unknow option, please see usage\n"help(2)sign_push(passphrase,repository,login,password,folder,debug)if__name__=="__main__":main(sys.argv[1:])
You can run it either by hardcoding the necessary information in the code in the 'Initialize vars' section, or by using arguments:
For various reasons, you may want to re-register a machine. It's very simple - you need to remove the current references to the satellite, then restart the registration:
If you want to restart the installation at any time, you can do it with the --skip-db-install option, because generally, the database installation operation went well, but not necessarily the rest:
Tomcat failed to start properly or the installer ran out of tries. Please check /var/log/tomcat*/catalina.out for errors
If you have this type of message, it's because the hostname is incorrectly configured. To fix this problem, check that this section is correctly filled in, then restart the installer like this:
...
SYNC ERROR: unhandled exception occurred:

(Check logs/email for potentially more detail)

<rhnFault class (code = 54, text = 'ORA-01654: unable to extend index RHNSAT.RHN_ERRATAFILE_EID_FILE_IDX by 128 in tablespace DATA_TBS
')>
(54, 'ORA-01654: unable to extend index RHNSAT.RHN_ERRATAFILE_EID_FILE_IDX by 128 in tablespace DATA_TBS\n', '\n     Package Upload Failed due to uniqueness constraint violation.\n     Make sure the package does not have any duplicate dependencies or\n     does not alre
It means you're at 100% utilization of your Oracle database. First check your disk space size. If all is ok, let's verify that we're out of space:
All is ok, we can restart the satellite-sync command.
could not find kernel image: menu
I don't know if it's a bug with the Satellite server, or if I forgot something, but the menu.c32 file is not in the right place and PXE clients refuse to boot. So to fix the problem:
Error Downloading Packages:
  puppet-2.7.9-2.el6.noarch: failed to retrieve getPackage/puppet-2.7.9-2.el6.noarch.rpm from custom-repo
error was [Errno -1] Package does not match intended download. Suggestion: run yum --enablerepo=deimos-repo clean metadata