Modifying the firmware with OpenWrt
Introduction
As you know, some time ago, I tried to install OpenWrt on a Fonera+ (the larger one with two Ethernet connectors). After persisting, I finally managed to get something partially functional: recompiling the Fon firmware and getting both Ethernet ports working. However, WiFi still remains a problem.
After a period of working on my Frankenstein-modified Foneras, I decided to try again with another approach: using the Fon binary firmware and activating a serial console. The first step was to get a binary update for the Fonera+ in the form of the file foneraplus_1.1.1.1.fon.
This is a gzip compressed tar archive to which Fon added a specific header as explained by Stefan Tomanek on his site. His explanations for the classic Fonera firmware seem to be perfectly valid for the Fonera+.
Modifying the firmware
We use cat and tail to remove the header and get a real archive:
The resulting file contains three files that are used by the router to update itself:
The image_full file is built with the kernel image, the root file system, and a checksum for the stage2 loader launched by RedBoot. A look at the content of the Fon BuildRoot Makefile (the firmware sources) and we understand the build procedure:
- the lzma compressed kernel image is built classically
- the Perl script fonimage.pl adds a 12-byte header containing a CRC via the Digest::CRC module
- dd is used to get a file multiple of 64KB with zero padding if necessary (bs=64k conv=sync)
- the kernel image file doesn't seem to be used
- fonimage.pl is also used to group the kernel and the root file system in squashfs. The Perl script is launched to build the complete system image with the CRC.
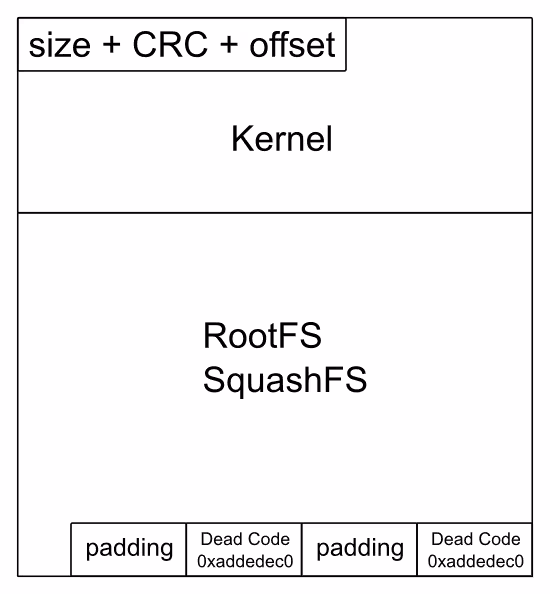
We can conclude that the image_full file is a header/CRC of 12 bytes followed by the lzma kernel then the squashfs image of the root file system. A look at the Perl script also tells us the composition of the 12-byte header:
- 4 bytes for the size
- 4 bytes for the CRC
- 4 bytes for the location of the root file system
Checking is easy, just display the values using fonimage.pl manually:
The offset corresponds to the kernel size and the size corresponds to the final image size minus the header size. The numerical values are stored in the header in a specific format called unsigned long in "network" (big-endian) order. Indeed, in the header of the daimage file, we find:
23006506 is actually 00230665, which is 2295397, the size of daimage minus 12. The image_full file has this header:
2100debf is 0021bfde, which is 2211806. 2211806+12 equals 2211818. But the file size is 2293764. It doesn't match! Back to the Makefile.
After using the fonimage.pl script, the Makefile calls prepare_generic_squashfs declared in image.mk, an OpenWrt file. The function uses dd:
We find the padding in 64k blocks and a call to add_jffs2_mark which does:
In short:
- we resize the image in 64k blocks
- we add 0xdeadc0de (Dead Code???)
- we resize again
- we add 0xdeadc0de again
Let's verify with a Fon BuildRoot compiled by ourselves:
Bingo! We are able to manually recreate an image. We have perfectly analyzed the build process. Now we need to reverse this process to get a kernel file and a rootfs image that we can modify.
The simplest way to be sure is to dismantle our own attempt. So we start by looking at the header of daimage1:
The values we're interested in here are:
- the image size: 23006506 or 00230665 or 2295397 bytes
- the kernel size (the offset to find the rootfs): 0a0007ec or 000aec07 or 715783
We remove the header:
Then the padding using the image size specified in the header:
Our file is now the concatenation of the kernel and rootfs. We use the offset specified in the header to retrieve the rootfs. image size - offset = rootfs size (2295397-715783=1579614):
While we're at it, we also extract the kernel to have all the elements:
Let's check:
It works! We are able to dismantle an official Fon update. Let's apply this to image_full:
Some calculations:
- image size: 2100debf or 0021bfde or 2211806
- kernel size: 0a003450 or 000a5034 or 675892
- rootfs size: 2211806-675892=1535914
Dismantling:
Quick verification:
That's indeed a lzma kernel header.
Now we need to dismantle the squashfs. We're facing several problems including lzma compression and endianness. The image is built for a big endian system (MIPS) but a PC x86 is little endian. Simply forget the idea of mounting the file system in loopback. We need to look at the unsquashfs tool, but again, many problems. After a long period of research, I finally came across a firmware modification kit: firmware_mod_tools_prebuilt.tar.gz.
This archive contains an unsquashfs-lzma that works perfectly with the images for the Fonera (both the new and old ones):
And we find a squashfs-root directory containing the useful tree structure. A quick look in /etc/inittab and indeed, there, something is missing that I would have liked:
We add it and build a brand new squashfs using the BuildRoot tools:
Uploading the Firmware
We have a kernel and a new rootfs. We reuse the commands to create an image: fonimage.pl, dd, echo, dd, echo. We get a new image that we just need to flash on the Fonera+ via RedBoot:
After this operation, the Fonera+ is restarted by the reset command. No kernel messages appear, which is normal, but after the complete boot phase we do have a usable shell. The DHCP messages keep cluttering the console but it works!
Resources
- http://www.lefinnois.net/wp/index.php/2007/11/18/modification-du-firmware-fon-pour-une-fonera/
- http://www.dd-wrt.com/wiki/index.php/LaFonera_Software_Flashing
- http://www.dd-wrt.com/wiki/index.php/LaFonera_(fr)
- http://www.cure.nom.fr/blog/archives/141-Fonera-et-le-firmware-alternatif-DD-WRT.html
- http://www.dd-wrt.com/wiki/index.php/Wireless_Access_Point