MariaDB Galera Cluster: Multi-Master Replication
![]()
| Software version | 5.5 |
| Operating System | Debian 7 |
| Website | MariaDB Website |
| Others | Galera 23.2.4(r147) |
Introduction
If you have already set up MySQL replication, you know that you're limited to 2 master nodes maximum. Many actions must be done manually, making it difficult to have something that's both scalable and accessible for simultaneous writes, since by default writes are synchronous.
Note: If you need advice or support for MySQL/MariaDB/Galera, I recommend OceanDBA.
There's a tool called Galera that integrates with MariaDB or MySQL (through recompilation in both cases) and allows multi-master replication (3 nodes minimum). There are several products that use Galera:
- MariaDB Galera Cluster
- Percona Cluster
- MySQL Galera Cluster
For those wondering, this is really different from MySQL Cluster which knows how to scale writes. Here it's only multi-threaded. And unlike MHA which is an asynchronous solution, Galera is synchronous.
Galera only works with the InnoDB engine and allows:
- Synchronous replication
- Active multi-master replication
- Simultaneous read/write on multiple nodes
- Automatic detection when a node fails
- Automatic node reintegration
- No lag on slaves
- No lost transactions
- Lower client latency
Although this seems perfect on paper, there are some limitations:
- Only supports InnoDB
- All tables must have primary keys
- DELETE only works on tables with primary keys
- LOCK/UNLOCK/GET_LOCK/RELEASE_LOCK doesn't work in multi-master
- Query logs can only be sent to files, not tables
- XA transactions are not supported
To help you understand a typical architecture:
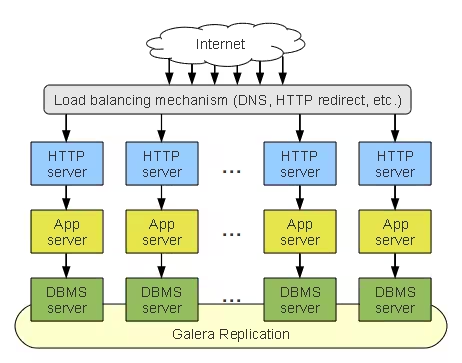
There's also an online tool to help build this kind of infrastructure: Galera Configurator
Installation
To install MariaDB, it's unfortunately not embedded in Debian, so we'll add a repository. First of all, install a python tool to get aptkey:
Then let's add this repository (https://downloads.mariadb.org/mariadb/repositories/):
We're now going to change apt pinning to prioritize MariaDB's repository:
Info
At the time of writing, there is a small dependency issue with some packages. You'll need to download them in advance and install them. You don't need to follow the rest of this installation if you haven't encountered errors with the previous steps.
Now, we'll install MariaDB and Galera:
Info
The rsync package is not mandatory, but necessary if you're going to use this transfer method later.
Configuration
MariaDB
Before we start changing the configuration, we need to delete some log files or MariaDB won't start. We'll need to stop the MariaDB service:
Then we'll apply this MariaDB configuration:
1 2 3 4 5 6 7 8 9 10 11 12 13 14 15 16 17 18 19 20 21 22 23 24 25 26 27 28 29 30 31 32 33 34 35 36 37 38 39 40 41 42 43 44 45 46 47 48 49 50 51 52 53 54 55 56 57 58 59 60 61 62 63 64 65 66 67 68 69 70 71 72 73 74 75 76 77 78 79 80 81 82 83 84 85 86 87 88 89 90 91 92 93 94 95 96 97 98 99 100 101 102 103 104 105 106 107 108 109 110 111 112 113 114 115 116 117 118 119 120 121 122 123 124 125 126 127 128 129 130 131 132 133 134 135 136 137 138 139 140 141 142 143 144 145 146 147 148 149 150 151 152 153 154 155 156 157 158 159 160 161 162 163 164 165 166 167 168 169 170 171 172 173 174 175 176 177 178 179 180 181 182 183 184 185 186 187 188 189 190 191 | |
Now we'll delete the log files because we just changed their configuration (or we won't be able to start the instance) and be able to start our MariaDB service:
Galera
Here's the configuration to apply for a cluster on the same site:
- wsrep_cluster_name: the name of the Galera cluster. Use this especially if you have multiple Galera clusters in the same subnet to prevent nodes from entering the wrong cluster.
- wsrep_node_name: the name of the machine where this configuration file is located. You'll understand that you absolutely must avoid duplicates (especially for debugging ;-))
- wsrep_node_address: IP address of the current node (same warning as the previous line)
- wsrep_cluster_address: list of cluster members that can be master (separated by commas).
- wsrep_provider_options: enables additional options.
- gcache allows storing data to transfer to other nodes. Default is 128M, it's advised to increase this value.
- wsrep_retry_autocommit: defines the number of times a query should be retried in case of conflict.
- wsrep_sst_method: the data exchange method. Rsync is currently the fastest.
- wsrep_replication_myisam: enables replication of MyISAM data (no transaction management...so avoid it!)
- wsrep_sst_receive_address: forces the use of a certain address for remote hosts to connect (resolves VIP problems)
- wsrep_notify_cmd: allows executing a script for each Galera event (node state change)
- binlog_format: defines the log format in ROW mode
- innodb_autoinc_lock_mode: changes the lock behavior
- innodb_flush_log_at_trx_commit: performance optimization
Info
Adapt the wsrep_node_name and wsrep_cluster_address lines to your respective machines.
The above configuration is applicable to all nodes except the master (node 1). The master should have the identical configuration with the only difference being this line:
Warning
It's important that only one machine has the 'gcomm://' configuration, as this initializes the cluster.
Geo cluster
It's possible to set up a geo cluster, but the disadvantage is that when there's a network outage exceeding the specified timeouts, one of the clusters will have to completely resynchronize. Here's the line to configure to modify these timeouts:
If you use the 'wsrep_sst_receive_address' option, you'll need to add a parameter to this line (ist.recv_addr) with the same IP as the 'wsrep_sst_receive_address' option:
Replication methods
There are several solutions for data transfers between nodes. In the example above, we used rsync. When a machine requests a donor (another machine) to receive data, transactions are blocked for the donor during the data exchange period with the receiver!!!
Warning
If you use a load balancer, you'll need to remove the donor node during this period.
This block can be limited by using the xtrabackup method.
mysqldump
SST (State Snapshot Transfer) will allow complete exchanges (only complete, not incremental). So you need to create a user on all machines:
Then modify the configuration so that the user and password match:
So when we add a new node, we can see that a node has become a donor:
We also see that the wsrep_local_state value changes to 4 when the process is complete.
Info
The problem with this method is that it doesn't handle IST (Incremental State Transfer). Everything must be transferred in case of problems, not just the incremental data. You need to look at rsync or xtrabackup methods to be able to do IST.
Rsync
This is a very efficient method! The major disadvantage is that it doesn't allow hot transfers. Here's how to configure SST:
The data must no longer be accessed by MariaDB for this to work properly. Another prerequisite is the presence of rsync on the servers.
XtraBackup
XtraBackup is the best method today. It allows transfers while minimizing lock time to just a few seconds. To use this method, we need to install XtraBackup.
To install it on Debian, it's very simple, we'll add its repository:
Create this file to add the repository:
Update and install:
Then we can configure our nodes to use this method:
Specifying a donor
For replication, if you want to dedicate a machine as a donor (and possibly for backups) from a server:
This solves the load balancer issue mentioned above and avoids blocks during a backup.
Otherwise, you can specify it directly for node integration:
Info
If you start MariaDB twice in a row without running a Galera sync at least once, the second time it will do a complete sync.
Usage
Before using, you need to understand the principle. When we start our MariaDB instances, we'll end up in this configuration (I deliberately didn't draw all the communication arrows to avoid clutter, but all nodes talk to each other):

- Node 1 initializes the cluster with the empty gcomm value.
- The other nodes connect to node 1 and exchange their data to have the same data level everywhere
Creating the cluster
Go to node 1 to create the cluster. We'll start it with an empty cluster address, which will indicate its creation:
or
Adding nodes to the cluster
To join nodes to the newly created cluster, it's simple:
or
Put the IP of node 1 to connect to it. You can also simply start the MariaDB service, as we have a working configuration:
If you can't reach the master, run this command in mysql on the master to make sure it's properly started:
Info
You can use IPs or DNS names.
Checking the cluster status
To check the cluster status, here's the command to run in MariaDB:
Here I only have my main server running. No other nodes have joined the cluster yet. But when I add some:
Here I can clearly see my 4 master nodes :-)
Garbd (quorum)
To avoid split brains (cluster inconsistencies), it's advisable to use a tool provided with the Galera cluster that acts as a cluster quorum, especially if you're in 2-node mode (and that's generally the main advantage). Here's a use case:
You'll need to use the garbd service. It's installed by default but simply not activated. To configure it, we'll edit its configuration:
Adapt GALERA_NODES with the list of all your nodes and GALERA_GROUP with the name of the Galera cluster. Now we just need to activate it at machine startup and start the service:
Now, on one of your nodes, you'll see there's a new node, which is actually just the quorum:
Backups and restorations
For backups, there are several methods and Xtrabackup is again one of the favorites.
Info
Just like when a new node joins the cluster and blocks the donor's transactions, it's the same for backups, but only for MyISAM!
If you only use InnoDB and use Xtrabackup, there will be no transaction locks and therefore no special node needed for backups!
Installation
To install on Debian, it's very simple, we'll add its repository:
Create this file to add the repository:
Update and install:
Usage
Backup
To back up a Galera cluster and allow incremental backup while blocking the node that will perform the backups for only a few seconds:
The 'galera-info' option prevents problems during the uuid request (which will always return 0). If this option is not specified, incremental restorations won't be possible.
Info
For databases containing only InnoDB tables, it's possible to have no blocking at all during the lock by adding the '--no-lock' option.
Restoration
During restoration, one of the nodes will have blocked transactions after the Xtrabackup restoration, while the differential is being applied. To restore, copy the backup files to the MariaDB directory:
You can specify the donor (optional), then check the backup position:
And integrate the node into the cluster by specifying the position to avoid it getting a complete backup:
or
Recovery and maintenance
Automatic method
You don't need to worry about replication if a node other than the master (node1) fails. Once repaired and powered on, it will automatically reconnect to node 1 and catch up. However, in case of a problem with node 1:
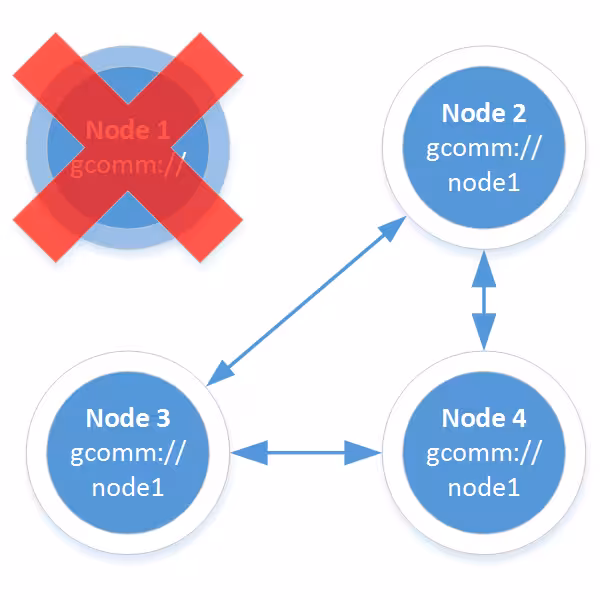
The other nodes will continue to communicate with each other and wait for the master to return. Once the master is turned back on, you'll need to tell it another node to which it should connect to continue synchronization:
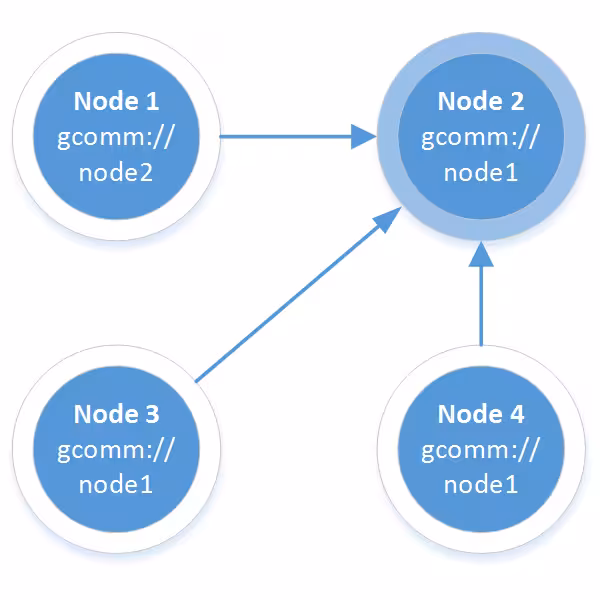
Whether you want to force a reconnection or perform maintenance on the master node, it's advisable to redirect the other servers to another master to avoid outages:
You can then check the master node on your MariaDB instances:
I've also tested violently shutting down any node and turning it back on. Once integrated into the cluster, it properly retrieves all the differential information. I had no corruption problems. The only issues I encountered were with MariaDB startup and lock problems as explained in the FAQ.
Manual method
It's possible to update a node from a delta between an up-to-date version and one that's behind. To do this, check the version in which one of the up-to-date nodes is:
Here we can see the uuid number and the position of the last commit (wsrep_last_committed).
Warning
The following command should only be used on a turned off server or you risk losing data on it!!!
With the server off, it's possible to retrieve the position of the last commit:
Then we can restart with the delta from this last commit:
or
The delta is then performed and the server is now at position 6.
Force a node to resynchronize
If you really don't know what a node has and you want to completely resynchronize it because you're unsure about its data, just delete the MariaDB content and restart it:
All data will then resynchronize.
Warning
This can take some time if your database is large or if the bandwidth between nodes is low.
Split brain
When you have one or more nodes in a split brain state, it's possible to continue using the cluster and discard all changes from the other down nodes so they'll do a complete sync when they start back up. On a 'primary' server:
- pc.bootstrap: takes control of the other nodes in the cluster and indicates that it's the master
- pc.ignore_quorum: allows splitting nodes and having a split brain
Then restart your other servers so they synchronize.
Warning
Once the cluster is restored, you MUST set these variables back to False to avoid future split brains that you can't recover from!!!
FAQ
One of my MariaDB services refuses to start after shutting it down
It can happen that when you turn off a MariaDB service, the lock files aren't properly released and the rsync service is still running. To clean everything up (without completely restarting the machine), follow these steps:
- Make sure MariaDB is no longer running:
- If it's still running, kill the process!
- Check that the rsync process is no longer running and kill it if it is
- Delete the lock files:
- Check that the directory for storing the pid exists, otherwise create it:
- You can now start the service, it should work:
Otherwise check the logs (/var/log/syslog)
/dev/stderr: Permission denied
If you have this problem, it's due to a Galera bug that incorrectly redirects its error output:
To fix the problem, simply set the correct permissions on the error output:
References
- http://www.codership.com/wiki/doku.php?id=galera_deployment
- http://www.severalnines.com/galera-configurator/
- http://www.severalnines.com/blog/understanding-gcache-galera
- http://www.codership.com/wiki/doku.php?id=sst_mysql
- http://www.codership.com/wiki/doku.php?id=galera_node_fsm
-
http://www.sebastien-han.fr/blog/2012/04/01/mysql-multi-master-replication-with-galera/
- MariaDB MySQL Advanced
- File:Galera1_src.vsdx - File:Galera2_src.vsdx - File:Galera3_src.vsdx