LXC is the userspace control package for Linux Containers, a lightweight virtual system mechanism sometimes described as "chroot on steroids".
LXC builds up from chroot to implement complete virtual systems, adding resource management and isolation mechanisms to Linux's existing process management infrastructure.
Linux Containers (lxc) implement:
Resource management via "process control groups" (implemented via the cgroup filesystem)
Resource isolation via new flags to the clone(2) system call (capable of create several types of new namespaces for things like PIDs and network routing)
Several additional isolation mechanisms (such as the "-o newinstance" flag to the devpts filesystem).
The LXC package combines these Linux kernel mechanisms to provide a userspace container object, a lightweight virtual system with full resource isolation and resource control for an application or a system.
Linux Containers take a completely different approach than system virtualization technologies such as KVM and Xen, which started by booting separate virtual systems on emulated hardware and then attempted to lower their overhead via paravirtualization and related mechanisms. Instead of retrofitting efficiency onto full isolation, LXC started out with an efficient mechanism (existing Linux process management) and added isolation, resulting in a system virtualization mechanism as scalable and portable as chroot, capable of simultaneously supporting thousands of emulated systems on a single server while also providing lightweight virtualization options to routers and smart phones.
The first objective of this project is to make the life easier for the kernel developers involved in the containers project and especially to continue working on the Checkpoint/Restart new features. The lxc is small enough to easily manage a container with simple command lines and complete enough to be used for other purposes.^1
Installation
To install LXC, we do not need too much packages. As I will want to manage my LXC containers with libvirt, I need to install it as well:
At the time where I write this sentence, there is an issue with LVM container creation (here is a first Debian bug and a second one) on Debian Wheezy and it doesn't seams to be resolve soon.
Here is a workaround to avoid errors during LVM containers initialization:
It's recommended to get a recent kernel as LXC grow very fast, get better performances, stabilities and new features. To get a newer kernel, we're going to use a kernel from the testing repo:
If it's not enough, you'll need to install the package with specific kernel version number corresponding to latest (ex. linux-image-3.11-2-amd64) and reboot on this new kernel.
# /etc/default/grub# If you change this file, run 'update-grub' afterwards to update# /boot/grub/grub.cfg.# For full documentation of the options in this file, see:# info -f grub -n 'Simple configuration'GRUB_DEFAULT=0GRUB_TIMEOUT=5GRUB_DISTRIBUTOR=`lsb_release-i-s2>/dev/null||echoDebian`GRUB_CMDLINE_LINUX_DEFAULT="quiet cgroup_enable=memory swapaccount=1"GRUB_CMDLINE_LINUX=""[...]
All should be enabled to ensure it will work as expected!
Network
No specific configuration (same than host)
If you don't configure your network configuration after container initialization, you'll have the exact same configuration on your guests (containers) than your host. That mean all network interfaces are available on the guests and they will have full access to the host.
Danger
This is not the recommended solution for production usages
The pro of that "no" configuration, is to have network working out of the box for the guests (perfect for quick tests)
Another con, is to have the access to process on host. I mean that a SSH server running on host will have it's port available on the guest too. So you cannot have a SSH server running on guests without changing port (or you'll have a network binding conflict).
You can easily check this configuration in opening a port on the host (here 80):
Libvirt is not necessary as for the moment it doesn't manage LXC containers very well. So you can manage your own dnsmasq server to give DNS and DHCP to your containers. First of all, install it:
# /etc/dnsmasq.conf# Bind it to the LXC interfaceinterface=lxcbr0
bind-interfaces
# Want DHCP client FQDNdhcp-fqdn
# Domain name and ip range with lease timedomain=deimos.fr,192.168.122.0/24
dhcp-range=192.168.122.100,192.168.122.200,1h
# DHCP optionsdhcp-option=40,deimos.fr
log-dhcp
Then restart the dnsmasq service. And now configure the lxcbr0 interface:
# /etc/network/interfaces# This bridge will is used to NAT LXC containers' trafficautolxcbr0
ifacelxcbr0inetstatic
pre-upbrctladdbrlxcbr0
bridge_fd0bridge_maxwait0address192.168.122.1
netmask255.255.255.0
post-upiptables-AFORWARD-ilxcbr0-s192.168.122.1/24-jACCEPT
post-upiptables-APOSTROUTING-tnat-s192.168.122.1/24-jMASQUERADE
# add checksum so that dhclient does not complain.# udp packets staying on the same host never have a checksum filled elsepost-upiptables-APOSTROUTING-tmangle-pudp--dportbootpc-s192.168.122.1/24-jCHECKSUM--checksum-fill
Iptables
You may need to configure iptables for example if you're on a dedicated box where the provider doesn't allow bridge configuration. Here is a working iptables configuration to permit incoming connexions to Nated guests:
#!/bin/bash# Made by Pierre Mavro / Deimosfr# This script will Nat you KVM/containers hosts# and help you to get access from outside#-------------------------------------------------------------------------# Essentials#-------------------------------------------------------------------------IPTABLES='/sbin/iptables'modprobenf_conntrack_ftp
#-------------------------------------------------------------------------# Physical and virtual interfaces definitions#-------------------------------------------------------------------------# Interfaceswan1_if="eth0"wan2_if="eth0:0"kvm_if="virbr0"#-------------------------------------------------------------------------# Networks definitions#-------------------------------------------------------------------------# Networkswan1_ip="x.x.x.x"wan2_ip="x.x.x.x"vms_net="192.168.122.0/24"# Dedibox internals IPsweb_ip="192.168.122.10"mail_ip="192.168.122.20"#-------------------------------------------------------------------------# Global Rules input / output / forward#-------------------------------------------------------------------------# Flushing tables$IPTABLES-F
$IPTABLES-X
$IPTABLES-tnat-F
# Define default policy$IPTABLES-PINPUTDROP
$IPTABLES-POUTPUTACCEPT
$IPTABLES-PFORWARDACCEPT
## Loopback accepte${IPTABLES}-AFORWARD-ilo-olo-jACCEPT
${IPTABLES}-AINPUT-ilo-jACCEPT
${IPTABLES}-AOUTPUT-olo-jACCEPT
# Allow KVM DHCP/dnsmasq${IPTABLES}-AINPUT-i$kvm_if-pudp--dport67-jACCEPT
${IPTABLES}-AINPUT-i$kvm_if-pudp--dport69-jACCEPT
$IPTABLES-AINPUT-jACCEPT-d$vms_net$IPTABLES-AINPUT-jACCEPT-mstate--stateESTABLISHED,RELATED
#-------------------------------------------------------------------------# Allow masquerading for KVM VMs#-------------------------------------------------------------------------# Activating masquerade to get Internet from KVM VMs$IPTABLES-tnat-APOSTROUTING-o$wan1_if-s$vms_net-jMASQUERADE
#-------------------------------------------------------------------------# Allow ports on KVM host#-------------------------------------------------------------------------# Allow ICMP$IPTABLES-AINPUT-jACCEPT-picmp
# SSH access$IPTABLES-AINPUT-jACCEPT-ptcp--dport22# HTTPS access$IPTABLES-AINPUT-jACCEPT-ptcp--dport443#-------------------------------------------------------------------------# Redirections for incoming connections (wan1)#-------------------------------------------------------------------------# HTTP access$IPTABLES-tnat-APREROUTING-ptcp--dport80-d$wan1_ip-jDNAT--to-destination$web_ip:80
# HTTP access$IPTABLES-tnat-APREROUTING-ptcp--dport443-d$wan1_ip-jDNAT--to-destination$web_ip:443
# Mail for mailsrv$IPTABLES-tnat-APREROUTING-ptcp--dport25-d$wan1_ip-jDNAT--to-destination$mail_ip:25
#-------------------------------------------------------------------------# Reload fail2ban#-------------------------------------------------------------------------/etc/init.d/fail2banreload
Nat on containers
DHCP
On each containers you want to use NAT configuration, you need to add those lines for DHCP configuration^2:
You can create a private interface for your containers. Containers will be able to communicate together though this dedicated interface. Here are the steps to create one between 2 hosts.
# /etc/network/interfaces# This file describes the network interfaces available on your system# and how to activate them. For more information, see interfaces(5).# The loopback network interfaceautolobr0br1
ifaceloinetloopback
# DMZifacebr0inetstatic
address192.168.10.1
netmask255.255.255.0
gateway192.168.10.254
network192.168.10.0
broadcast192.168.10.255
bridge_portseth0
bridge_fd9bridge_hello2bridge_maxage12bridge_stpoff
# Internalifacebr1inetstatic
address192.168.0.1
netmask255.255.255.0
gateway192.168.0.254
network192.168.0.0
broadcast192.168.0.255
bridge_portseth1
bridge_fd9bridge_hello2bridge_maxage12bridge_stpoff
# /etc/network/interfaces# This file describes the network interfaces available on your system# and how to activate them. For more information, see interfaces(5).# The loopback network interfaceautolo
ifaceloinetloopback
# The primary network interfaceallow-hotplugeth0
autoeth0
ifaceeth0inetmanual
autoeth0.110
ifaceeth0.110inetmanual
vlan_raw_deviceeth0
# The bridged interfaceautovmbr0
ifacevmbr0inetstatic
address192.168.100.1
netmask255.255.255.0
network192.168.100.0
broadcast192.168.100.255
gateway192.168.100.254
# dns-* options are implemented by the resolvconf package, if installeddns-nameservers192.168.100.254
dns-searchdeimos.fr
bridge_portseth0
bridge_fd9bridge_hello2bridge_maxage12bridge_stpoff
autovmbr0.110
ifacevmbr0.110inetstatic
address192.168.110.1
netmask255.255.255.0
bridge_portseth0.190
bridge_stpoff
bridge_maxwait0bridge_fd0
Security
It's recommended to use Grsecurity kernel (may be not compatible with the testing kernel)or Apparmor.
B: we want to use LVM as backend (BTRFS is also supported)
vgname: set the volume group (VG) name where logical volume (LV) should be created
lvname: set the wished LV name for that container
fssize: set the size of the LV
fstype: set the filesystem for this container (full list is available in /proc/filesystems)
BTRFS method
If your host has a btrfs /var, the LXC administration tools will detect this and automatically exploit it by cloning containers using btrfs snapshots.^4
Templating configuration
You can template configuration if you want to simplify your deployments. It could be useful if you need to do specific lxc configuration. To do it, simply create a file (name it as you want) and add your lxc configuration (here the network configuration):
Then you could call it when you'll create a container with -f argument. You can create as many configuration as you want and place them were you want. I did it in /etc/lxc as I felt it well.
d: Run the container as a daemon. As the container has no more tty, if an error occurs nothing will be displayed, the log file can be used to check the error.
This restart the cron service in "mycontianer" container.
Convert/Migrate a VM/Host to a LXC container
If you already have a running machine on KVM/VirtualBox or anything else and want to convert to an LXC container, it's easy. I've wrote a script (strongly inspired from the lxc-create) that helps me to initiate the missing elements. You can copy it in /usr/bin folder (lxc-convert).
#!/bin/bash## lxc: linux Container library# Authors:# Pierre MAVRO <xxx@company.com># This library is free software; you can redistribute it and/or# modify it under the terms of the GNU Lesser General Public# License as published by the Free Software Foundation; either# version 2.1 of the License, or (at your option) any later version.# This library is distributed in the hope that it will be useful,# but WITHOUT ANY WARRANTY; without even the implied warranty of# MERCHANTABILITY or FITNESS FOR A PARTICULAR PURPOSE. See the GNU# Lesser General Public License for more details.# You should have received a copy of the GNU Lesser General Public# License along with this library; if not, write to the Free Software# Foundation, Inc., 59 Temple Place, Suite 330, Boston, MA 02111-1307 USAconfigure_debian(){rootfs=$1hostname=$2# Remove unneeded foldersrm-Rf$rootfs/{dev,proc,sys,run}# Decompress dev devicestar-xzf/usr/share/debootstrap/devices.tar.gz-C$rootfsrootfs_dev=$rootfs/dev
# Create missing dev devicesmkdir-m755$rootfs_dev/pts
mkdir-m1777$rootfs_dev/shm
mknod-m666$rootfs_dev/tty0c40mknod-m600$rootfs_dev/initctlp
# Create foldersmkdir-p$rootfs/{proc,sys,run}# Do not use fstabmv$rootfs/etc/fstab{,.old}touch$rootfs/etc/fstab
# squeeze only has /dev/tty and /dev/tty0 by default,# therefore creating missing device nodes for tty1-4.forttyin$(seq14);doif[!-e$rootfs/dev/tty$tty];thenmknod$rootfs/dev/tty$ttyc4$ttyfidone# configure the inittabcat<<EOF > $rootfs/etc/inittabid:2:initdefault:si::sysinit:/etc/init.d/rcSl0:0:wait:/etc/init.d/rc 0l1:1:wait:/etc/init.d/rc 1l2:2:wait:/etc/init.d/rc 2l3:3:wait:/etc/init.d/rc 3l4:4:wait:/etc/init.d/rc 4l5:5:wait:/etc/init.d/rc 5l6:6:wait:/etc/init.d/rc 6# Normally not reached, but fallthrough in case of emergency.z6:6:respawn:/sbin/sulogin1:2345:respawn:/sbin/getty 38400 consolec1:12345:respawn:/sbin/getty 38400 tty1 linuxc2:12345:respawn:/sbin/getty 38400 tty2 linuxc3:12345:respawn:/sbin/getty 38400 tty3 linuxc4:12345:respawn:/sbin/getty 38400 tty4 linuxEOF# add daemontools-run entryif[-e$rootfs/var/lib/dpkg/info/daemontools.list];thencat<<EOF >> $rootfs/etc/inittab#-- daemontools-run beginSV:123456:respawn:/usr/bin/svscanboot#-- daemontools-run endEOFfi# Remove grub and kernelchroot$rootfsapt-get--yes-oDpkg::Options::="--force-confdef"-oDpkg::Options::="--force-confold"removegrubgrub2grub-pcgrub-commonlinux-image-amd64
# remove pointless services in a containerchroot$rootfs"LANG=C /usr/sbin/update-rc.d -f checkroot.sh remove"# Schroot$rootfs"LANG=C /usr/sbin/update-rc.d checkroot.sh stop 09 S ."chroot$rootfs"LANG=C /usr/sbin/update-rc.d -f umountfs remove"# 0 6chroot$rootfs"LANG=C /usr/sbin/update-rc.d umountfs start 09 0 6 ."chroot$rootfs"LANG=C /usr/sbin/update-rc.d -f umountroot remove"# 0 6chroot$rootfs"LANG=C /usr/sbin/update-rc.d umountroot start 10 0 6 ."# The following initscripts don't provide an empty start or stop block.# To prevent them being enabled on upgrades, we leave a start link on# runlevel 3.chroot$rootfs"LANG=C /usr/sbin/update-rc.d -f hwclock.sh remove"# S 0 6chroot$rootfs"LANG=C /usr/sbin/update-rc.d hwclock.sh start 10 3 ."chroot$rootfs"LANG=C /usr/sbin/update-rc.d -f hwclockfirst.sh remove"# Schroot$rootfs"LANG=C /usr/sbin/update-rc.d hwclockfirst start 08 3 ."chroot$rootfs"LANG=C /usr/sbin/update-rc.d -f module-init-tools remove"# Schroot$rootfs"LANG=C /usr/sbin/update-rc.d module-init-tools start 10 3 ."return0}copy_configuration(){path=$1rootfs=$2name=$3cat<<EOF > $path/config# $path/config## Containerlxc.utsname = $hostnamelxc.tty = 4lxc.pts = 1024#lxc.console = /var/log/lxc/$name.console## Capabilities#lxc.cap.drop = mac_admin#lxc.cap.drop = mac_overridelxc.cap.drop = sys_admin#lxc.cap.drop = sys_module## Devices# Allow all devices#lxc.cgroup.devices.allow = a# Deny all deviceslxc.cgroup.devices.deny = a# /dev/null and zerolxc.cgroup.devices.allow = c 1:3 rwmlxc.cgroup.devices.allow = c 1:5 rwm# /dev/consoleslxc.cgroup.devices.allow = c 5:1 rwm# /dev/ttylxc.cgroup.devices.allow = c 5:0 rwmlxc.cgroup.devices.allow = c 4:0 rwmlxc.cgroup.devices.allow = c 4:1 rwm# /dev/{,u}randomlxc.cgroup.devices.allow = c 1:9 rwm# /dev/randomlxc.cgroup.devices.allow = c 1:8 rwm# /dev/pts/*lxc.cgroup.devices.allow = c 136:* rwm# /dev/ptmxlxc.cgroup.devices.allow = c 5:2 rwm# /dev/rtclxc.cgroup.devices.allow = c 254:0 rwm# /dev/fuselxc.cgroup.devices.allow = c 10:229 rwm## Limits#lxc.cgroup.cpu.shares = 1024#lxc.cgroup.cpuset.cpus = 0#lxc.cgroup.memory.limit_in_bytes = 256M#lxc.cgroup.memory.memsw.limit_in_bytes = 1G#lxc.cgroup.blkio.weight = 500## Filesystemlxc.mount.entry = proc $rootfs/proc proc nodev,noexec,nosuid 0 0lxc.mount.entry = sysfs $rootfs/sys sysfs defaults,ro 0 0lxc.rootfs = $rootfs# LVM#lxc.rootfs = /dev/vg/lvnameEOF# Adding shared data directory if existingif[-d/srv/share/$hostname];thenecho"lxc.mount.entry = /srv/share/$hostname$rootfs/srv/$hostname none defaults,bind 0 0">>$path/config
elseecho"#lxc.mount.entry = /srv/share/$hostname$rootfs/srv/$hostname none defaults,bind 0 0">>$path/config
figen_mac=`opensslrand-hex6|sed's/\(..\)/\1:/g; s/.$//'`cat>>$path/config<< EOF#lxc.mount.entry = /srv/$hostname $rootfs/srv/$hostname none defaults,bind 0 0## Networklxc.network.type = vethlxc.network.flags = up#lxc.network.hwaddr = $gen_maclxc.network.link = lxcbr0lxc.network.name = eth0lxc.network.veth.pair = veth-$hostnameEOFif[$?-ne0];thenecho"Failed to add configuration"return1fireturn0}usage(){cat<<EOF$1 -h|--help -p|--path=<path> -n|--name=nameEOFreturn0}options=$(getopt-ohp:n:c-lhelp,path:,name:,clean--"$@")if[$?-ne0];thenusage$(basename$0)exit1fievalset--"$options"whiletruedocase"$1"in-h|--help)usage$0&&exit0;;-p|--path)path=$2;shift2;;-n|--name)name=$2;shift2;;--)shift1;break;;*)break;;esacdoneif[!-z"$clean"-a-z"$path"];thenclean||exit1exit0fiif[-z"$path"];thenecho"'path' parameter is required"exit1fiif["$(id-u)"!="0"];thenecho"This script should be run as 'root'"exit1firootfs=$path/rootfs
configure_debian$rootfs$nameif[$?-ne0];thenecho"failed to configure debian for a container"exit1ficopy_configuration$path$rootfsif[$?-ne0];thenecho"failed write configuration file"exit1fi
To use it, it's easy. First of all mount or copy all your datas in the rootfs folder, be sure to have enough space, then launch the lxc-convert script like in this example :
Adapt the remote host to your distant SSH host or rsync without SSH if it's possible. During the transfer, you need to exclude some folders to avoid errors (/proc, /sys, /dev). They will be recreated during the lxc-convert.
Then you'll be able to start it :-)
Container configuration
Once you've initialized your container, there are a lot of interesting options. Here are some for a classical configuration (/var/lib/lxc/mycontainer/config):
You can specify the capability to be dropped in the container. A single line defining several capabilities with a space separation is allowed. The format is the lower case of the capability definition without the "CAP_" prefix, eg. CAP_SYS_MODULE should be specified as sys_module. You can see the complete list of linux capabilities with explanations by reading the man page :
> grep -e processor -e core /proc/cpuinfo | sed 's/processor/\nprocessor/'

processor   : 0
core id     : 0
cpu cores   : 4

processor   : 1
core id     : 1
cpu cores   : 4

processor   : 2
core id     : 2
cpu cores   : 4

processor   : 3
core id     : 3
cpu cores   : 4

processor   : 4
core id     : 0
cpu cores   : 4

processor   : 5
core id     : 1
cpu cores   : 4

processor   : 6
core id     : 2
cpu cores   : 4

processor   : 7
core id     : 3
cpu cores   : 4
You can see there are 7 cores (called processor). In fact there are 4 cores with 2 thread each on this CPU. That's why there are 4 cores id and 8 detected cores.
So here is the list of the cores with their attached core:
This will stress 2 CPU at 100% for 10 seconds. You'll see your htop CPU bars at 100%. If I change 2 by 3 and only binded 2 CPUs, only 2 will be at 100% :-)
Scheduler
This is the other method to assign CPU to a container. You need to add weight to VMs so that the scheduler can decide which container should use CPU time form the CPU clock. For instance, if a container is set to 512 and another to 1024, the last one will have twice more CPU time than the first container. To edit this property (/var/lib/lxc/mycontainer/config):
The actual problem is you can't check how many memory you've set and is available for your container. For the moment /proc/meminfo is not correctly updated^9. If you need to validate the available memory on a container, you have to write fake data into the allocated memory area to trigger the memory checks of the kernel/visualization tool.
Memory overcommit is a Linux kernel feature that lets applications allocate more memory than is actually available. The idea behind this feature is that some applications allocate large amounts of memory just in case, but never actually use it. Thus, memory overcommit allows you to run more applications than actually fit in your memory, provided the applications don’t actually use the memory they have allocated. If they do, then the kernel (via OOM killer) terminates the application.
ZFS: if you're using ZFS on Linux, you can use integrated zfs/zpool quotas
Quotas: using classical Linux quotas (not the recommended solution)
Disk image: you can use QCOW/QCOW2/RAW/QED images
Mount
Warning
You should take care if you want to create a mount entry in a subdirectory of /mnt.
It won't work so easily. The reason this happens is that by default 'mnt' is the directory used as pivotdir, where the old_root is placed during pivot_root(). After that, everything under pivotdir is unmounted.
A workaround is to specify an alternate 'lxc.pivotdir' in the container configuration file.^11
Block Device
You can mount block devices in adding in your container configuration lines like this (adapt with your needs) (/var/lib/lxc/mycontainer/config):
Higher the value is, more the priority will be important. You can get more informations here. Maximum value is 1000 and lowest is 10.
Info
You need to have CFQ scheduler to make it work properly
Disk bandwidth
Another solution is to limit bandwidth usage, but the Wheezy kernel doesn't have the "CONFIG_BLK_DEV_THROTTLING" activated. You need to take a testing/unstable kernel instead or recompile a new one with this option activated. To do this follow the kernel procedure.
Then, you'll be able to limit bandwidth like that (/var/lib/lxc/mycontainer/config):
# Limit to 1Mb/s
lxc.cgroup.blkio.throttle.read_bps_device = 100
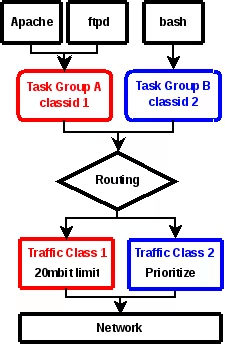
Network
You can limit network bandwidth using native kernel QOS directly on cgroups. For example, we have 2 containers : A and B. To get a good understanding, look at this schema:
Now you've understand how it could looks like. Now if I want to limit a container to 30Mb and the other one to 40Mb, here is how I should achieve it. Assign IDs on containers that should have quality of service :
Unfortunately, you can't have informations directly on the containers, however you can have informations from the host. Here is a little script to do it (/usr/bin/lxc-resources-stats):
Copying local cache to /var/lib/lxc/mycontainerlvm/rootfs.../usr/share/lxc/templates/lxc-debian: line 101: /var/lib/lxc/mycontainerlvm/rootfs/etc/apt/sources.list.d/debian.list: No such file or directory
/usr/share/lxc/templates/lxc-debian: line 107: /var/lib/lxc/mycontainerlvm/rootfs/etc/apt/sources.list.d/debian.list: No such file or directory
/usr/share/lxc/templates/lxc-debian: line 111: /var/lib/lxc/mycontainerlvm/rootfs/etc/apt/sources.list.d/debian.list: No such file or directory
/usr/share/lxc/templates/lxc-debian: line 115: /var/lib/lxc/mycontainerlvm/rootfs/etc/apt/sources.list.d/debian.list: No such file or directory
/usr/share/lxc/templates/lxc-debian: line 183: /var/lib/lxc/mycontainerlvm/rootfs/etc/fstab: No such file or directory
mount: mount point /var/lib/lxc/mycontainerlvm/rootfs/dev/pts does not exist
mount: mount point /var/lib/lxc/mycontainerlvm/rootfs/proc does not exist
mount: mount point /var/lib/lxc/mycontainerlvm/rootfs/sys does not exist
mount: mount point /var/lib/lxc/mycontainerlvm/rootfs/var/cache/apt/archives does not exist
/usr/share/lxc/templates/lxc-debian: line 49: /var/lib/lxc/mycontainerlvm/rootfs/etc/dpkg/dpkg.cfg.d/lxc-debconf: No such file or directory
/usr/share/lxc/templates/lxc-debian: line 55: /var/lib/lxc/mycontainerlvm/rootfs/usr/sbin/policy-rc.d: No such file or directory
chmod: cannot access `/var/lib/lxc/mycontainerlvm/rootfs/usr/sbin/policy-rc.d': No such file or directory
chroot: failed to run command `/usr/bin/env': No such file or directory
chroot: failed to run command `/usr/bin/env': No such file or directory
chroot: failed to run command `/usr/bin/env': No such file or directory
umount: /var/lib/lxc/mycontainerlvm/rootfs/var/cache/apt/archives: not found
chroot: failed to run command `/usr/bin/env': No such file or directory
chroot: failed to run command `/usr/bin/env': No such file or directory
chroot: failed to run command `/usr/bin/env': No such file or directory
chroot: failed to run command `/usr/bin/env': No such file or directory
chroot: failed to run command `/usr/bin/env': No such file or directory
chroot: failed to run command `/usr/bin/env': No such file or directory
umount: /var/lib/lxc/mycontainerlvm/rootfs/dev/pts: not found
umount: /var/lib/lxc/mycontainerlvm/rootfs/proc: not found
umount: /var/lib/lxc/mycontainerlvm/rootfs/sys: not found
'debian' template installed
Unmounting LVM
'mycontainerlvm' created
this is because of a Debian bug that the maintainer doesn't want to fix :-(. Here is a workaround.
Cannot limit container memory or swap
If you can't limit container memory and have this kind of issue:
# If you change this file, run 'update-grub' afterwards to update# /boot/grub/grub.cfg.# For full documentation of the options in this file, see:# info -f grub -n 'Simple configuration'GRUB_DEFAULT=0GRUB_TIMEOUT=5GRUB_DISTRIBUTOR=`lsb_release -i -s 2> /dev/null || echo Debian`GRUB_CMDLINE_LINUX_DEFAULT="quiet cgroup_enable=memory swapaccount=1"GRUB_CMDLINE_LINUX=""[...]
You can now shutdown it properly without any issue :-)
Some containers are loosing their IP addresse at boot
If you're experiencing issues with booting containers which are loosing their static IP at boot^14 there is a solution. The first thing to do to recover is:
But is is a temporary solution. You in fact need to add in your LXC configuration file, the IP address with CIDR of your container (/var/lib/lxc/<container_name>/config):
lxc.network.ipv4 = 192.168.0.50/24
lxc.network.ipv4.gateway = auto
The automatic gateway setting is will in fact address to the container, the IP of the interface on which the container is attached. Then you have to modify your container network configuration and change static configuration to manual of eth0 interface. You should have something like this:
In Docker, you may want to use devicemapper driver. To get it working, you need to let your LXC container to control devicemappers. To do so, just add those 1 lines in your container configuration: