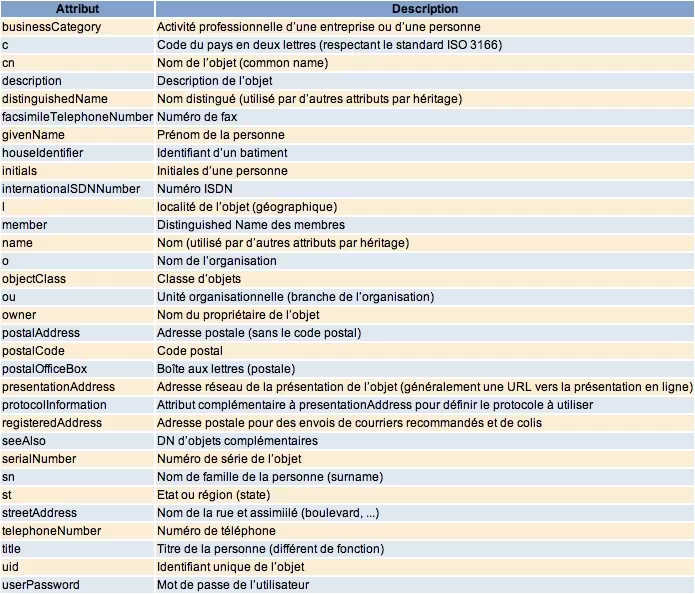
Lightweight Directory Access Protocol (LDAP) is a protocol that allows querying and modification of directory services. This protocol is based on TCP/IP. An LDAP directory typically follows the X.500 model defined by ITU-T: it is a tree structure where each node consists of attributes associated with their values.
The naming of the elements that make up the tree (root, branches, leaves) often reflects the political, geographical, or organizational model of the represented structure. The current trend is to use DNS naming for the basic elements of the directory (root and first branches). Deeper branches of the directory can represent people, organizational units, groups, etc.
graph TD
    A[dc=fr] --> B[dc=example]
    B --> C[ou=people]
    B --> D[ou=groups]
First, we need to generate an encrypted password because we will need to put it in the configuration file. We have the choice to put it in clear text as well, but for security reasons, it will be encrypted:
# The following line allows the use of LDAP V2 standard
allow bind_v2

# The following line gives the root of the LDAP base
suffix "dc=deimos,dc=fr"

# The following line that must be added manually gives the administrator login (admin with the reminder of the root).
# This line and the next one are mandatory to have root access to the base from an external program (ex: PHP)
rootdn "cn=admin,dc=deimos,dc=fr"

# Paste the password we generated earlier:
# Admin password for OpenLDAP
rootpw {SSHA}5y67xJ/t7esuGKUD7TQPcgykd8xiYMO2

# Setting up write access to the database. You must indicate the correct login and the root of the database:
access to attrs=userPassword,shadowLastChange
       by dn="cn=admin,dc=deimos,dc=fr" write
       by anonymous auth
       by self write
       by * none

# Setting up read-only access to the database. You must indicate the correct login and the root of the database:
access to *
       by dn="cn=admin,dc=deimos,dc=fr" write
       by * read
Now, to apply the configuration, we will restart the server:
dn: <distinguished name
   objectClass: <object class
   objectClass: <object class
   ...
   <attribute type:<attribute value
   <attribute type:<attribute value
   ...
Here is an example of an LDIF file "AjoutRacine.ldif" to create the root of the LDAP tree:
$server="localhost";$port="389";$dn="dc=deimos,dc=fr";$rootdn="cn=admin,$dn";$rootpw="admin";$ds=ldap_connect($server,$port);ldap_set_option($ds, LDAP_OPT_PROTOCOL_VERSION, 3);$r=ldap_bind($ds,$rootdn,$rootpw) or die ("Cannot connect to server! \n");echo "Authentication on the OpenLDAP server -> OK \n\n";
In general, unix clients can authenticate using information contained in the LDAP directory via PAM and NSS. It is therefore sufficient to install and configure these components on the different systems.
Debian
You have the choice of installing libpam-ldapd or libpam-ldap. libpam-ldapd is newer and avoids some bugs seen in libpam-ldap. It's up to you to decide what you want :-)
libpam-ldapd
If you opt for libnss-ldapd, then you just have to install this and answer the questions.
If you have chosen to install libpam-ldap instead of libpam-ldapd, you will have to do this manually.
By default, Debian creates two different configuration files for libpam-ldap and libnss-ldap. This is unnecessary since these two files will contain the same thing. You need to delete the libpam-ldap configuration files and create links from those of libnss-ldap to those of libpam-ldap:
uri ldap://ldap.mydomain.local/
base dc=openldap,dc=mydomain,dc=local
ldap_version 3
rootbinddn cn=admin,dc=openldap,dc=mydomain,dc=local
scope sub
nss_paged_results yes
pagesize 1000
nss_base_passwd dc=openldap,dc=mydomain,dc=local?sub?&(&(objectClass=posixAccount)(!(objectClass=computer)))
nss_base_shadow dc=openldap,dc=mydomain,dc=local?sub
In /etc/libnss-ldap.secret, indicate the password of the user indicated on the rootdn line of the file /etc/libnss-ldap.conf.
You then need to modify the /etc/nsswitch.conf file to indicate that the search will be done, among other things, in the ldap directory for the different services. This gives for example:
passwd:         files ldap
group:          files ldap
shadow:         files ldap

hosts:          files dns
networks:       files

protocols:      db files
services:       db files
ethers:         db files
rpc:            db files

netgroup:       nis
libpam-ldapd and libpam-ldap
Finally, you need to modify the pam chains so that they allow authentication via the ldap directory. This is done by copying the different files /etc/pam.d/common-* to /etc/pam.d/common-*-ldap:
Once these common-*-ldap files are created, we can edit the files of the different services for which we want to authorize authentication by ldap... If for example we want to allow users contained in the LDAP directory to connect via ssh to the machine, we edit the file /etc/pam.d/ssh and replace the common-qqc with common-qqc-ldap.
For automounting partitions according to the user, edit the file /etc/security/pam_mount.conf:
One of the common methods is to allow only one or certain groups from LDAP to access a machine. For this, the groups must have a posixGroup attribute called login.
As on Debian, you also need to modify the /etc/nsswitch.conf file.
Force a Shell at Login
If you have pam authentication via LDAP, it is possible to force a particular shell at login. It will override the information sent by NSS and replace it with the desired shell. We will use lshell here for all people connecting via LDAP:
#
#ident  "@(#)pam.conf   1.28    04/04/21 SMI"
#
# Copyright 2004 Sun Microsystems, Inc.  All rights reserved.
# Use is subject to license terms.
#
# PAM configuration
#
# Unless explicitly defined, all services use the modules
# defined in the "other" section.
#
# Modules are defined with relative pathnames, i.e., they are
# relative to /usr/lib/security/$ISA. Absolute path names, as
# present in this file in previous releases are still acceptable.
#
# Authentication management
#
# login service (explicit because of pam_dial_auth)
#
login   auth requisite          pam_authtok_get.so.1
login   auth required           pam_dhkeys.so.1
login   auth required           pam_unix_cred.so.1
login   auth sufficient         pam_ldap.so.1 try_first_pass
login   auth sufficient         pam_unix_auth.so.1
login   auth required           pam_dial_auth.so.1
#
# rlogin service (explicit because of pam_rhost_auth)
#
rlogin  auth sufficient         pam_rhosts_auth.so.1
rlogin  auth requisite          pam_authtok_get.so.1
rlogin  auth required           pam_dhkeys.so.1
rlogin  auth required           pam_unix_cred.so.1
rlogin  auth sufficient         pam_ldap.so.1 try_first_pass
rlogin  auth sufficient         pam_unix_auth.so.1
#
# Kerberized rlogin service
#
krlogin auth required           pam_unix_cred.so.1
krlogin auth binding            pam_krb5.so.1
krlogin auth sufficient         pam_ldap.so.1
krlogin auth sufficient         pam_unix_auth.so.1
#
# rsh service (explicit because of pam_rhost_auth,
# and pam_unix_auth for meaningful pam_setcred)
#
rsh     auth sufficient         pam_rhosts_auth.so.1
rsh     auth required           pam_unix_cred.so.1
#
# Kerberized rsh service
#
krsh    auth required           pam_unix_cred.so.1
krsh    auth binding            pam_krb5.so.1
krsh    auth sufficient         pam_ldap.so.1
krsh    auth sufficient         pam_unix_auth.so.1
#
# Kerberized telnet service
#
ktelnet auth required           pam_unix_cred.so.1
ktelnet auth binding            pam_krb5.so.1
ktelnet auth sufficient         pam_ldap.so.1
ktelnet auth sufficient         pam_unix_auth.so.1
#
# PPP service (explicit because of pam_dial_auth)
#
ppp     auth requisite          pam_authtok_get.so.1
ppp     auth required           pam_dhkeys.so.1
ppp     auth required           pam_unix_cred.so.1
ppp     auth sufficient         pam_ldap.so.1
ppp     auth sufficient         pam_unix_auth.so.1
ppp     auth required           pam_dial_auth.so.1
#
# Default definitions for Authentication management
# Used when service name is not explicitly mentioned for authentication
#
other   auth requisite          pam_authtok_get.so.1
other   auth required           pam_dhkeys.so.1
other   auth required           pam_unix_cred.so.1
other   auth sufficient         pam_ldap.so.1
other   auth sufficient         pam_unix_auth.so.1
#
# passwd command (explicit because of a different authentication module)
#
passwd  auth required           pam_passwd_auth.so.1
#
# cron service (explicit because of non-usage of pam_roles.so.1)
#
cron    account required        pam_unix_account.so.1
#
# Default definition for Account management
# Used when service name is not explicitly mentioned for account management
#
other   account requisite       pam_roles.so.1
other   account required        pam_unix_account.so.1
#
# Default definition for Session management
# Used when service name is not explicitly mentioned for session management
#
other   session required        pam_unix_session.so.1
#
# Default definition for  Password management
# Used when service name is not explicitly mentioned for password management
#
other   password required       pam_dhkeys.so.1
other   password requisite      pam_authtok_get.so.1
other   password requisite      pam_authtok_check.so.1
other   password required       pam_authtok_store.so.1
#
# Support for Kerberos V5 authentication and example configurations can
# be found in the pam_krb5(5) man page under the "EXAMPLES" section.
#
Configure the file /etc/nsswitch.ldap
Leave "ldap" only where it's useful: for the moment on the passwd: and group: lines. For the rest, put the content of the file /etc/nsswitch.dns. Which gives:
#
# Copyright 2006 Sun Microsystems, Inc.  All rights reserved.
# Use is subject to license terms.
#

#
# /etc/nsswitch.dns:
#
# An example file that could be copied over to /etc/nsswitch.conf; it uses
# DNS for hosts lookups, otherwise it does not use any other naming service.
#
# "hosts:" and "services:" in this file are used only if the
# /etc/netconfig file has a "-" for nametoaddr_libs of "inet" transports.

# DNS service expects that an instance of svc:/network/dns/client be
# enabled and online.

passwd:     files ldap
group:      files ldap

# You must also set up the /etc/resolv.conf file for DNS name
# server lookup.  See resolv.conf(4).
hosts:      files dns

# Note that IPv4 addresses are searched for in all of the ipnodes databases
# before searching the hosts databases.
ipnodes:   files dns

networks:   files
protocols:  files
rpc:        files
ethers:     files
netmasks:   files
bootparams: files
publickey:  files
# At present there isn't a 'files' backend for netgroup;  the system will
#   figure it out pretty quickly, and won't use netgroups at all.
netgroup:   files
automount:  files
aliases:    files
services:   files
printers:       user files

auth_attr:  files
prof_attr:  files
project:    files

tnrhtp:     files
tnrhdb:     files
Once this is done, we will be able to set up the configuration. Warning: if you are in a cluster environment, adapt to the initial conf!:
Warning: it seems that the ldapclient command is buggy and requires the proxyDN and proxyPassword parameters even if they are unused! (and even if they contain anything)
#
# Copyright 2003 Sun Microsystems, Inc.  All rights reserved.
# Use is subject to license terms.
#
# ident "@(#)auto_home  1.6     03/04/28 SMI"
#
# Home directory map for automounter
#
+auto_home
* localhost:/export/home/&
In case you would like to automatically create the home directory, you need to port the pam_mkhomedir from linux:
adding new entry "dc=deimos,dc=fr"
ldap_add: Naming violation (64)
       additional info: value of naming attribute 'dc' is not present in entry
This means that you have a problem at the "dc" level. Indeed, if your "dn" contains 2 arguments as here (deimos and fr for deimos.fr), then you must indicate for your "dc" the first argument of your "dn". Ex:
It happened to me to run out of space on one of my disks because of logs taking too much space. To automatically flush the logs, 2 methods exist: auto and manual.
Automatic Method
Just insert this in this file /var/lib/ldap/DB_CONFIG:
It can happen to have several users who vanish following an unfortunate faulty synchronization. For example, a slapcat will show you the ldap users and groups, but not the getent command.
All this is due to the cache. To fix the problem, we need to empty it. The nscd command:
You may still encounter issues after that. For my part, the slapcat command works. We can therefore extract the content to make a ldif, start with an empty base and reinject this ldif (I haven't tested, but in theory, it should work). To start with an empty base, here's how to do it:
Make sure the ldap server is turned off
Backup your old base /var/lib/ldap
Create all your database folders with a logs folder inside (ex: /var/lib/ldap/base/logs)
Go to /var/lib/ldap and run the db_recover command
[ID 293258 user.warning] libsldap: Status: 4 Mesg: Service search descriptor for service 'passwd' contains filter, which can not be used for service 'user_attr'.
It's simply that you are missing 2 lines in your ldap client configuration file:
The Organization test and the OU person must exist before being able to import. And unfortunately, if the creation of these entries are not present in the tree structure, then the import will fail.
ldap_add: Constraint violation (19)
If you have this kind of error when importing a LDIF into an LDAP instance:
It means that there are non-indexed fields when an application tries to access them. To fix this, we need to add (the UID in our case) to the index. We will therefore edit this file and add the uid in our case: