Configuration and Usage of Solaris Zones (Containers)
Introduction
Zones or Containers are: - Virtual instance of Solaris - Software partition for the OS
A large SunFire server with hardware domains allows many isolated systems to be created. Zones achieve this in software and is far more flexible - it is easy to move individual CPUs between zones as needed, or to configure a more sophisticated way to share CPUs and memory.
Configuration
There are two general zone types to pick from during zone creation. They are,
Small zone - (also known as a "Sparse Root zone"): The default. This consumes the least disk space, has the best performance and the best security.
Big zone - (also known as a "Whole Root zone"): The zone has its own /usr files, which can be modified independently.
If you aren't sure which to choose, pick the small zone. Below are examples of installing each zone type as a starting point for Zone Resource Controls.
Small Zone
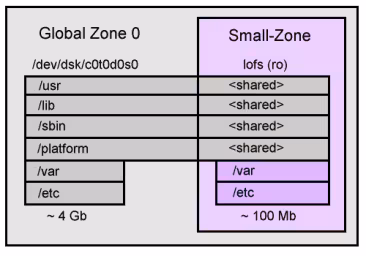
This demonstrates creating a simple zone that uses the default settings which share most of the operating system with the global zone. The final layout will be like the following,
To create such a zone involves letting the system pick default settings, which includes the loopback filesystem (lofs) read only mounts that share most of the OS. The following commands were used,
The new zone is in a configured state. Those inherited-pkg-dir's are filesystems that will be shared lofs (loopback filesystem) readonly from the global; this saves copying the entire operating system over during install, but can make adding packages to the small-zone difficult as /usr is readonly. (See the big-zone example that uses a different approach).
We can see the zonecfg command has saved the info to an XML file in /etc/zones:
<?xml version="1.0" encoding="UTF-8"?><!DOCTYPE zone PUBLIC "-//Sun Microsystems Inc//DTD Zones//EN" "file:///usr/share/lib/xml/dtd/zonecfg.dtd.1"><!-- DO NOT EDIT THIS FILE. Use zonecfg(1M) instead.--><zonename="small-zone"zonepath="/export/small-zone"autoboot="true"><inherited-pkg-dirdirectory="/lib"/><inherited-pkg-dirdirectory="/platform"/><inherited-pkg-dirdirectory="/sbin"/><inherited-pkg-dirdirectory="/usr"/><networkaddress="192.168.2.101"physical="hme0"/></zone>
Next we begin the zone install, it takes around 10 minutes to initialise the packages it needs for the new zone. A verify is run first to check our zone config is ok, then we run the install, then boot the zone:
We can see small-zone is up and running. Now we login for the first time to the console, so we can answer system identification questions such as timezone,
From the directories that are not lofs shared from the global zone, the main ones are /etc and /var. They add up to around 70Mb, which is roughly how much extra disk space was required to create this small-zone.
Big Zones
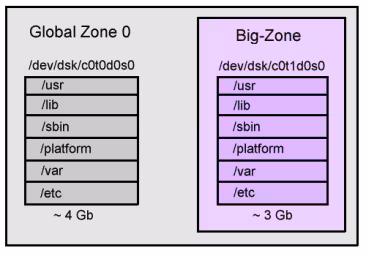
This demonstrates creating a zone that resides on it's own slice, which has it's own copy of the operating system. The final layout will be like the following:
<?xml version="1.0" encoding="UTF-8"?><!DOCTYPE zone PUBLIC "-//Sun Microsystems Inc//DTD Zones//EN" "file:///usr/share/lib/xml/dtd/zonecfg.dtd.1"><zonename="big-zone"zonepath="/export/big-zone"autoboot="true"><networkaddress="192.168.2.201"physical="hme0"/></zone>
Wow! 2.9Gb, pretty much most of Solaris 10. This zone resides on it's own slice, and can add many packages as though it was a separate system. Using inherit-pkg-dir as happened with small-zone can be great, but it's good to know we can do this as well.
Management
View or list all running zones
The zoneadm command can be used to list active or running zones.
To view a list and brief status information about running zones, use the following command from the global zone:
When you want to remove a non-global zone from your Solaris 10 installation, you'll need to follow the following steps.
If you want to completely remove a zone called 'testzone' from your system, login to the global zone and become root. The first command is the opposite of the 'install' option of zoneadm and deletes all of the files under the zonepath:
There is no undo, so make sure this is what you want to do before you do it.
Resource Control
Use cpu-shares to control zone computing resources
Although the Solaris 10 08/07 OS allows you to specify how many CPUs can be used in a zone, sometimes this does not work out well. For example, I use dedicated-cpu for three zones in an 8-core Sun Fire T2000 server. Each zone has 4-20 specified for ncpus with a different importance value. However, when the system is fully utilized, the importance value does not always play its role. Sometimes, a zone with a lower importance value consumes a higher percentage of the computing resources than a zone with higher importance.
In the following, I demonstrate that cpu-shares works well.
root@bigfoot#perl-e'while (--$ARGV[0] and fork) {}; while () {}'15&root@bigfoot#vmstat33kthrmemorypagediskfaults
cpu
rbwswapfreeremfpipofrdesrs1s2s3s4insy
csussyid
50037520616152498881023144061109413-0-0248696466259250149150038745928151513920500000100080632536610000150038745672151511360000000000073923432010000root@bigfoot#prstat-Z
ZONEIDNPROCSWAPRSSMEMORYTIMECPUZONE
065228M298M1.8%1:32:5540%global
155202M264M1.6%1:59:4830%bighead
247199M263M1.6%1:37:3229%bighand
root@bigfoot#prstat-Z
ZONEIDNPROCSWAPRSSMEMORYTIMECPUZONE
065228M298M1.8%1:19:1538%global
247199M263M1.6%1:27:3131%bighand
155202M264M1.6%1:48:2431%bighead
As we see, each zone is consuming a portion of the computing resources according to its cpu-shares value when the system's computing resources are fully utilized.
The swap property of capped-memory is virtual swap space, not physical swap space
For zone bighead running Oracle Database 10g Enterprise Edition with total memory of 2 Gbytes (1.5 Gbytes System Global Area [SGA] and 0.5 Gbytes Process Global area [PGA]), we might just give a maximum of 3 Gbytes memory and 1.5 Gbytes swap space, as follows:
So the swap here is not physical swap space. Based on Sun documents, swap here means the total amount of swap that can be consumed by user process address space mappings and tmpfs mounts for this zone. When we set up swap, the capped-memory swap should be set proportionately. For example:
I needed to add a second file system to one of my Solaris 10 zones this morning, and needed to do so without rebooting the zone. Since the global zone uses loopback mounts to present file systems to zones, adding a new file system was as easy as loopback mounting the file system into the zone's file system: