Tomcat: Setting up a Tomcat server
![]()
| Software version | 5.5/6/7 |
| Operating System | Debian 6 |
| Website | Tomcat Website |
| Last Update | 17/06/2013 |
Introduction
Apache Tomcat is a J2EE servlet container. Originating from the Jakarta project, Tomcat is now a main project of the Apache Foundation. Tomcat implements Sun Microsystems’ servlet and JSP specifications. It includes tools for configuration and management, but can also be configured by editing XML configuration files. Since Tomcat includes an internal HTTP server, it is also considered an HTTP server. Tomcat is also considered an application server.
Installation
As usual, on Debian, it’s very simple:
aptitude install tomcat5.5
If you get a message like this:
  Errors were encountered during execution:
 tomcat5.5
E: Sub-process /usr/bin/dpkg returned an error code (1)
Installation of package failed. Attempting to recover:
Setting up tomcat5.5 (5.5.20-2) ...
Starting Tomcat servlet engine: tomcat5.5invoke-rc.d: initscript tomcat5.5, action "start" failed.
dpkg: error processing tomcat5.5 (--configure):
 the post-installation script returned an exit status error code 1
Errors were encountered during execution:
 tomcat5.5
Press Enter to continue.
Then you’ll need to analyze the logs:
  > tail /var/lib/tomcat5.5/logs/catalina_`date +%Y-%m-%d`.log
The java-gcj-compat-dev environment currently doesn't support a security manager. Please check the TOMCAT5_SECURITY variable in /etc/default/tomcat5.5.
Using CATALINA_BASE:   /var/lib/tomcat5.5
Using CATALINA_HOME:   /usr/share/tomcat5.5
Using CATALINA_TMPDIR: /var/lib/tomcat5.5/temp
Using JRE_HOME:       /usr/lib/jvm/java-gcj
The java-gcj-compat-dev environment currently doesn't support a security manager. Please check the TOMCAT5_SECURITY variable in /etc/default/tomcat5.5.
I think that’s clear enough. We need to edit the /etc/default/tomcat5.5 file to replace:
TOMCAT5_SECURITY=yes
with:
TOMCAT5_SECURITY=no
Of course, this involves some risks (I won’t pretend to know what they are and haven’t had time to look into the issue). Now let’s restart the installation:
apt-get install tomcat5.5
And for those who want to install the admin tools:
apt-get install tomcat5.5-admin
Configuration
Tomcat is quite complex in its configuration. That’s why good explanations are always helpful1.
Modifying Tomcat Environment Variables
You may need to adjust Tomcat’s Xmx or Xms settings. Edit the file /etc/default/tomcat5.5:
  # Run Tomcat as this user ID. Not setting this or leaving it blank will use the
# default of tomcat55.
TOMCAT5_USER=tomcat55

# The home directory of the Java development kit (JDK). You need at least
# JDK version 1.4. If JAVA_HOME is not set, some common directories for
# the Sun JDK, various J2SE 1.4 versions, and the free runtimes
# java-gcj-compat-dev and kaffe are tried.
JAVA_HOME=/usr/lib/jvm/java-6-sun

# Directory for per-instance configuration files and webapps. It contain the
# directories conf, logs, webapps, work and temp. See RUNNING.txt for details.
# Default: /var/lib/tomcat5.5
#CATALINA_BASE=/var/lib/tomcat5.5

# Arguments to pass to the Java virtual machine (JVM).
JAVA_OPTS="-Djava.awt.headless=true -Xms512m -Xmx512m"

# Java compiler to use for translating JavaServer Pages (JSPs). You can use all
# compilers that are accepted by Ant's build.compiler property.
#JSP_COMPILER=jikes

# Use the Java security manager? (yes/no, default: yes)
# WARNING: Do not disable the security manager unless you understand
# the consequences!
# NOTE: java-gcj-compat-dev currently doesn't support a security
# manager.
TOMCAT5_SECURITY=no
For security reasons, uncomment the TOMCAT5_USER line as shown above.
Redirecting Logs
To redirect Tomcat logs, please follow this documentation.
Giving Access to Admin Interfaces
To access the manager and admin interfaces, you’ll need to edit the users configuration file:
  <?xml version='1.0' encoding='utf-8'?>
<tomcat-users>
<role rolename="manager"/>
<role rolename="tomcat"/>
<role rolename="admin"/>
<role rolename="role1"/>
<user username="tomcat" password="tomcat" roles="tomcat,manager,admin"/>
<user username="both" password="tomcat" roles="tomcat,role1"/>
<user username="role1" password="tomcat" roles="role1"/>
</tomcat-users>
Adapt it according to the logins and passwords you want to use.
You can then access via the following links (adapting as needed):
- manager: http://localhost:8180/manager/html
- admin: http://localhost:8180/admin
Changing the Java Version
To change the default Java version (version 6 in this example):
update-java-alternatives -s java-6-sun
Make sure you have this line in the tomcat default file:
  ...
JAVA_HOME=/usr/lib/jvm/java-6-sun
...
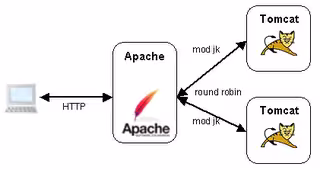
mod_jk
It’s sometimes useful to redirect Apache to Tomcat to simplify the URL for end users and allow Tomcat to not manage connections directly. You can also use mod_proxy (which is increasingly being used instead of mod_jk).
Install Apache and mod_jk:
aptitude install apache2 libapache2-mod-jk
Then edit the workers.properties file:
  workers.tomcat_home=/usr/share/tomcat6
workers.java_home=/usr/lib/jvm/default-java
ps=/
worker.list=ajp13_worker,jk-status,jk-manager,examples
worker.ajp13_worker.port=8009
worker.ajp13_worker.host=localhost
worker.ajp13_worker.type=ajp13
worker.examples.port=8009
worker.examples.host=localhost
worker.examples.type=ajp13
worker.jk-status.read_only=True
worker.jk-status.type=status
worker.jk-manager.type=status
#worker.ajp13_worker.lbfactor=1
#worker.loadbalancer.type=lb
#worker.loadbalancer.balance_workers=ajp13_worker
I’ve added ajp13 with the connector information. Now let’s uncomment it in the Tomcat configuration:
  [...]
<!-- Define an AJP 1.3 Connector on port 8009 -->
<Connector port="8009" protocol="AJP/1.3" redirectPort="8443" />
[...]
Restart Tomcat for this configuration to take effect. Now, let’s configure Apache:
  a2enmod mod_jk
touch /etc/apache2/mods-available/jk.conf
cd /etc/apache2/mods-enabled/
ln -s /etc/apache2/mods-available/jk.conf .
Then let’s edit this configuration file to tell it about the workers.properties file:
  <ifmodule mod_jk.c>
    JkWorkersFile   /etc/libapache2-mod-jk/workers.properties
    JkShmFile       /var/log/apache2/mod_jk.shm
    JkLogFile       /var/log/apache2/mod_jk.log
    JkLogLevel      info
</ifmodule>
Finally, let’s modify the VirtualHost to tell it to use mod_jk:
  <VirtualHost *:80>
	ServerAdmin webmaster@localhost

	DocumentRoot /var/www

	JkMountCopy	On
	JkMount		/docs/* ajp13_worker
	JkUnMount	/docs/*.gif ajp13_worker

        JkMount         /examples/* examples

        #JkMount         /jk-status/* jk-status
        <Location /jk-status/>
            JkMount jk-status
            Order deny,allow
            Deny from all
            Allow from 127.0.0.1
        </Location>

        #JkMount           /jk-manager/* jk-manager
        <Location /jk-manager/>
            JkMount jk-manager
            Order deny,allow
            Deny from all
            Allow from 127.0.0.1
        </Location>

	<Directory />
		Options FollowSymLinks
		AllowOverride None
	</Directory>
	<Directory /var/www/>
		Options Indexes FollowSymLinks MultiViews
		AllowOverride None
		Order allow,deny
		allow from all
	</Directory>

	ScriptAlias /cgi-bin/ /usr/lib/cgi-bin/
	<Directory "/usr/lib/cgi-bin">
		AllowOverride None
		Options +ExecCGI -MultiViews +SymLinksIfOwnerMatch
		Order allow,deny
		Allow from all
	</Directory>

	ErrorLog ${APACHE_LOG_DIR}/error.log

	# Possible values include: debug, info, notice, warn, error, crit,
	# alert, emerg.
	LogLevel warn

	CustomLog ${APACHE_LOG_DIR}/access.log combined
</VirtualHost>
Now you can access:
- Your Tomcat documentation via Apache http://server/docs/
- The status: http://server/jk-status/
- The manager: http://server/jk-manager/
You also have access to the read-only status and the manager. I’ve left some commented lines in case you don’t want to use Apache Locations.
Advanced Configuration
Load Balancing
It’s essential to master mod_jk before continuing. Load balancing allows distributing load in Round Robin fashion across multiple Tomcat servers.
For this, you need 2 Tomcat servers. On each of them, edit the server.xml file and add the jvmRoute directive:
<Engine name="Catalina" defaultHost="localhost" jvmRoute="worker1"></Engine>
I’ve set worker1 on my first server and worker2 on my second server. Then edit this file to configure the workers and the load balancer:
  workers.tomcat_home=/usr/share/tomcat6
workers.java_home=/usr/lib/jvm/default-java
ps=/

# Worker list
worker.list=loadbalancer,jk-status,jk-manager

# Tomcat Status & Manager
worker.jk-status.read_only=True
worker.jk-status.type=status
worker.jk-manager.type=status

# Worker 1
worker.worker1.port=8009
worker.worker1.host=server1
worker.worker1.type=ajp13
worker.worker1.lbfactor=1

# Worker 2
worker.worker2.port=18009
worker.worker2.host=server2
worker.worker2.type=ajp13
worker.worker2.lbfactor=1

# Load Balancer
worker.loadbalancer.type=lb
worker.loadbalancer.balance_workers=worker1, worker2
worker.loadbalancer.sticky_session=True
Now we just need to configure Apache to point to the right Worker, which is actually the load balancer:
  <VirtualHost *:80>
        ServerAdmin webmaster@localhost
        DocumentRoot /var/www
        JkMountCopy    On
        JkMount         /demo/* loadbalancer
Restart Apache and Tomcat.
Download this file, extract it and add it to your 2 Tomcat instances. Now the demo page is accessible in load-balanced mode at http://server-apache/demo/jsp/test.jsp. You’ll get something like this:
  date of the day: Tue Nov 06 13:46:19 CET 2012
param message: null
session ID: C706F51B9ACAB96A10CCDACCADEA9026
node: /var/lib/tomcat6
List object in session:
Try stopping one Tomcat server and you’ll see it switch to the other :-)
Let’s use the manager interface to see the status of your servers: http://server-apache/jk-manager/:

You can see here that the Tomcat servers are enabled and functional. If one of them goes down, it will show an ‘ERR’ error. You’ll then need to click on the ‘R’ hyperlink to reset its status. The load balancer will accept sending requests to it again. There’s also another menu that allows you to properly take a Tomcat node out of service by clicking on ‘Edit this attribute for all members: Activation’:
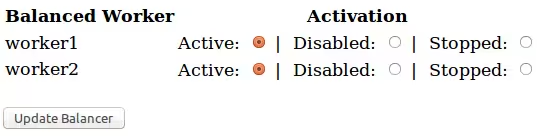
Then update the states by clicking on the ‘Update balancer’ button.
Clustering
To set up clustering2, you’ll normally need Load Balancing. With clustering, you can share your application sessions across Tomcat servers. The advantage is that if you lose one machine, the sessions will be present on other machines and the user won’t notice anything. Of course, the applications in question must be developed to handle this kind of mechanism.
To test session replication, add this small application that will allow you to test sessions, download this file.
To set up clustering, edit the following file and add this line just before the end:
  [...]
   <distributable />
</web-app>
Then let’s edit the server section and add a cluster block in the Engine section:
  [...]
    <!-- You should set jvmRoute to support load-balancing via AJP ie:
    <Engine name="Catalina" defaultHost="localhost" jvmRoute="jvm1">
    -->
    <Engine name="Catalina1" defaultHost="localhost" jvmRoute="worker2">
      <!--For clustering, please take a look at documentation at:
          /docs/cluster-howto.html  (simple how to)
          /docs/config/cluster.html (reference documentation) -->
      <!--
      <Cluster className="org.apache.catalina.ha.tcp.SimpleTcpCluster"/>
      -->
        <Cluster className="org.apache.catalina.ha.tcp.SimpleTcpCluster" channelSendOptions="8">

            <Manager className="org.apache.catalina.ha.session.DeltaManager"                  expireSessionsOnShutdown="false"
                  notifyListenersOnReplication="true"/>

            <Channel className="org.apache.catalina.tribes.group.GroupChannel">

                <Membership className="org.apache.catalina.tribes.membership.McastService"
                        address="228.0.0.4"
                        port="45564"
                        frequency="1000"
                        dropTime="30000" />

                <Receiver className="org.apache.catalina.tribes.transport.nio.NioReceiver"
                      address="auto"
                      port="4000"
                      autoBind="100"
                      selectorTimeout="5000"
                      maxThreads="6" />

                <Sender className="org.apache.catalina.tribes.transport.ReplicationTransmitter">
                    <Transport className="org.apache.catalina.tribes.transport.nio.PooledParallelSender" timeout="60000"/>
                </Sender>

                <Interceptor className="org.apache.catalina.tribes.group.interceptors.TcpFailureDetector"/>
                <Interceptor className="org.apache.catalina.tribes.group.interceptors.MessageDispatch15Interceptor"/>
            </Channel>

         <Valve className="org.apache.catalina.ha.tcp.ReplicationValve"
                filter=".*\.gif;.*\.js;.*\.jpg;.*\.htm;.*\.html;.*\.txt;" />

         <Deployer className="org.apache.catalina.ha.deploy.FarmWarDeployer"
                   tempDir="D:/cluster/temp/war-temp/"
                   deployDir="D:/cluster/temp/war-deploy/"
                   watchDir="D:/cluster/temp/war-listen/"
                   watchEnabled="false" />

         <ClusterListener className="org.apache.catalina.ha.session.ClusterSessionListener"/>
   </Cluster>
[...]
For the engine name, use different names for each node in the cluster. I won’t detail all the options here but leave you to check the resources of this page or the official site. Just know that this configuration allows multiple nodes and replicates sessions to all nodes (DeltaManager). It’s possible to do a simple backup by changing the className of the manager.
Restart your Tomcat servers, which will synchronize with each other via multicast. To test, use your load balancer to open this URL: http://tomcat-lb/clustertest/jsp/myjsp.jsp. And then? Well, it’s simple, you’ll see something like this:
  date of the day: Sat Nov 17 21:33:58 CET 2012
param message: null
session ID: E7FFB32D3EDEF512C118ACDCC7FB4255.worker2
node: /var/www/tomcat7
List object in session:
Do a SIGKILL (kill -9) on the worker2 instance. The load balancer will do its job of routing all connections to another worker and the session number (session ID) will be identical. It won’t have changed even though you’ve switched servers :-)
Creating a Context
What’s the use of creating a context? Well, for example, to connect to a MySQL database via the JDBC connector. To create a context for a database:
  <Context path="/mon_appli" docBase="mon_appli">
    <Resource name="jdbc/test" auth="Container" type="javax.sql.DataSource" username="user" password="password" driverClassName="com.mysql.jdbc.Driver" url="jdbc:mysql://localhost:3306/database" maxActive="8" maxIdle="4"/>
</Context>
Monitoring
We’ll look at two solutions for monitoring your Tomcat server: one via URL and another by opening a port.
JMXproxy
For this solution, simply give a user the right to query via JMX URLs:
  [...]
  <role rolename="manager-jmx"/>
  <user username="tomcat" password="tomcat" roles="tomcat,admin,manager,manager-jmx"/>
[...]
Now, the tomcat user can query like this: http://tomcat:18080/manager/jmxproxy/?qry=:
This will give me a ton of lines:
  OK - Number of results: 170

Name: Catalina:j2eeType=Servlet,name=HelloWorldExample,WebModule=//localhost/demo,J2EEApplication=none,J2EEServer=none
modelerType: org.apache.catalina.mbeans.ContainerMBean
minTime: 9223372036854775807
countAllocated: 0
eventProvider: false
statisticsProvider: false
objectName: Catalina:j2eeType=Servlet,name=HelloWorldExample,WebModule=//localhost/demo,J2EEApplication=none,J2EEServer=none
processingTime: 0
errorCount: 0
maxTime: 0
available: 0
asyncSupported: false
backgroundProcessorDelay: -1
loadOnStartup: -1
maxInstances: 20
stateName: STARTED
[...]
You can refine the query at the URL level to avoid having pages and pages of information.
JMX
For this solution, we’ll tell Tomcat to listen on a specific port to be able to query it via JMX:
  [...]
JAVA_OPTS="-Djava.awt.headless=true -Xmx128m -XX:+UseConcMarkSweepGC"
JAVA_OPTS="$JAVA_OPTS -Dcom.sun.management.jmxremote.port=9003"
JAVA_OPTS="$JAVA_OPTS -Dcom.sun.management.jmxremote.password.file=/etc/tomcat6/jmxremote.password"
JAVA_OPTS="$JAVA_OPTS -Dcom.sun.management.jmxremote.access.file=/etc/tomcat6/jmxremote.access"
JAVA_OPTS="$JAVA_OPTS -Dcom.sun.management.jmxremote.ssl=false
JAVA_OPTS="$JAVA_OPTS -Dcom.sun.management.jmxremote.authenticate=false
JAVA_OPTS="$JAVA_OPTS -Djava.rmi.server.hostname="x.x.x.x"
[...]
If you have a firewall between your equipment, you may need to add this configuration:
<Listener className="org.apache.catalina.mbeans.JmxRemoteLifecycleListener" rmiRegistryPortPlatform="10001" rmiServerPortPlatform="10002" />
We add a file with the list of users and their passwords:
[user] [password]
And another for permissions:
  [user] readwrite
[user] readonly
And finally we set the correct permissions:
  chmod 600 /etc/tomcat6/jmxremote.access
chmod 600 /etc/tomcat6/jmxremote.password
chown tomcat6:tomcat6 /etc/tomcat6/jmxremote.access
chown tomcat6:tomcat6 /etc/tomcat6/jmxremote.password
Restart Tomcat for the changes to take effect. You can now connect via VisualVM for example to monitor or profile your Tomcat.
FAQ
Stop Problem on a VServer
Tomcat can have problems stopping on a vserver. Since I haven’t found the solution, I set the service to load last at boot and shutdown to prevent it from blocking the shutdown of other services:
  update-rc.d -f tomcat5.5 remove
update-rc.d tomcat5.5 defaults 99
Resources
Last updated 17 Jun 2013, 12:29 CEST.