Slony-I: Database Replication for PostgreSQL
Introduction
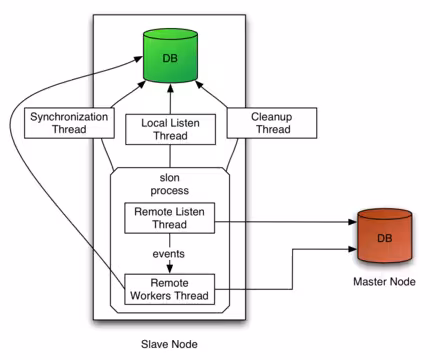
Slony-I enables advanced database replication capabilities. The downside is that it’s not simple to set up the first time. People who have previously configured DB replications will find it easier to succeed.
According to Slony’s documentation, it’s not recommended to replicate across a WAN, as the slon daemon (replication daemon) is very fragile and may leave a database in a zombie state, and won’t die for up to 2 hours.
Installation
Here’s how to install Slony-I for PostgreSQL 8.2:
apt-get install postgresql-8.2-slony1 slony1-bin postgresql-contrib-8.2
Edit your hosts file on your nodes and add:
  192.168.0.87    deb-node1
192.168.0.88    deb-node2
We have set the IP address first followed by the hostnames associated with the IPs.
Preparation
Environment
You need to set up some environment variables for your postgres user. Insert them in your shell configuration file (e.g. ~/.profile):
  export CLUSTERNAME=slony_example
export MASTERDBNAME=pgbench
export SLAVEDBNAME=pgbenchslave
export MASTERHOST=localhost
export SLAVEHOST=localhost
export REPLICATIONUSER=pgsql
export PGBENCHUSER=pgbench
PATH=$PATH:/usr/lib/postgresql/8.2/bin/
Users
For flexibility rather than security, we’ll create a “replicationuser” with super-user rights. Create this user on all your PostgreSQL servers:
  createuser -A -D $PGBENCHUSER
createuser -A -D $PGBENCHUSER -h $SLAVEHOST
createuser -s $REPLICATIONUSER
createuser -s $REPLICATIONUSER -h $SLAVEHOST
If it doesn’t prompt you to change passwords, make sure to do it for the users:
  psql -d template1 -c "alter user $PGBENCHUSER with password 'password'"
psql -d template1 -c "alter user $PGBENCHUSER with password 'password'" -h $SLAVEHOST
psql -d template1 -c "alter user $REPLICATIONUSER with password 'password'"
psql -d template1 -c "alter user $REPLICATIONUSER with password 'password'" -h $SLAVEHOST
Creating the Databases
From now on, if you encounter password problems, add the following to your commands:
-P password
Next, let’s prepare the databases:
  createdb -O $PGBENCHUSER -h $MASTERHOST $MASTERDBNAME
createdb -O $PGBENCHUSER -h $SLAVEHOST $SLAVEDBNAME
Creating databases for Slony:
pgbench -i -s 1 -U $PGBENCHUSER -h $MASTERHOST $MASTERDBNAME
If some lines fail, check your permissions (/etc/postgresql/8.2/main/pg_hba.conf) and ensure that PostgreSQL is not bound to localhost only.
You need to have the pl/pgSQL procedural language installed, then:
createlang -h $MASTERHOST plpgsql $MASTERDBNAME
Slony does not automatically import databases when a slave enters the cluster. We need to import them manually:
pg_dump -s -U $REPLICATIONUSER -h $MASTERHOST $MASTERDBNAME | psql -U $REPLICATIONUSER -h $SLAVEHOST $SLAVEDBNAME
Test Data Population
To illustrate how Slony-I performs real-time replication, we’ll run pgbench (launch in a separate window):
pgbench -s 1 -c 5 -t 1000 -U $PGBENCHUSER -h $MASTERHOST $MASTERDBNAME
This command will run pgbench 5 times, creating 1000 transactions on the database with $PGBENCHUSER.
Configuration
Slonik is a utility that allows scripting to facilitate Slony administration. You can create tables, register procedures, etc.
Configuration Script
Here’s a script (script-initilization.sh) that will create the initial connection. Edit it according to your needs (add passwords if needed):
  #!/bin/sh

slonik <<_EOF_
	#--
	# define the namespace the replication system uses in our example it is
	# slony_example
	#--
	cluster name = $CLUSTERNAME;

	#--
	# admin conninfo's are used by slonik to connect to the nodes one for each
	# node on each side of the cluster, the syntax is that of PQconnectdb in
	# the C-API
	# --
	node 1 admin conninfo = 'dbname=$MASTERDBNAME host=$MASTERHOST user=$REPLICATIONUSER';
	node 2 admin conninfo = 'dbname=$SLAVEDBNAME host=$SLAVEHOST user=$REPLICATIONUSER';

	#--
	# init the first node.  Its id MUST be 1.  This creates the schema
	# _$CLUSTERNAME containing all replication system specific database
	# objects.

	#--
	init cluster ( id=1, comment = 'Master Node');

	#--
	# Because the history table does not have a primary key or other unique
	# constraint that could be used to identify a row, we need to add one.
	# The following command adds a bigint column named
	# _Slony-I_$CLUSTERNAME_rowID to the table.  It will have a default value
	# of nextval('_$CLUSTERNAME.s1_rowid_seq'), and have UNIQUE and NOT NULL
	# constraints applied.  All existing rows will be initialized with a
	# number
	#--
	table add key (node id = 1, fully qualified name = 'public.history');

	#--
	# Slony-I organizes tables into sets.  The smallest unit a node can
	# subscribe is a set.  The following commands create one set containing
	# all 4 pgbench tables.  The master or origin of the set is node 1.
	#--
	create set (id=1, origin=1, comment='All pgbench tables');
	set add table (set id=1, origin=1, id=1, fully qualified name = 'public.accounts', comment='accounts table');
	set add table (set id=1, origin=1, id=2, fully qualified name = 'public.branches', comment='branches table');
	set add table (set id=1, origin=1, id=3, fully qualified name = 'public.tellers', comment='tellers table');
	set add table (set id=1, origin=1, id=4, fully qualified name = 'public.history', comment='history table', key = serial);

	#--
	# Create the second node (the slave) tell the 2 nodes how to connect to
	# each other and how they should listen for events.
	#--

	store node (id=2, comment = 'Slave node');
	store path (server = 1, client = 2, conninfo='dbname=$MASTERDBNAME host=$MASTERHOST user=$REPLICATIONUSER');
	store path (server = 2, client = 1, conninfo='dbname=$SLAVEDBNAME host=$SLAVEHOST user=$REPLICATIONUSER');
	store listen (origin=1, provider = 1, receiver =2);
	store listen (origin=2, provider = 2, receiver =1);
_EOF_
Make it executable and run it:
  chmod 755 script-initilization.sh
./script-initilization.sh
Altperl Scripts
Now let’s copy the Slony configuration file:
  cd /usr/share/doc/slony1-bin/examples/
gzip -d slon_tools.conf-sample.gz
cp slon_tools.conf-sample /etc/slony1/slon_tools.conf
Modify this file according to your needs. Then initialize the cluster:
slonik_init_cluster | slonik
Start slon on both nodes:
  slon_start 1 # On node 1
slon_start 2 # On node 2
Create sets:
slonik_create_set 1
Register the second node (1 = set ID, 2 = node ID):
slonik_subscribe_set 2 | slonik
Synchronization
To start synchronization (not database replication yet), run these commands on the appropriate nodes:
  slon $CLUSTERNAME "dbname=$MASTERDBNAME user=$REPLICATIONUSER host=$MASTERHOST" & # Run on the master
slon $CLUSTERNAME "dbname=$SLAVEDBNAME user=$REPLICATIONUSER host=$SLAVEHOST" & # Run on the slave
Add password=password inside the quotes if you get a password error (e.g., slon $CLUSTERNAME "dbname=$MASTERDBNAME user=$REPLICATIONUSER host=$MASTERHOST password=password").
You should now see many diagnostic messages. You can see the synchronization between nodes.
Replication
Now let’s replicate tables from node 1 to node 2:
  #!/bin/sh
slonik <<_EOF_
	 # ----
	 # This defines which namespace the replication system uses
	 # ----
	 cluster name = $CLUSTERNAME;

	 # ----
	 # Admin conninfo's are used by the slonik program to connect
	 # to the node databases.  So these are the PQconnectdb arguments
	 # that connect from the administrators workstation (where
	 # slonik is executed).
	 # ----
	 node 1 admin conninfo = 'dbname=$MASTERDBNAME host=$MASTERHOST user=$REPLICATIONUSER';
	 node 2 admin conninfo = 'dbname=$SLAVEDBNAME host=$SLAVEHOST user=$REPLICATIONUSER';

	 # ----
	 # Node 2 subscribes set 1
	 # ----
	 subscribe set ( id = 1, provider = 1, receiver = 2, forward = no);
_EOF_
As with the script above, set the permissions and run it.
An initial replication will occur at a given moment (when the script is launched). At the end of the first replication, logs will be analyzed to check for any changes between the start time and the end of replication to catch up. Then those changes will be updated as well. After that, analyses for replication happen about once every 10 seconds (depending on the load of the machines).
Now we have our two identical databases!
Verification
We can verify using this script. It will dump both databases and compare them:
  #!/bin/sh
echo -n "**** comparing sample1 ... "
psql -U $REPLICATIONUSER -h $MASTERHOST $MASTERDBNAME >dump.tmp.1.$$ <<_EOF_
	 select 'accounts:'::text, aid, bid, abalance, filler
		  from accounts order by aid;
	 select 'branches:'::text, bid, bbalance, filler
		  from branches order by bid;
	 select 'tellers:'::text, tid, bid, tbalance, filler
		  from tellers order by tid;
	 select 'history:'::text, tid, bid, aid, delta, mtime, filler,
		  "_Slony-I_${CLUSTERNAME}_rowID"
		  from history order by "_Slony-I_${CLUSTERNAME}_rowID";
_EOF_
psql -U $REPLICATIONUSER -h $SLAVEHOST $SLAVEDBNAME >dump.tmp.2.$$ <<_EOF_
	 select 'accounts:'::text, aid, bid, abalance, filler
		  from accounts order by aid;
	 select 'branches:'::text, bid, bbalance, filler
		  from branches order by bid;
	 select 'tellers:'::text, tid, bid, tbalance, filler
		  from tellers order by tid;
	 select 'history:'::text, tid, bid, aid, delta, mtime, filler,
		  "_Slony-I_${CLUSTERNAME}_rowID"
		  from history order by "_Slony-I_${CLUSTERNAME}_rowID";
_EOF_

if diff dump.tmp.1.$$ dump.tmp.2.$$ >$CLUSTERNAME.diff ; then
	 echo "success - databases are equal."
	 rm dump.tmp.?.$$
	 rm $CLUSTERNAME.diff
else
	 echo "FAILED - see $CLUSTERNAME.diff for database differences"
fi
Adding a New Node
 –>
–>
Here’s an example of the .profile for the 3rd node to add:
  export CLUSTERNAME=slony_example
export MASTERDBNAME=pgbench
export SLAVEDBNAME=pgbenchslave
export MASTERHOST=localhost
export SLAVEHOST=localhost
export SLAVE2HOST=localhost
export REPLICATIONUSER=pgsql
export PGBENCHUSER=pgbench
PATH=$PATH:/usr/lib/postgresql/8.2/bin/
Replicate your slony configuration file:
scp /etc/slony1/slon_tools.conf deb-node3:/etc/slony1/slon_tools.conf
Let’s create what’s needed (as we did above):
  createuser -A -D $PGBENCHUSER -h $SLAVE2HOST
createuser -s $REPLICATIONUSER -h $SLAVE2HOST
psql -d template1 -c "alter user $PGBENCHUSER with password 'password'" -h $SLAVE2HOST
psql -d template1 -c "alter user $REPLICATIONUSER with password 'password'" -h $SLAVE2HOST
createdb -O $PGBENCHUSER -h $SLAVE2HOST $SLAVEDBNAME
pg_dump -s -U $REPLICATIONUSER -h $MASTERHOST $MASTERDBNAME | psql -U $REPLICATIONUSER -h $SLAVE2HOST $SLAVEDBNAME
Then create and execute this script (adapting it to your needs):
  #!/bin/sh
slonik << _END_
#
# Define cluster namespace and node connection information
#
cluster name = $CLUSTERNAME;
node 1 admin conninfo = 'dbname=$MASTERDBNAME host=$MASTERHOST port=5434 user=$REPLICATIONUSER';
node 2 admin conninfo = 'dbname=$SLAVEDBNAME host=$SLAVEHOST port=5430 user=$REPLICATIONUSER';
node 3 admin conninfo = 'dbname=$SLAVEDBNAME host=$SLAVE2HOST port=5430 user=$REPLICATIONUSER';
echo 'Cluster defined, nodes identified';

#
# Initialize the cluster and create the second node
#
store node (id=3, comment='Slave2 Node');

#
# create paths
#
store path (server=1, client=3, conninfo='dbname=$MASTERDBNAME host=$MASTERHOST port=5434 user=$REPLICATIONUSER');
store path (server=2, client=3, conninfo='dbname=$MASTERDBNAME host=$SLAVEHOST port=5430 user=$REPLICATIONUSER');
store path (server=3, client=1, conninfo='dbname=$SLAVEDBNAME host=$SLAVE2HOST port=5430 user=$REPLICATIONUSER');
store path (server=3, client=2, conninfo='dbname=$SLAVEDBNAME host=$SLAVE2HOST port=5430 user=$REPLICATIONUSER');

#
# Enable listening along each path
#
store listen (origin=1, receiver=3, provider=1);
store listen (origin=3, receiver=1, provider=3);
store listen (origin=2, receiver=3, provider=1);
store listen (origin=3, receiver=2, provider=1);

_END_
Now, we can start the Slon synchronization:
slon $CLUSTERNAME "dbname=$SLAVEDBNAME host=$SLAVE2HOST port=5430 user=$REPLICATIONUSER" & # Run on the 3rd node
Replication should now be operating. Create another script:
  #!/bin/sh
slonik << _END_
#
# Define cluster namespace and node connection information
#
cluster name = $CLUSTERNAME;
node 1 admin conninfo = 'dbname=$MASTERDBNAME host=$MASTERHOST port=5434 user=$REPLICATIONUSER';
node 2 admin conninfo = 'dbname=$MASTERDBNAME host=$SLAVEHOST port=5430 user=$REPLICATIONUSER';
node 3 admin conninfo = 'dbname=$SLAVEDBNAME host=$SLAVE2HOST port=5430 user=$REPLICATIONUSER';

subscribe set (id=1, provider=1, receiver=3, forward=yes);

_END_
The data verification is ensured at this point!
High Availability
Promoting a Replica
Promoting the replica is useful when you have multiple nodes to perform maintenance on the Master, for example.
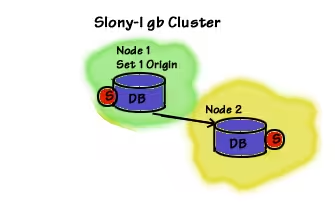
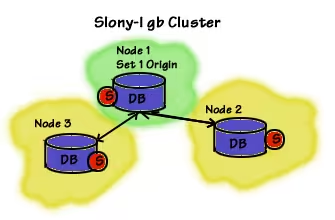
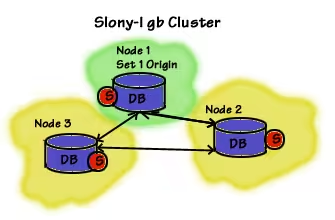
In this example, node 1 is the origin of set 1, sending set 1 information to node 2. When you add the 3rd node, you register it to set table 1. The set table is then sent to both other nodes.
Now the goal is to change the master. So node 3 gets information from node 2 rather than from node 1.
Node 3 must obviously have nodes 1 and 2 as masters in the information set. Node 2 then becomes master, because you subscribed node 2 to set table 1, and you also activated it as a forwarder of set table 1.
Fortunately, there is a direct link between nodes 2 and 3 for replication. Once node 1 is ready for reintegration, you need to change node 1’s registration to slave rather than master.
  #! /bin/bash
#
# varlena Slony Initialization
# ==============================
slonik << _END_

cluster name =$CLUSTERNAME;

node 1 admin conninfo = 'dbname=$MASTERDBNAME host=$MASTERHOST port=5434 user=$REPLICATIONUSER';
node 2 admin conninfo = 'dbname=$SLAVEDBNAME host=$SLAVEHOST port=5430 user=$REPLICATIONUSER';
node 3 admin conninfo = 'dbname=$SLAVEDBNAME host=$SLAVE2HOST port=5430 user=$REPLICATIONUSER';
# ==============================

store listen (origin=3, receiver=2, provider=3);
store listen (origin=2, receiver=3, provider=2);

subscribe set ( id=1, provider=2, receiver=3, forward=yes);

_END_
Master Change
Here, we’ll upgrade the PostgreSQL version of our master. We’ll need to switch our master to another node using the “fast upgrade using master promotion” method.
Before deciding to switch the master, you must establish a plan for switching your applications. You’ll likely need to change your PostgreSQL database address, unless you’re using virtual IPs in a cluster environment.
Another precaution: work with test database copies before moving to production. Remember that replicas are read-only! And one last thing, back up your databases before any major operations!!!
Each state in a Slony replication occurs because there’s a new element. Important events are SYNC events, and they are synchronized to each registered node. Logs are also transmitted to nodes that accept forwarding to resynchronize the old master if needed.
To change the master set, you must be sure they can replicate properly from the new master. But before switching, sets must be locked from all modifications. Then you can move the set. Finally, the new master must register at the set level.
WARNING: Before running the script, make sure write permissions on the master database are disabled!!!
  #!/bin/sh

slonik << _EOF_

cluster name = $CLUSTERNAME;
node 1 admin conninfo = 'dbname=$MASTERDBNAME host=$MASTERHOST port=5434 user=$REPLICATIONUSER';
node 2 admin conninfo = 'dbname=$SLAVEDBNAME host=$SLAVEHOST port=5430 user=$REPLICATIONUSER';
node 3 admin conninfo = 'dbname=$SLAVEDBNAME host=$SLAVE2HOST port=5430 user=$REPLICATIONUSER';

# add listener paths if required

#
# lock and move set
#
lock set (id=1, origin=1);
move set (id=1, old origin=1, new origin=2);

# subscribe set if required
subscribe set (id=1, provider=2, receiver=1, forward=yes);

_EOF_
Failover
Failover cannot be done with Slony alone. You need a Cluster that will manage virtual IPs such as heartbeat 1 or heartbeat 2 for the more adventurous.

When configuring the cluster, assign a virtual IP and the init script. Here’s what you need to promote a slave to master:
  #!/bin/sh

 slonik <<_EOF_

 cluster name = $CLUSTERNAME;
 node 1 admin conninfo = 'dbname=$MASTERDBNAME host=$MASTERHOST port=5434 user=$REPLICATIONUSER';
 node 2 admin conninfo = 'dbname=$SLAVEDBNAME host=$SLAVEHOST port=5430 user=$REPLICATIONUSER';
 node 3 admin conninfo = 'dbname=$SLAVEDBNAME host=$SLAVE2HOST port=5430 user=$REPLICATIONUSER';

 failover (id=2, backup node = 1);

 _EOF_
Reference
Documentation Building and configuration of Slony
Documentation Introducing Slony
Documentation on integration of Slony with PostgreSQL
Last updated 30 Aug 2007, 13:47 CEST.