Satellite: Deploying Red Hat OS via Red Hat Satellite
| Software version | 5.4.1 |
| Operating System | RHEL 6.2 |
| Website | Red Hat Website |
| Last Update | 22/06/2012 |
Introduction
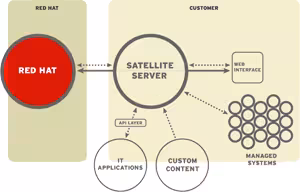
A Red Hat Satellite server is a solution that allows you to automatically deploy Red Hat OS via PXE/DHCP. You can then manage different installation profiles, manage updates, and perform a variety of simplified administrative tasks.
If you don’t have the money or simply want to create a lab, you can use its free equivalent: Spacewalk (hence the logo).
Prerequisites
Have a local Red Hat DVD repository or direct access to the RHN (this is ideal, as you’ll need it anyway).
Packages
Before starting, we need to verify that we have installed the necessary components:
  yum groupinstall base
yum install syslinux
- Base: minimum required for Satellite installation
- syslinux: necessary for PXE
Hostname
Make sure to properly set the hostname and associated IP (adapt to your configuration):
  echo "x.x.x.x     satellite-master.deimos.fr satellite-master" >> /etc/hosts
echo "satellite-master.deimos.fr" > /proc/sys/kernel/hostname
service network restart
Disable SELinux
For the installation, the simplest approach is to temporarily disable the SELinux service:
setenforce 0
It is then recommended to leave it disabled (see the documentation for persistence)
Sysctl
Let’s enable IP forwarding:
  echo "net.ipv4.ip_forward=1" >> /etc/sysctl.conf
sysctl -p
DNS
Make sure that all future clients (as well as the server) have access to the DNS server!!! In our case, the server will be called ‘satellite-master’, and it’s very important that it remains accessible by any server with this name, otherwise PXE will not work.
Installation
Satellite Master
To install it, it’s quite simple - there’s an installer that does everything. However, you’ll need the Red Hat DVD for dependencies (I recommend a local repository), and to copy the Satellite installer locally (/home/sat in my case).
Note: use the ‘–disconnected’ option if you are behind a proxy during installation.
Then we’ll simply launch the installation:
  > /home/sat/install.pl
* Starting the Red Hat Network Satellite installer.
* Performing pre-install checks.
* Pre-install checks complete.  Beginning installation.
* RHN Registration.
** Registration: Disconnected mode.  Not registering with RHN.
* Checking for uninstalled prerequisites.
** Checking if yum is available ...
There are some packages from Red Hat Enterprise Linux that are not part
of the @base group that Satellite will require to be installed on this
system. The installer will try resolve the dependencies automatically.
However, you may want to install these prerequisites manually.
Do you want the installer to resolve dependencies [y/N]? y
We answer ‘y’ to this question so it installs the necessary packages automatically.
We’ll wait a bit and then provide the email and certificate:
  * Applying updates.
* Installing RHN packages.
Warning: more packages were installed by yum than expected:
        cdparanoia-libs
        cups
        cvs
        foomatic
        foomatic-db
        foomatic-db-filesystem
        foomatic-db-ppds
        gdb
        gettext
        ghostscript
        ghostscript-fonts
        gstreamer
        gstreamer-plugins-base
        gstreamer-tools
        iso-codes
        java-1.5.0-gcj
        java_cup
        lcms-libs
        libICE
        libSM
        libXfont
        libXt
        libXv
        libXxf86vm
        libfontenc
        libgomp
        libmng
        libogg
        liboil
        libtheora
        libvisual
        libvorbis
        mailcap
        make
        mesa-dri-drivers
        mesa-libGL
        mesa-libGLU
        openjpeg-libs
        patch
        pax
        perl-CGI
        perl-Compress-Raw-Zlib
        perl-Error
        perl-ExtUtils-MakeMaker
        perl-ExtUtils-ParseXS
        perl-IO-Compress-Base
        perl-IO-Compress-Zlib
        perl-Test-Harness
        perl-Test-Simple
        perl-YAML-Syck
        perl-devel
        phonon-backend-gstreamer
        poppler
        poppler-data
        poppler-utils
        portreserve
        python-setuptools
        qt
        qt-sqlite
        qt-x11
        qt3
        redhat-lsb
        redhat-lsb-graphics
        redhat-lsb-printing
        sinjdoc
        urw-fonts
        xml-common
        xorg-x11-font-utils
Warning: yum did not install the following packages:
        libXpm
* Now running spacewalk-setup.
* Setting up Oracle environment.
* Setting up database.
** Database: Installing the database:
** Database: This is a long process that is logged in:
** Database:   /var/log/rhn/install_db.log
*** Progress: ############################
** Database: Installation complete.
** Database: Setting up database connection for Oracle backend.
** Database: Testing database connection.
** Database: Populating database.
*** Progress: #########################################################
* Setting up users and groups.
** GPG: Initializing GPG and importing key.
** GPG: Creating /root/.gnupg directory
You must enter an email address.
Admin Email Address? deimos@deimos.fr
* Performing initial configuration.
* Activating RHN Satellite.
Where is your satellite certificate file? /root/deimos.cert
We’ll answer ‘y’ to this question:
  ** Loading RHN Satellite Certificate.
** Verifying certificate locally.
** Activating RHN Satellite.
* Enabling Monitoring.
* Configuring apache SSL virtual host.
Should setup configure apache's default ssl server for you (saves original ssl.conf) [Y]? y
Enter a password for the certificate:
  ** /etc/httpd/conf.d/ssl.conf has been backed up to ssl.conf-swsave
* Configuring tomcat.
** /etc/tomcat6/tomcat6.conf has been backed up to tomcat6.conf-swsave
** /etc/tomcat6/server.xml has been backed up to server.xml-swsave
** /etc/tomcat6/web.xml has been backed up to web.xml-swsave
* Configuring jabberd.
* Creating SSL certificates.
CA certificate password?
Re-enter CA certificate password?
The certificate information:
  ** /etc/httpd/conf.d/ssl.conf has been backed up to ssl.conf-swsave
* Configuring tomcat.
** /etc/tomcat6/tomcat6.conf has been backed up to tomcat6.conf-swsave
** /etc/tomcat6/server.xml has been backed up to server.xml-swsave
** /etc/tomcat6/web.xml has been backed up to web.xml-swsave
* Configuring jabberd.
* Creating SSL certificates.
CA certificate password?
Re-enter CA certificate password?
Organization? deimos
Organization Unit [satellite-master.deimos.fr]?
Email Address [deimos@deimos.fr]?
City? Paris
State? IDF
Country code (Examples: "US", "JP", "IN", or type "?" to see a list)? FR
** SSL: Generating CA certificate.
** SSL: Deploying CA certificate.
** SSL: Generating server certific
** SSL: Storing SSL certificates.
* Deploying configuration files.
* Update configuration in database.
* Setting up Cobbler..
Cobbler requires tftp and xinetd services be turned on for PXE provisioning functionality. Enable these services [Y/n]?y
cobblerd does not appear to be running/accessible
* Restarting services.
Installation complete.
Visit https://satellite-master.deimos.fr to create the RHN Satellite administrator account.
And the installation is complete. Now let’s update yum to install 2 missing packages:
  > yum update
Loaded plugins: product-id, security, subscription-manager
Updating certificate-based repositories.
Setting up Update Process
Resolving Dependencies
--> Running transaction check
---> Package python-netaddr.noarch 0:0.7.5-3.el6 will be updated
---> Package python-netaddr.noarch 0:0.7.5-4.el6 will be an update
--> Finished Dependency Resolution

Dependencies Resolved

==============================================================================================================================================================================================================================================================================
 Package                                                               Arch                                                          Version                                                            Repository                                                       Size
==============================================================================================================================================================================================================================================================================
Updating:
 python-netaddr                                                        noarch                                                        0.7.5-4.el6                                                        dvd_repo                                                        1.0 M

Transaction Summary
==============================================================================================================================================================================================================================================================================
Upgrade       1 Package(s)

Total download size: 1.0 M
Is this ok [y/N]: y
Downloading Packages:
Running rpm_check_debug
Running Transaction Test
Transaction Test Succeeded
Running Transaction
Warning: RPMDB altered outside of yum.
  Updating   : python-netaddr-0.7.5-4.el6.noarch                                                                                                                                                                                                                          1/2
  Cleanup    : python-netaddr-0.7.5-3.el6.noarch                                                                                                                                                                                                                          2/2
Installed products updated.

Updated:
  python-netaddr.noarch 0:0.7.5-4.el6

Complete!
DHCP
We’re going to install a DHCP server to be able to push OS via PXE/TFTP (already done by the Satellite installer). If you already have a DHCP server, go directly to the configuration.
DHCP Installation
To install a DHCP server on Red Hat:
yum install dhcp
Before modifying the configuration, we’ll copy a standard configuration:
cp -f /usr/share/doc/dhcp-*/dhcpd.conf.sample /etc/dhcp/dhcpd.conf
DHCP Configuration
Edit the /etc/dhcp/dhcpd.conf file to add the desired configuration. Here I have 2 declared ranges. Each range has its own interface:
  # dhcpd.conf
#
# Sample configuration file for ISC dhcpd
#

# option definitions common to all supported networks...
option domain-name "deimos.fr";
option domain-name-servers ns1.deimos.fr, ns2.deimos.fr;

default-lease-time 600;
max-lease-time 7200;
# Use this to enble / disable dynamic dns updates globally.
ddns-update-style none;
allow booting;
allow bootp;
# If this DHCP server is the official DHCP server for the local
# network, the authoritative directive should be uncommented.
authoritative;

# Use this to send dhcp log messages to a different log file (you also
# have to hack syslog.conf to complete the redirection).
log-facility local7;

# No service will be given on this subnet, but declaring it helps the
# DHCP server to understand the network topology.

subnet 10.102.2.32 netmask 255.255.255.224 {
	option routers 10.102.2.63;
	option subnet-mask 255.255.255.224;
	option domain-name-servers 192.168.0.69;
	range 10.102.2.33 10.102.2.62;
	next-server 10.102.2.1;
	filename "pxelinux.0";
}

subnet 10.102.2.64 netmask 255.255.255.224 {
	option routers 10.102.2.65;
        option subnet-mask 255.255.255.224;
        option domain-name-servers 192.168.0.69;
        range 10.102.2.66 10.102.2.94;
        next-server 10.102.2.1;
        filename "pxelinux.0";
}
# This is a very basic subnet declaration.

#subnet 10.254.239.0 netmask 255.255.255.224 {
#  range 10.254.239.10 10.254.239.20;
#  option routers rtr-239-0-1.deimos.fr, rtr-239-0-2.deimos.fr;
#}

# This declaration allows BOOTP clients to get dynamic addresses,
# which we don't really recommend.

#subnet 10.254.239.32 netmask 255.255.255.224 {
#  range dynamic-bootp 10.254.239.40 10.254.239.60;
#  option broadcast-address 10.254.239.31;
#  option routers rtr-239-32-1.deimos.fr;
#}

# A slightly different configuration for an internal subnet.
#subnet 10.5.5.0 netmask 255.255.255.224 {
#  range 10.5.5.26 10.5.5.30;
#  option domain-name-servers ns1.internal.deimos.fr;
#  option domain-name "internal.deimos.fr";
#  option routers 10.5.5.1;
#  option broadcast-address 10.5.5.31;
#  default-lease-time 600;
#  max-lease-time 7200;
#}

# Hosts which require special configuration options can be listed in
# host statements.   If no address is specified, the address will be
# allocated dynamically (if possible), but the host-specific information
# will still come from the host declaration.

#host passacaglia {
#  hardware ethernet 0:0:c0:5d:bd:95;
#  filename "vmunix.passacaglia";
#  server-name "toccata.fugue.com";
#}

# Fixed IP addresses can also be specified for hosts.   These addresses
# should not also be listed as being available for dynamic assignment.
# Hosts for which fixed IP addresses have been specified can boot using
# BOOTP or DHCP.   Hosts for which no fixed address is specified can only
# be booted with DHCP, unless there is an address range on the subnet
# to which a BOOTP client is connected which has the dynamic-bootp flag
# set.

# You can declare a class of clients and then do address allocation
# based on that.   The example below shows a case where all clients
# in a certain class get addresses on the 10.17.224/24 subnet, and all
# other clients get addresses on the 10.0.29/24 subnet.

#class "foo" {
#  match if substring (option vendor-class-identifier, 0, 4) = "SUNW";
#}

#shared-network 224-29 {
#  subnet 10.17.224.0 netmask 255.255.255.0 {
#    option routers rtr-224.deimos.fr;
#  }
#  subnet 10.0.29.0 netmask 255.255.255.0 {
#    option routers rtr-29.deimos.fr;
#  }
#  pool {
#    allow members of "foo";
#    range 10.17.224.10 10.17.224.250;
#  }
#  pool {
#    deny members of "foo";
#    range 10.0.29.10 10.0.29.230;
#  }
#}
Then I’ll declare the interfaces on which the dhcpd service should listen:
  # Command line options here
DHCPDARGS="eth1 eth2";
As I mentioned above, I have one interface per range, so we’ll add the appropriate routes:
  ADDRESS1=10.102.2.32
NETMASK1=255.255.255.224
GATEWAY1=10.102.2.63
  ADDRESS2=10.102.2.64
NETMASK2=255.255.255.224
GATEWAY2=10.102.2.94
Then I restart the service:
service restart dhcpd
Configuration
Configuring the proxy on Satellite (Only for installation in disconnected mode)
If you installed with the ‘–disconnected’ option, you’ll need to edit the /etc/rhn/rhn.conf file to add or edit the following lines:
  server.satellite.rhn_parent = satellite.rhn.redhat.com
server.satellite.http_proxy = <hostname>:<port>
server.satellite.http_proxy_username = <username>
server.satellite.http_proxy_password = <password>
Obviously, you only use the last three lines if you are behind a proxy.
Then we need to reactivate the satellite in connected mode:
  > rhn-satellite-activate --rhn-cert=/root/deimos.cert
RHN_PARENT: satellite.rhn.redhat.com
Before going further, make sure your system is up to date using ‘yum update’.
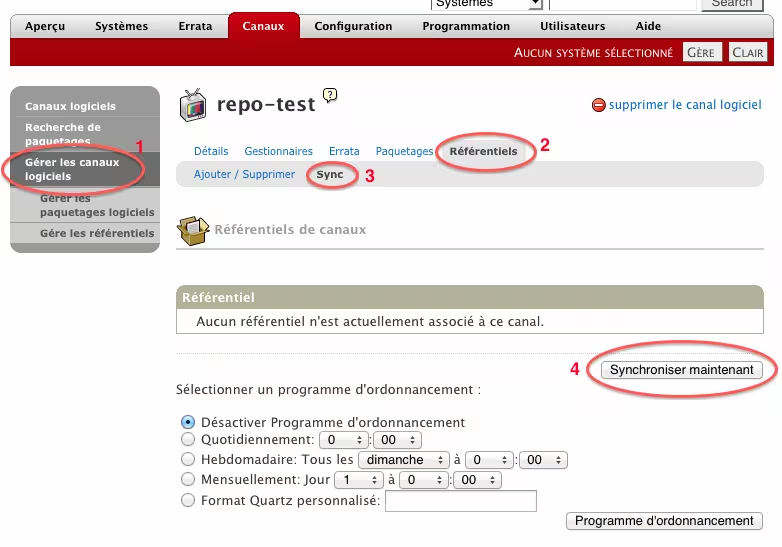
Synchronizing/Adding a repository locally
We’ll start one of the longest operations during Satellite installation, namely downloading repositories locally. For this, you have 2 methods:
Method 1
Download everything:
satellite-sync
Method 2
Download only certain Satellite versions: First, let’s display the available repositories:
  > satellite-sync -l
16:28:41 Red Hat Network Satellite - live synchronization
16:28:41    url: https://satellite.rhn.redhat.com
16:28:41    debug/output level: 1
16:28:42    db:  rhnsat/<password>@rhnsat
16:28:42
16:28:42 Retrieving / parsing channel-families data
16:28:46 channel-families data complete
16:28:48
16:28:48 Retrieving / parsing channel data
16:29:51    p = previously imported/synced channel
16:29:51    . = channel not yet imported/synced
16:29:51    base-channels:
16:29:51       . jb-middleware                               0
16:29:51       . jbdevstudio-1-linux                         0
...
16:29:59       . solaris-sparc-9-rhdirserv-7.1               0
16:29:59       . solaris-sparc-9-rhdirserv-7.1-beta          0
16:29:59       . solaris-sparc-9-rhdirserv-8                 0
16:29:59       . solaris-sparc-9-rhdirserv-8-beta            0
16:29:59
    Import complete:
        Begin time: Sat Feb 25 16:28:41 2012
        End time:   Sat Feb 25 16:29:59 2012
        Elapsed:    0 hours, 1 minutes, 17 seconds
And we’ll select the ones we’re interested in:
  > satellite-sync -c rhel-x86_64-server-6 -c rhn-tools-rhel-x86_64-server-6 -c rhel-x86_64-server-5 -c rhn-tools-rhel-x86_64-server-5
11:47:15 Red Hat Network Satellite - live synchronization
11:47:15    url: https://satellite.rhn.redhat.com
11:47:15    debug/output level: 1
11:47:16    db:  rhnsat/<password>@rhnsat
11:47:16
11:47:16 Retrieving / parsing channel-families data
11:47:20 channel-families data complete
11:47:22
11:47:22 Retrieving / parsing arches data
11:47:23 arches data complete
11:47:23
11:47:23 Retrieving / parsing additional arches data
11:47:24 additional arches data complete
11:47:24
11:47:24 Retrieving / parsing channel data
11:48:31    p = previously imported/synced channel
11:48:31    . = channel not yet imported/synced
11:48:31    base-channels:
11:48:31       p rhel-x86_64-server-5                     12409
11:48:31       p rhel-x86_64-server-6                     6740
11:48:31
11:48:31 Channel data complete
11:48:31
11:48:31 Retrieving / parsing blacklists data
11:48:32 blacklists data complete
11:48:32
11:48:32 Retrieving / parsing product names data
11:48:33 product names data complete
11:48:33
11:48:33 Retrieving short package metadata (used for indexing)
11:48:33    Retrieving / parsing short package metadata: rhel-x86_64-server-5 (12409)
11:48:42    Retrieving / parsing short package metadata: rhel-x86_64-server-6 (6740)
11:48:47 Diffing package metadata (what's missing locally?): rhel-x86_64-server-5
            ________________________________________
Diffing:    ######################################## - complete
11:48:56 Diffing package metadata (what's missing locally?): rhel-x86_64-server-6
            ________________________________________
Diffing:    ######################################## - complete
11:49:01
11:49:01 Downloading package metadata
11:49:02    Retrieving / parsing *relevant* package metadata: rhel-x86_64-server-5 (NONE RELEVANT)
11:49:02    Retrieving / parsing *relevant* package metadata: rhel-x86_64-server-6 (3390)
11:49:02    * WARNING: this may be a slow process.
            ________________________________________
Downloading:###################
...
The rhn-tools will be used for kickstarts.
Deleting a repository
To delete a repository:
spacewalk-remove-channel -c <repository-name> --unsubscribe
- spacewalk-remove-channel: enter here the name of the channel you want to unsubscribe from
- unsubscribe: allows you to remove the registration of all machines that are attached to this repository
Integrating Satellite into a LDAP environment
Installing packages
We’ll need to install the PAM modules. On Red Hat, there’s not much to install:
yum install nss-pam-ldapd
Then install this package to integrate with Satellite:
yum install pam-devel
Configuring LDAP with PAM
To configure PAM with LDAP, use this command and adapt it to your needs:
authconfig --enableldap --enableldapauth --ldapserver=ldap://**openldap-server.deimos.fr:389** --ldapbasedn="**dc=openldap,dc=deimos,dc=fr**" --enableldaptls --ldaploadcacer=**http://serveur-web/deimosfr.crt** --enablemkhomedir --update
- –ldapserver: enter your web server address
- –ldapbasedn: your server’s DN
- –enableldaptls: if you use secure LDAP connections
- –ldaploadcacer: the certificate to use (if you have no way to retrieve it this way, see the procedure below)
or a version without ssl/tls:
authconfig --enableldap --enableldapauth --disablenis --disableshadow --enablecache --passalgo=sha512 --disableldaptls --disableldapstarttls --disablesssdauth --enablemkhomedir --enablepamaccess --enablecachecreds --enableforcelegacy --disablefingerprint --ldapserver=192.168.0.1 --ldapbasedn=dc=openldap,dc=deimos,dc=fr --updateall
To retrieve the ssl certificate requested above, here’s a solution:
  > openssl s_client -connect openldap-server.deimos.fr:636
CONNECTED(00000003)
depth=0 C = FR, ST = IDF, L = Paris, O = DEIMOS, CN = openldap-server.deimos.fr, emailAddress = deimos@deimos.fr
verify error:num=18:self signed certificate
verify return:1
depth=0 C = FR, ST = IDF, L = Paris, O = DEIMOS, CN = openldap-server.deimos.fr, emailAddress = deimos@deimos.fr
verify return:1
---
Certificate chain
 0 s:/C=FR/ST=IDF/L=Paris/O=DEIMOS/CN=openldap-server.deimos.fr/emailAddress=deimos@deimos.fr
   i:/C=FR/ST=IDF/L=Paris/O=DEIMOS/CN=openldap-server.deimos.fr/emailAddress=deimos@deimos.fr
---
Server certificate
-----BEGIN CERTIFICATE-----
MIIDpTCCAw6gAwIBAgIJAJJUJLhNM1/XMA0GCSqGSIb3DQEBBQUAMIGUMQswCQYD
VQQGEwJGUjEMMAoGA1UECBMDSURGMQ4wDAYDVQQHEwVQYXJpczEPMA0GA1UEChMG
VUxMSU5LMREwDwYDVQQLEwh1bHN5c25ldDEcMBoGA1UEAxMTdGFzbWFuaWEMdWxs
aW5rLmxhbjElMCMGCSqGSIb3DQEJARYWaW503XJuYWwtaXRAdWxsaW5rLmNvbTAe
Fw0xMTEyMDUxMjQzMzVaFw0yMTEyMDIxMjQzMzVaMIGUMQswCQYDVQQGEwJGUjEM
MAoGA1UECBMDSURGMR4wDAYDVQQHEwVQYXJpczEPMA0GA1UEChMGVUxMSU5LMREw
DwYDVQQLEwh1bHN5c25ldDEcMBoGA1UEAxMTdGFzbWFuaWEudWxsaW5rLmxhbjEl
MCMGCSqGSIb3DQEJARYWaW50ZXJuYWwtaXRAdWxsaW5rLmNvbTCBnzANBgkqhkiG
9w0BAQEFAAOBjQAwgYkCgYEA4QoXFn39LhMW7mlA9r3NOX6iTHCCSlZjVQi0mQ5k
BVysN8KMFfC0E4vOeG1Z11AYwW7xCOb4Pl+LgfgfdgfgfdJIn92LX0meJcsgWKOh
qVAsZNkWn2ss8oDw3t5NEOjKFZ5BKVR2fL4Yj23DmFOAwew5PR5xhxGV5LJ9VErS
Ks0CAwEAAaOB/DCB+TAdBgNVHQ4EFgQUn5Ig2hFtROXcG3vxux7izNqcUd4wgckG
A1UdIwSBwTCBvoAUn5Ig2hFtROXcG3vxux7izNqcUd6hgZqkgZcwgZQxCzAJBgNV
BAYTAkZSMQwwCgYDVQQIEwNJREYxDjAMBgNVBAcTBVBhcmlzMQ8wDQYDVQQKEwZV
TExJTksxETAPBgNVBAsTCHVsc3lzbmV0MRwwGgYDVQQDExN0YXNtYW5pYS51bGxp
bmsubGFuMSUwIwYJKoZIhvcNAQkBFhZpbnRlcm5hbC1pdEB1bGxpbmsuY29tggkA
klQkuE0zX9cwDAYCVR0TBAUwAwEB/zANBgkqhkiG9w0BAQUFAAOBgQAbjjAbcBez
dKyq+Tlf3/DURW0BJhHKyY7UW7L39m/KZRIB2lbgFjslrAL4yNnFgipJ6aKlJFfV
BYEu7MhKH2pJZBYFpzuHOdKvDq+Kmn/wGvxeOvzh1GzQPGhQv4cClm2PJNMh/jrK
ZWNzqyLWYtWAoLu6N6gMER1Bd1Z5uzHl3A==
-----END CERTIFICATE-----
subject=/C=FR/ST=IDF/L=Paris/O=DEIMOS/CN=openldap-server.deimos.fr/emailAddress=deimos@deimos.fr
issuer=/C=FR/ST=IDF/L=Paris/O=DEIMOS/CN=openldap-server.deimos.fr/emailAddress=deimos@deimos.fr
---
No client certificate CA names sent
---
SSL handshake has read 1291 bytes and written 311 bytes
---
New, TLSv1/SSLv3, Cipher is AES256-SHA
Server public key is 1024 bit
Secure Renegotiation IS NOT supported
Compression: NONE
Expansion: NONE
SSL-Session:
    Protocol  : TLSv1
    Cipher    : AES256-SHA
    Session-ID: 91E6398F6DE9FBDC1B7EBDF890FE818B09EB79555C9FC1CF64EDC284F7A23B2A
    Session-ID-ctx:
    Master-Key: 51408932336792F4E8F5339BD12F312005022A4B20E6A5FBC56239BC0DD514344449531973B9A8395B1E799196D8F411
    Key-Arg   : None
    Krb5 Principal: None
    PSK identity: None
    PSK identity hint: None
    Start Time: 1327491823
    Timeout   : 300 (sec)
    Verify return code: 18 (self signed certificate)
---
If the certificate is retrieved manually, copy it to /etc/openldap/cacerts/ldap.crt, then run the following command:
cacertdir_rehash /etc/openldap/cacerts
Configuring LDAP on Satellite
We’ll insert this into the /etc/rhn/rhn.conf file:
pam_auth_service = rhn-satellite
Finally, provide this information:
  #%PAM-1.0
auth      required      /lib64/security/pam_env.so
auth      sufficient    /lib64/security/pam_ldap.so no_user_check
auth      required      /lib64/security/pam_deny.so
account   required      /lib64/security/pam_ldap.so no_user_check
#account   required      /lib64/security/pam_access.so
I commented out the pam*access part which allows increasing account security. For more information on this module (pam_access) read this documentation.
Then restart the Satellite services to see the user creation options:
rhn-satellite restart
A new checkbox will appear in the user creation section:
  Use PAM to authenticate via LDAP, Kerberos, and other network-based authentication systems.
Note: The password fields above are not required when this box is checked; however, you can enter a password that will only work when PAM authentication for this user's account is disabled.
Usage
Creating the admin account
To connect to the web interface, it’s very simple, go to HTTPS on your server (https://satellite-master):
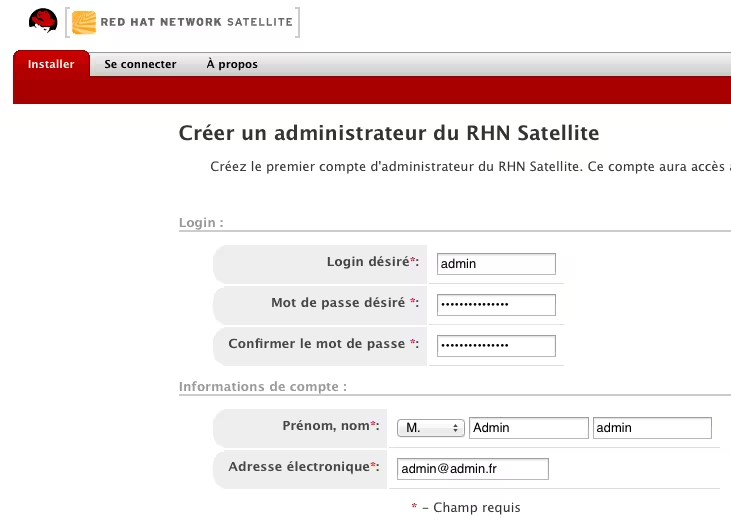
Then fill in the information and click “Create Account”.
Configuring the timezone
To configure the timezone, it’s done in the graphical interface:

Adding a custom repository
Create your repository in the “Custom Channels” and set the Red Hat version as parent if you want to add additional packages and keep the standard packages available on Red Hat.
Prerequisites (GPG)
We’ll need to generate a GPG key to sign our packages:
  > gpg --gen-key
gpg (GnuPG) 2.0.14; Copyright (C) 2009 Free Software Foundation, Inc.
This is free software: you are free to change and redistribute it.
There is NO WARRANTY, to the extent permitted by law.

Select the type of key you want:
   (1) RSA and RSA (default)
   (2) DSA and Elgamal
   (3) DSA (signature only)
   (4) RSA (signature only)
Your choice? 1
So we’ll choose the first option.
Then generate the default key size without expiration:
  RSA keys may be between 1024 and 4096 bits long.
What keysize do you want? (2048)
Requested keysize is 2048 bits
Specify how long the key should be valid.
         0 = key does not expire
      <n>  = key expires in n days
      <n>w = key expires in n weeks
      <n>m = key expires in n months
      <n>y = key expires in n years
How long is the key valid for? (0)
Key doesn't expire at all
Is this correct? (y/N) y
Enter your information for package signing:
  You need a user ID to identify your key; the software constructs the user ID
from the Real Name, Comment and Email Address in this form:
    "Heinrich Heine (Der Dichter) <heinrichh@duesseldorf.de>"

Real name: Deimos FR
Email address: deimos@deimos.fr
Comment:
You selected this USER-ID:
    "Deimos <deimos@deimos.fr>"

Change (N)ame, (C)omment, (E)mail or (O)kay/(Q)uit? o
You need a passphrase to protect your secret key.

can't connect to `/root/.gnupg/S.gpg-agent': No such file or directory
gpg-agent[25522]: directory `/root/.gnupg/private-keys-v1.d' created
Then enter a passphrase, and the key validity:
  /-----------------------------------------------------\
| Please re-enter this passphrase                     |
|                                                     |
| Passphrase ________________________________________ |
|                                                     |
|       <OK>                             <Cancel>     |
\-----------------------------------------------------/
Specify how long the key should be valid.
         0 = key does not expire
      <n>  = key expires in n days
      <n>w = key expires in n weeks
      <n>m = key expires in n months
      <n>y = key expires in n years
How long is the key valid for? (0)
Key doesn't expire at all
Is this correct? (y/N) y
The key is created and you are given the key ID:
  Can't connect to `/root/.gnupg/S.gpg-agent': No such file or directory
A large number of random bytes need to be generated. You should do
something else (type on the keyboard, move the mouse, use the disks)
during the generation of prime numbers; this gives the random number
generator a better chance of gathering enough entropy.
gpg: key DFC7E56C marked as ultimately trusted.
public and secret key created and signed.

gpg: checking the trustdb
gpg: 3 marginal(s) needed, 1 complete(s) needed, PGP trust model
gpg: depth: 0  valid:   1  signed:   0
trust: 0-, 0q, 0n, 0m, 0f, 1u
pub   2048R/DFC7E56A 2012-03-12
    Key fingerprint = 4EC2 939F 3986 96CE 826C  665A 83D7 D404 DFC7 E56D
uid                  Deimos FR <deimos@deimos.fr>
sub   2048R/4425ACDD 2012-03-12
The key is now created, and we can sign our packages with it.
We can list our keys at any time like this:
gpg --list-keys
To export our newly created public key:
gpg --export -a 'Deimos fr' > /etc/pki/rpm-gpg/RPM-GPG-KEY-deimos
This key will be used to deploy packages for all our future clients.
To help us with bulk package signing, we’ll create a small preferences file:
  %_signature gpg
%_gpg_name DFC7E56A
Replace the value of ‘%_gpg_name’ with your key ID.
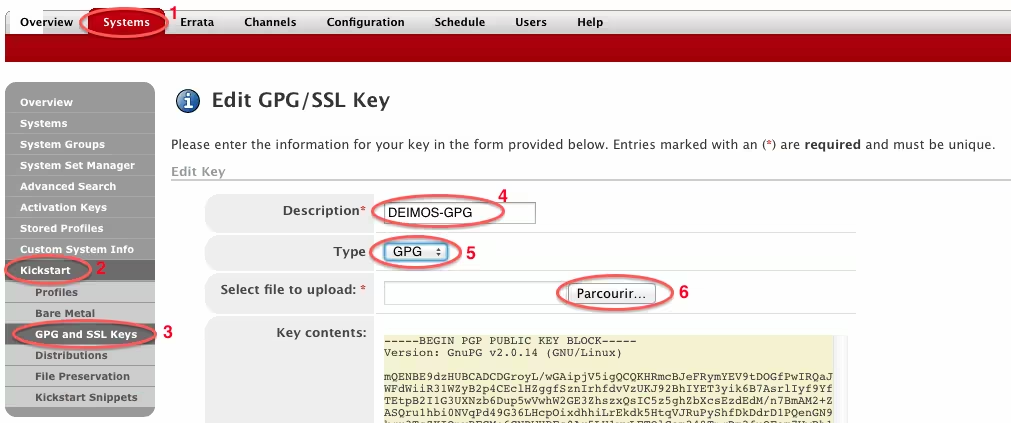
Now we’ll declare our new key in Satellite at the kickstart level so our automated installations have this key present:
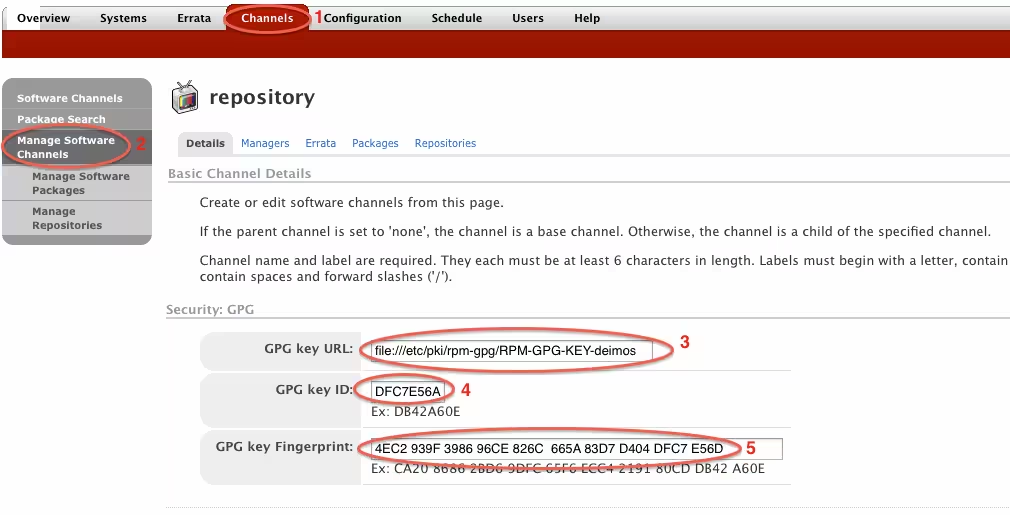
And finally the custom repository must contain the GPG information:
Adding packages
If you want to add packages to a repository (e.g.: repo-test), temporarily download the RPM(s) you’re interested in on the satellite server:
wget http://dl.fedoraproject.org/pub/epel/6/x86_64/tmux-1.5-1.el6.x86_64.rpm
We’ll sign this package:
  > rpm --resign tmux-1.5-1.el6.x86_64.rpm
Enter passphrase:
Pass phrase is good.
Then add this RPM to your custom repository:
  > rhnpush -c repo-test tmux-1.5-1.el6.x86_64.rpm
Red Hat Network username: deimos
Red Hat Network password:
- -c repo-test: -c allows you to specify the repository where you want to put this package.
Now you need to update the package list in the web interface so clients can see them:
Now, on the client, you just need to do:
  yum clean all
yum install tmux
Automating and simplifying package signing and adding
If you don’t want to have to constantly type your credentials, passphrase etc… every time you set up new packages, I created a small Python tool to save time:
  #!/usr/bin/env python
# Made by Pierre Mavro 14/03/2012
# Version : 0.1
# This script permit to automate in a non secure way, new packages for a custom repository on Red Hat Satellite
# Require : pexpect

import getopt, os, sys, glob, pexpect
from string import Template

# Help
cmd_name = sys.argv[0]
def help(code):
    print cmd_name, "[-h] [-r] [-s] [-l] [-p] [-d]"
    str = """
   -h, --help
      Show this help
   -s, --passphrase
      Passphrase to sign packages
   -r, --repository
      Select wished repository to push the packages
   -l, --login
      Red Hat Network username
   -p, --password
      Red Hat Network password
   -f, --folder
      folder were new packages should be added (default: /tmp/packages)
   -d, --debug
      Debug mode
"""
    print str
    sys.exit(code)

class bcolors:
    OK = '\033[92m'
    FAIL = '\033[91m'
    END = '\033[0m'

    def disable(self):
        self.OK = ''
        self.FAIL = ''
        self.END = ''

# Sign and push function
def sign_push(passphrase,repository,login,password,folder,debug):

    # Package signing
    def sign(rpm_files,passphrase,folder,debug,charspacing):
        if (debug == 1): print 80*'=' + "\n"
        print '[+] Signing packages :'
        # Sign all packages
        for package in rpm_files:
            # Formating
            charspace = Template("{0:<$space}")
            print charspace.substitute(space = charspacing).format(' - ' + package + '...'),
            # Launch resign
            child = pexpect.spawn('rpm --resign ' + package)
            if (debug == 1): child.logfile = sys.stdout
            child.expect ('Enter pass phrase|Entrez la phrase de passe')
            child.sendline (passphrase)
            if (debug == 1): child.logfile = sys.stdout
            child.expect(pexpect.EOF)
            child.close()
            # Check return status
            if (child.exitstatus == 0):
                print '[ ' + bcolors.OK + 'OK' + bcolors.END + ' ] '
            else:
                print '[ ' + bcolors.FAIL + 'FAIL' + bcolors.END + ']'

    # Package push
    def push(rpm_files,repository,login,password,folder,debug,charspacing):
        if (debug == 1): print 80*'=' + "\n"
        print '[+] Adding packages to satellite server :'
        for package in rpm_files:
            # Formating
            charspace = Template("{0:<$space}")
            print charspace.substitute(space = charspacing).format(' - ' + package + '...'),
            # RPM push command
            child = pexpect.spawn('rhnpush --force --no-cache -c ' + repository + ' ' + package)
            if (debug == 1): child.logfile = sys.stdout
            child.expect ('Red Hat Network username')
            child.sendline (login)
            child.expect ('Red Hat Network password')
            child.sendline (password)
            if (debug == 1): child.logfile = sys.stdout
            child.expect(pexpect.EOF)
            child.close()
            # Check return status
            if (child.exitstatus == 0):
                print '[ ' + bcolors.OK + 'OK' + bcolors.END + ' ] '
            else:
                print '[ ' + bcolors.FAIL + 'FAIL' + bcolors.END + ' ]'

    # Get rpm files list
    rpm_files=glob.glob(folder + '/*.rpm')
    if (debug == 1): print 80*'=' + "\n" + 'RPM found :'
    if (debug == 1): print rpm_files

    # Check if RPM were found
    if (len(rpm_files) == 0):
       print "No RPM were found in " + folder
       sys.exit(2)

    # Get maximum rpm size for visual answers (OK/FAIL)
    charspacing=0
    for package in rpm_files:
        count = len(package)
        if (count > charspacing):
            charspacing=count
    charspacing += 10

    # Sign packages
    sign(rpm_files,passphrase,folder,debug,charspacing)
    # Push packages
    push(rpm_files,repository,login,password,folder,debug,charspacing)

# Main
def main(argv):
    try:
        opts, args = getopt.getopt(argv, 'hs:r:l:p:f:d', ["passphrase=","repository=","login=","password=","folder=","help"])
    except getopt.GetoptError:
        # Print help and exit
        print "Unknow option, bad or missing argument\n"
        help(2)

    # Initialize vars
    # GPG passphrase for package sign in
    passphrase=None
    repository=None
    login=None
    password=None
    folder='/tmp/'
    debug=0

    # Check opts
    for opt, arg in opts:
        if opt in ("-h", "--help"):
            help(0)
            sys.exit(0)
        elif opt in ("-s", "--passphrase"):
            passphrase = str(arg)
        elif opt in ("-r", "--repository"):
            repository=str(arg)
        elif opt in ("-l", "--login"):
            login=str(arg)
        elif opt in ("-p", "--password"):
            password=str(arg)
        elif opt in ("-f", "--folder"):
            folder=str(arg)
        elif opt in ("-d", "--debug"):
            debug=1
        else:
            print "Unknow option, please see usage\n"
            help(2)

    # Checks
    if (passphrase or repository or login or password) is None:
        print "Unknow option, please see usage\n"
        help(2)

    sign_push(passphrase,repository,login,password,folder,debug)

if __name__ == "__main__":
   main(sys.argv[1:])
You can run it either by hardcoding the necessary information in the code in the ‘Initialize vars’ section, or by using arguments:
  > satellite_add_packages.py -s <passphrase> -r <repository>  -f <folder> -l <login> -p <password>
[+] Signing packages :
 - /root/done/tmux-1.5-1.el6.x86_64.rpm...                       [ OK ]
[+] Adding packages to satellite server :
 - /root/done/tmux-1.5-1.el6.x86_64.rpm...                       [ OK ]
Client
In this section, we’ll see how clients can communicate with our satellite server.
Registration
To register a machine in your satellite server that was not deployed via kickstart, run this command to register it:
rhn-register
Then, the Satellite server information will be requested.
Updating the profile
If you make changes to the machine’s profile (hardware, hostname…), you can update it from the guest machine using this command:
rhn-profile-sync
Re-registering a machine
For various reasons, you may want to re-register a machine. It’s very simple - you need to remove the current references to the satellite, then restart the registration:
  rm -f /etc/sysconfig/rhn/systemid
rhn-register
Crontab for updates
Satellite synchronizations can take a lot of time. That’s why it’s recommended to update as much as possible, so add this to your crontab:
0 1 * * * perl -le 'sleep rand 9000' && satellite-sync --email >/dev/null 2>1
FAQ
Restarting the installation
If you want to restart the installation at any time, you can do it with the –skip-db-install option, because generally, the database installation operation went well, but not necessarily the rest:
install.pl --skip-db-install
There are many other options with ‘–help’.
Logs
When there’s an error, for uploading a package or otherwise, there are many logs to check. I’ll try to describe the method to follow:
- First thing to do is to check the apache logs: /var/log/httpd/error_log
- If there’s still not enough info, look in the /var/log/rhn/ folder. It’s well organized and you can quickly find the desired information.
“Error validating satellite certificate” error during RHN Satellite install
If you have this problem, it’s likely because you’re behind a proxy or don’t yet have an internet connection. You’ll need to restart the installation:
/home/sat/install.pl --disconnected --skip-db-install
Tomcat failed to start properly or the installer ran out of tries. Please check /var/log/tomcat*/catalina.out for errors
If you have this type of message, it’s because the hostname is incorrectly configured. To fix this problem, check that this section is correctly filled in, then restart the installer like this:
  spacewalk-hostname-rename x.x.x.x
Validating IP ... OK
=============================================
hostname: satellite-master.deimos.fr
ip: x.x.x.x
=============================================
Stopping rhn-satellite services ... OK
Testing DB connection ... OK
Updating /etc/rhn/rhn.conf ... OK
Actual SSL key pair package: rhn-org-httpd-ssl-key-pair-satellite-master-1.0-1.noarch
 No need to re-generate SSL certificate.
Regenerating new bootstrap client-config-overrides.txt ... OK
Updating NOCpulse.ini ... OK
Updating monitoring data ... OK
Updating other DB entries ... OK
Changing cobbler settings ... OK
Changing jabberd settings ... OK
Starting rhn-satellite services ... OK
If all is well, you’ll see OK everywhere :-)
ERROR: Server not registered? No systemid: /etc/sysconfig/rhn/systemid
If you have this kind of message when activating a satellite:
  > rhn-satellite-activate --rhn-cert=/root/deimos.cert
RHN_PARENT: satellite.rhn.redhat.com
ERROR: Server not registered? No systemid: /etc/sysconfig/rhn/systemid
It’s likely because you have an internet access problem. Or, your machine needs to be registered again:
rhn-register
Add the ‘–proxy=proxy:port’ option with the correct values if you’re behind a proxy.
unable to extend index RHNSAT.RHN_ERRATAFILE_EID_FILE_IDX by 128 in tablespace DATA_TBS
If you get this type of error message during a satellite sync:
  ...
SYNC ERROR: unhandled exception occurred:

(Check logs/email for potentially more detail)

<rhnFault class (code = 54, text = 'ORA-01654: unable to extend index RHNSAT.RHN_ERRATAFILE_EID_FILE_IDX by 128 in tablespace DATA_TBS
')>
(54, 'ORA-01654: unable to extend index RHNSAT.RHN_ERRATAFILE_EID_FILE_IDX by 128 in tablespace DATA_TBS\n', '\n     Package Upload Failed due to uniqueness constraint violation.\n     Make sure the package does not have any duplicate dependencies or\n     does not alre
It means you’re at 100% utilization of your Oracle database. First check your disk space size. If all is ok, let’s verify that we’re out of space:
  > su - oracle -c "db-control report"
Tablespace                  Size    Used   Avail   Use%
DATA_TBS                    3.9G    3.9G      0M   100%
SYSAUX                      500M   84.3M  415.6M    17%
SYSTEM                      400M  245.3M  154.6M    61%
TEMP_TBS                   1000M      0B   1000M     0%
UNDO_TBS                   1000M   96.3M  903.6M    10%
USERS                       128M     64K  127.9M     0%
Indeed, we’re out of space and we’ll need to increase the size of the DATA_TBS table by 500Mib:
  > su - oracle -c "db-control extend DATA_TBS"
Extending DATA_TBS... done.
Then we’ll check the data again to verify it’s good:
  > su - oracle -c "db-control report"
Tablespace                  Size    Used   Avail   Use%
DATA_TBS                    4.3G    3.9G  502.8M    89%
SYSAUX                      500M   84.3M  415.6M    17%
SYSTEM                      400M  245.3M  154.6M    61%
TEMP_TBS                   1000M      0B   1000M     0%
UNDO_TBS                   1000M   96.3M  903.6M    10%
USERS                       128M     64K  127.9M     0%
All is ok, we can restart the satellite-sync command.
could not find kernel image: menu
I don’t know if it’s a bug with the Satellite server, or if I forgot something, but the menu.c32 file is not in the right place and PXE clients refuse to boot. So to fix the problem:
cp /usr/share/syslinux/menu.c32 /var/lib/tftpboot/
warning: rpmts_HdrFromFdno: Header V4 RSA/SHA1 Signature, key ID
You might have this kind of message:
  warning: rpmts_HdrFromFdno: Header V4 RSA/SHA1 Signature, key ID dfc7eded: NOKEY

Public key for tmux-1.5-1.el6.x86_64.rpm is not installed
To solve this problem, you need to create GPG keys and sign your packages.
error was [Errno -1] Package does not match intended download
If you have this kind of message on the client side during a yum:
  Error Downloading Packages:
  puppet-2.7.9-2.el6.noarch: failed to retrieve getPackage/puppet-2.7.9-2.el6.noarch.rpm from custom-repo
error was [Errno -1] Package does not match intended download. Suggestion: run yum --enablerepo=deimos-repo clean metadata
You need to clear your cache and try again:
  rm -rf /var/cache/yum/*
yum clean all
Resources
Last updated 22 Jun 2012, 06:41 CEST.