Optimization of extX filesystems and RAID under Linux

| Software version | Kernel 2.6.32+ |
| Operating System | Red Hat 6.3 Debian 7 |
| Website | Kernel Website |
| Last Update | 13/02/2013 |
Introduction
All file operations on Linux are managed by VFS. The VFS layer is a common kernel interface for applications to access files. VFS handles the communication with different drivers. The inode and dentry cache is also managed by VFS. VFS is therefore capable of managing different types of filesystems, even network ones, through a common interface.
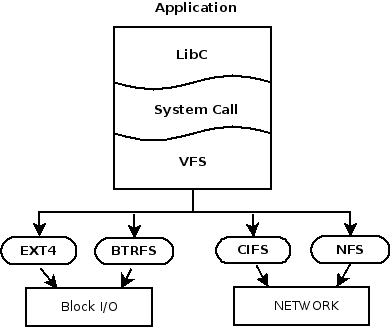
To see the list of loaded filesystem drivers that can be used by VFS:
  > cat /proc/filesystems
nodev	sysfs
nodev	rootfs
nodev	bdev
nodev	proc
nodev	cgroup
nodev	cpuset
nodev	tmpfs
nodev	devtmpfs
nodev	debugfs
nodev	securityfs
nodev	sockfs
nodev	pipefs
nodev	anon_inodefs
nodev	devpts
nodev	ramfs
nodev	hugetlbfs
nodev	pstore
nodev	mqueue
nodev	usbfs
	ext4
nodev	binfmt_misc
	vfat
ExtX
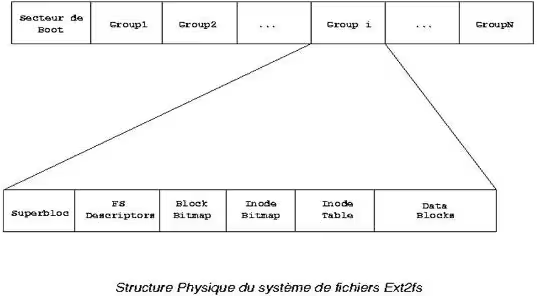
ExtX filesystems are divided into block groups, all of which have the same structure and help limit fragmentation. Each block group has its own inode table. The fact that each group manages its own table considerably reduces access times. When the kernel wants to allocate data blocks for a file, it will try to allocate them in the same block group.
To explain the diagram above:
- Superblock: block group 0 contains the primary superblock, while other groups contain a backup of this superblock
- FS/Group descriptor: provides information about the structure of the block group
- Block Bitmap: used to set or clear bits for each free or in-use block. For example, with a filesystem having 4K blocks, the block group size is limited to 4096*8 blocks.
- Inode Bitmap: used to set or clear bits for each free or in-use inode.
- Inode Table: The space where inodes are stored. Each inode corresponds to 128 bytes at 8 inodes/K.
As with any filesystem, the first block corresponds to the boot sector.
Fragmentation
Fragmentation is a source of significant slowdown on filesystems such as fat32, but not for extX. Although defragmentation utilities exist for extX, they are normally not necessary due to the nature of this filesystem. Fragmentation slows performance on sequential reads because the disk read head must move around significantly. The kernel takes care of rearranging data to minimize fragmentation.
When a file is allocated on extX, the filesystem will pre-allocate additional space up to 8 more blocks to limit fragmentation. If this is not possible, an allocation on the same block group will be made, resulting in only minimal fragmentation.
Getting fragmentation information
To see if there is fragmentation on a mounted filesystem:
  > dumpe2fs /dev/sda1
Group 1: (Blocks 8193-16384) [ITABLE_ZEROED]
  Checksum 0x6346, unused inodes 2007
 Backup Superblock at 8193, Group descriptors at 8194-8194
  Reserved GDT blocks at 8195-8450
 Block bitmap at 260 (bg #0 + 259), Inode bitmap at 276 (bg #0 + 275)
 Inode table at 542-792 (bg #0 + 541)
  5872 free blocks, 2007 free inodes, 1 directory, 2007 unused inodes
 Free blocks: 8577-8702, 8706-9216, 10043-10044, 10235-12288, 12293-12997, 13176, 13200, 13284, 13912-16382
 Free inodes: 2010-4016
Group 2: (Blocks 16385-24576) [INODE_UNINIT, ITABLE_ZEROED]
  Checksum 0x8215, unused inodes 2008
 Block bitmap at 261 (bg #0 + 260), Inode bitmap at 277 (bg #0 + 276)
 Inode table at 793-1043 (bg #0 + 792)
  3971 free blocks, 2008 free inodes, 0 directories, 2008 unused inodes
 Free blocks: 20481-20608
 Free inodes: 4017-6024
- At line 8: there is fragmentation because there are some non-contiguous blocks on the block group
- At line 15: there is no fragmentation on the block group
You can use the filefrag command to see fragmentation on a file:
  > filefrag -v /etc/passwd
Filesystem type is: ef53
File size of /etc/passwd is 1405 (1 block, blocksize 4096)
 ext logical physical expected length flags
   0       0  3219179               1 eof
/etc/passwd: 1 extent found
And for an unmounted filesystem, you know the fsck command.
Fragmentation tuning
By default, when you format a partition in extX, 5% of its capacity is reserved for filesystem management to prevent fragmentation. There is an option during mkfs to specify the desired percentage for this management:
mke2fs -m <reserve_percentage>
If your filesystem is already created, you can change the size of this allocation:
tune2fs -m <reserve_percentage>
Journals
One of the most important factors in performance degradation in ext3 is the journal. I should note that there are no journals in ext2. There are 3 types of journals:
- Ordered: metadata is journaled
- Journal: data and metadata are journaled
- Writeback: metadata is journaled without guarantees
When a write request is made, the data to be written corresponds to both the data itself and the journals. So there are 2 writes for one request.
To mount a partition by choosing the journal type:
mount -o data=<journal_type>
On most Linux systems, ordered mode is used. In this mode, data to be written will be written in such a way that data blocks related to metadata are written to disk before metadata is written to the journal. This ensures consistency between journals and data. Any listed data present in the journal is therefore on the disk.
The mode where we lose the least performance in extX is writeback. In this mode, the filesystem makes no effort to order data on disk. Data is first written to the journal before being written to disk.
When journaling is enabled, metadata and data are journaled. This doubles the visit counter when an internal journal is used. However, when ‘data=journal’, many small writes are combined for disk writing to achieve linear disk writing, which will improve performance and properly arrange the data.
The advantage of the journal is to reduce disk check time after a machine crash. And ‘data=journal’ avoids slowdowns on random writes. Journal mode is therefore the recommended mode.
Journal tuning
Separate partition
For better performance on the journal, it is possible to enlarge it and choose the size of the blocks (which can range from 1024 to 102400). For example, here’s how to specify a size:
mke2fs -b 4096 -J size=16 /dev/sda1
The size of the journal depends on the size of the filesystem and the write rate. If you want to gain performance, you should put the journal on a separate partition:
- Data journaling is a mount option, so the journal and the filesystem must have the same block size
- The entire partition must be dedicated to the journal
To create a journal on another partition, here’s how to do it:
- Unmount the filesystem:
umount /mnt/datas
- Get the size of the journal:
  > dumpe2fs /dev/sda1 | grep -i 'journal size'
dumpe2fs 1.42.5 (29-Jul-2012)
Journal size:             128M
We can see that the journal size is 128M.
- Remove the current journal from the partition:
tune2fs -f -O ^has_journal /dev/sda1
- Create a new journal on another partition, which you will need to create first (so 128M):
mke2fs -O journal_dev -b 4096 /dev/sdb1
- Update the filesystem on the first partition to inform it of the new journal:
tune2fs -j -J device=/dev/sdb1 /dev/sda1
Increase journal write periods
There is an option to tell the ext3/4 driver how often it should write to the journal. By default it is 5 seconds, but it is possible to increase this value, at the risk of losing data. The lower the value, the more we guarantee data integrity, but we reduce performance. If the passed value is 0, then the default 5 seconds will be used, but if you want to change this value:
mount -o commit=15 /dev/sda1 /mnt/datas
noatime
It is possible to disable access times on files. That is, by default, each time you access a file, the access date on the file is recorded. If there are many concurrent accesses to a partition, it can really be felt. That’s why you can disable it if this functionality is not useful to you. In your fstab, add the noatime option:
/dev/mapper/vg-home /home ext4 defaults,noatime 0 2
It is also possible to use the same functionality for directories:
/dev/mapper/vg-home /home ext4 defaults,noatime,nodiratime 0 2
Lock contentions
Applications requiring exclusive access to a file typically make a lock request to determine whether it is already in use. This is generally the case for network shares to ensure that there will not be modifications in 2 places simultaneously. When an application has finished with a file, it releases the lock, which will allow other applications to access it again. Lock mechanisms are widely used by databases, for example.
There are 3 types of locks:
- Application: Application locks are managed by the application and correspond to a file located somewhere on the system. It is up to the application to manage the lock system.
- Advisory: If you want the kernel to manage the lock system, it’s possible. However, in advisory mode, it is possible to code software to bypass this lock.
- Mandatory: If you want to go further and any application has the lock constraint without it being coded into the program, then you will ask the kernel to manage it.
For mandatory lock on a file, you will need to use the SGID bit on the group:
chmod g+s-x file
For this to work, the partition in question must also have the option enabled:
mount -oremount,mand /mnt/datas
You can get information about kernel locks like this:
  > cat /proc/locks
1: POSIX  ADVISORY  WRITE 24473 00:0e:250393 0 EOF
2: POSIX  ADVISORY  READ  23603 fd:02:1704266 128 128
3: POSIX  ADVISORY  READ  23603 fd:02:1704249 1073741826 1073742335
4: POSIX  ADVISORY  READ  23603 fd:02:1704823 1073741826 1073742335
5: POSIX  ADVISORY  READ  23603 fd:02:1704243 1073741826 1073742335
6: POSIX  ADVISORY  READ  23603 fd:02:1704259 128 128
7: POSIX  ADVISORY  READ  23603 fd:02:1704217 1073741826 1073742335
8: POSIX  ADVISORY  WRITE 23603 fd:02:1704846 0 EOF
9: POSIX  ADVISORY  WRITE 10347 fd:02:3015193 1073741824 1073742335
10: POSIX  ADVISORY  WRITE 10347 fd:02:3015194 1073741824 1073742335
11: POSIX  ADVISORY  READ  10347 fd:02:3015933 128 128
12: POSIX  ADVISORY  READ  10347 fd:02:3015252 1073741826 1073742335
13: POSIX  ADVISORY  READ  10347 fd:02:3015922 128 128
14: POSIX  ADVISORY  READ  10347 fd:02:3015240 1073741826 1073742335
15: POSIX  ADVISORY  WRITE 10347 fd:02:3015192 0 EOF
16: FLOCK  ADVISORY  WRITE 3376 fd:02:2359374 0 EOF
17: FLOCK  ADVISORY  WRITE 3376 fd:02:2359366 0 EOF
18: FLOCK  ADVISORY  WRITE 3376 fd:02:2359348 0 EOF
19: FLOCK  ADVISORY  WRITE 3376 fd:02:2359339 0 EOF
20: FLOCK  ADVISORY  WRITE 3376 fd:02:2228383 0 EOF
21: FLOCK  ADVISORY  WRITE 3376 fd:02:2228252 0 EOF
22: POSIX  ADVISORY  WRITE 3376 00:11:11525 0 EOF
[...]
The 6th column is read as follows: MAJOR-DEVICE:MINOR-DEVICE:INODE-NUMBER. Using the PID number, it is easy to find the process that is contending for a file (5th column). If you need to know the inode of a file:
  > ls --inode file
1704256 file
And conversely, if you need to find a file from an inode:
find / -inum <inode_number> -print
For more information, consult the official documentation.
RAID
I won’t discuss different RAIDs, but will direct you to Wikipedia for that. For using software RAID under Linux, I recommend this documentation. We will focus more on performance since that’s the topic here. RAID 0 is the most performant of all RAIDs, but it obviously has data security problems when a disk is lost.
The MTBF (Mean Time Between Failure) is also important for RAIDs. This is an estimate of how long the RAID will function properly before a disk is detected as failing.
Chunk size
The “Chunk size” (or stripe size or element size for some vendors) is the number (in segments size (KiB)) of data written or read for each device before moving to another segment. The displacement algorithm used is Round Robin. The chunk size must be an integer, a multiple of the block size. The larger the chunk size, the faster the write speed on very large capacity data, but conversely it is slow on small data. If the average size of IO requests is smaller than the chunk size, the request will then be placed on a single disk of the RAID, canceling all the advantages of RAID. Reducing the chunk size will break up large files into smaller ones that will be distributed across multiple disks, which will improve performance. However, the positioning time of chunks will be reduced. Some hardware does not allow writing until a stripe is complete, canceling this positioning latency effect.
A good rule for defining chunk size is to divide the IO operation size by the number of disks in the RAID (remove parity disks if RAID5 or 6).
- Raid 0: No parity
- Raid 1: No parity
- Raid 5: 1 parity disk
- Raid 6: 2 parity disks
- Raid 10: No parity disks
If you have no idea about your IOs, take a value between 32KB and 128KB, taking a multiple of 2KB (or 4KB if you have larger block sizes). The chunk size (stripe size) is an important factor in your RAID performance. If the stripe is too wide, the raid may have a “hot spot” which will be the disk receiving the most IO and will reduce your RAID performance. It’s obvious that the best performance is when data is spread across all disks. So the right formula is:
Chunk size = average request IO size (avgrq-sz) / number of disks
To get the average request size, I invite you to check out the documentation on Systat where we talk about Iostat and Sar.
- To see the chunk size on a RAID (here md0):
  > cat /sys/block/md0/md/chunk_size
131072
So it’s 128KB here.
Here’s another way to see it:
  > cat /proc/mdstat
Personalities : [raid10]
md0 : active raid10 sdc2[3] sda2[1] sdb2[0] sdd2[2]
      1949426688 blocks super 1.0 128K chunks 2 near-copies [4/4] [UUUU]
unused devices: <none>
Or even:
  > mdadm --detail /dev/md0
/dev/md0:
        Version : 1.0
  Creation Time : Sat May 12 09:35:34 2012
     Raid Level : raid10
     Array Size : 1949426688 (1859.12 GiB 1996.21 GB)
  Used Dev Size : 974713344 (929.56 GiB 998.11 GB)
   Raid Devices : 4
  Total Devices : 4
    Persistence : Superblock is persistent

    Update Time : Thu Aug 30 12:53:20 2012
          State : clean
 Active Devices : 4
Working Devices : 4
 Failed Devices : 0
  Spare Devices : 0

         Layout : near=2
     Chunk Size : 128K
           Name : N7700:2
           UUID : 1a83e7dc:daa7d822:15a1de4d:e4f6fd19
         Events : 64

    Number   Major   Minor   RaidDevice State
       0       8       18        0      active sync   /dev/sdb2
       1       8        2        1      active sync   /dev/sda2
       2       8       50        2      active sync   /dev/sdd2
       3       8       34        3      active sync   /dev/sdc2
- It is possible to define the chunk size when creating the RAID with the -c or –chunk argument. Let’s also see how to calculate it optimally. Let’s first use iostat to get the avgrq-sz value:
  > iostat -x sda 1 5

avg-cpu:  %user   %nice %system %iowait  %steal   %idle
           0,21    0,00    0,29    0,05    0,00   99,45

Device:         rrqm/s   wrqm/s     r/s     w/s   rsec/s   wsec/s avgrq-sz avgqu-sz   await  svctm  %util
sda               0,71     1,25    1,23    0,76    79,29    15,22    47,55     0,01    2,84   0,73   0,14

avg-cpu:  %user   %nice %system %iowait  %steal   %idle
           0,00    0,00    0,00    0,00    0,00  100,00

Device:         rrqm/s   wrqm/s     r/s     w/s   rsec/s   wsec/s avgrq-sz avgqu-sz   await  svctm  %util
sda               0,00     0,00    1,00    0,00    16,00     0,00    16,00     0,00    1,00   1,00   0,10

avg-cpu:  %user   %nice %system %iowait  %steal   %idle
           0,00    0,00    0,00    0,00    0,00  100,00
Let’s then calculate to get the chunk size in KiB:
  > echo "47.55*512/1024" | bc -l
23.77500000000000000000
We then need to divide this value by the number of disks (say 2) and round it to the nearest multiple of 2:
Chunk Size(KB) = 23.775/2 = 11.88 ≈ 8
Here the chunk size to set is 8, since it’s the multiple of 2 closest to 11.88.
To create a raid 0 by defining the chunk size:
mdadm -C /dev/md0 -l 0 -n 2 --chunk-size=32 /dev/sd[ab]1
Stride
Stride is a parameter that is passed when building a RAID that optimizes the way the filesystem will place its data blocks on the disks before moving to the next one. With extXn you can optimize using the -E option which corresponds to the number of filesystem blocks in a chunk. To calculate the stride:
Stride = chunk size / block size
For a raid 0 with a chunk size of 64KiB (64 KiB / 4KiB = 16) for example:
mkfs.ext4 -b 4096 -E stride=16 /dev/mapper/vg1-lv0
Some disk controllers do physical abstraction of block groups, making it impossible for the kernel to know them. Here’s an example to see the size of a stride:
  > dumpe2fs /dev/mapper/vg1-lv0 | grep -i stride
dumpe2fs 1.42 (29-Nov-2011)
RAID stride:              16
Here, the size is 16 KiB.
To calculate the stride, there’s also a website: https://busybox.net/~aldot/mkfs_stride.html
Round Robin
RAIDs without parity allow data to be segmented across multiple disks to increase performance using the Round Robin algorithm. The segment size is defined when creating the RAID and refers to the chunk size.
The size of a RAID is defined by the smallest disk when creating the RAID. The size can vary in the future if all disks are replaced by larger capacity disks. A resynchronization of the disks will occur and the filesystem can be extended.
So for Round Robin tuning, you need to correctly tune the chunk size and stride for optimal use of the algorithm! That’s all :-)
Parity RAIDs
One of the major performance constraints of RAID 5 and 6 is parity calculation. For data to be written, the parity calculation must first be performed on the raid. Only then can the parity and data be written.
Each data update requires 4 IO operations:
- The data to be updated is first read from the disks
- Update of the new data (but the parity is not yet correct)
- Reading of blocks from the same stripe and parity calculation
- Final writing of new data to disks and parity
In RAID 5, it is recommended to use the stripe cache:
echo 256 > /sys/block/md0/md/stripe_cache_size
For more information on RAID optimizations: https://kernel.org/doc/Documentation/md.txt. For the optimization part, look at the following parameters:
- chunk_size
- component_size
- new_dev
- safe_mode_delay
- syncspeed{min,max}
- sync_action
- stripe_cache_size
RAID 1
The RAID driver writes to the bitmap when changes have been detected since the last synchronization. A major disadvantage of RAID 1 is during a power outage, since it needs to be completely rebuilt. With the ‘write-intent’ bitmap, only the parts that have changed will need to be synchronized, which greatly reduces reconstruction time.
If a disk fails and is removed from the RAID, md stops erasing bits in the bitmap. If the same disk is reintroduced into the RAID, md will only need to resynchronize the difference. When creating the RAID, if the ‘–write-intent’ bitmap option is combined with ‘–write-behind’, write requests to devices with the ‘–write-mostly’ option will not wait for the requests to complete before writing to the disk. The ‘–write-behind’ option can be used for RAID1 with slow connections.
The new mdraid arrays support the use of write intent bitmaps. This helps the system identify problematic parts of an array; so, in case of an incorrect shutdown, only the problematic parts will need to be resynchronized, not the entire disk. This drastically reduces the time required for resynchronization. Newly created arrays will automatically have a write intent bitmap added when possible. For example, arrays used as swap and very small arrays (such as /boot arrays) will not benefit from getting write intent bitmaps. It is possible to add write intent bitmap to previously existing arrays once the device update is complete via the mdadm –grow command. However, write intent bitmaps do incur a performance impact (about 3-5% on a bitmap of size 65536, but can increase to 10% or more on smaller bitmaps, such as 8192). This means that if write intent bitmap is added to an array, it’s better to keep the size relatively large. The recommended size is 65536.
To see if a RAID is persistent:
  > mdadm --detail /dev/md0
/dev/md0:
        Version : 1.0
  Creation Time : Sat May 12 09:35:34 2012
     Raid Level : raid10
     Array Size : 1949426688 (1859.12 GiB 1996.21 GB)
  Used Dev Size : 974713344 (929.56 GiB 998.11 GB)
   Raid Devices : 4
  Total Devices : 4
    Persistence : Superblock is persistent

    Update Time : Thu Aug 30 16:43:17 2012
          State : clean
 Active Devices : 4
Working Devices : 4
 Failed Devices : 0
  Spare Devices : 0

         Layout : near=2
     Chunk Size : 128K

           Name : N7700:2
           UUID : 1a83e7dc:daa7d822:15a1de4d:e4f6fd19
         Events : 64

    Number   Major   Minor   RaidDevice State
       0       8       18        0      active sync   /dev/sdb2
       1       8        2        1      active sync   /dev/sda2
       2       8       50        2      active sync   /dev/sdd2
       3       8       34        3      active sync   /dev/sdc2
To add the write intent bitmap (internal):
mdadm /dev/md0 --grow --bitmap=internal
To add the write intent bitmap (external):
mdadm /dev/md0 --grow --bitmap=/mnt/my_file
And to remove it:
mdadm /dev/md0 --grow --bitmap=none
To define the slow disk and the fastest one:
mdadm -C /dev/md0 -l1 -n2 -b /tmp/md0 --write-behind=256 /dev/sdal --write-mostly /dev/sdbl
References
- https://www.apprenti-developpeur.net/unix-et-os/systeme-de-fichiers-sous-linux/
- https://kernel.org/doc/Documentation/filesystems/mandatory-locking.txt
- https://fr.wikipedia.org/wiki/RAID_%28informatique%29
- Configuration of a Software Raid
- Sysstat: Essential tools for analyzing performance issues
- https://kernel.org/doc/Documentation/md.txt
- https://makarevitch.org/rant/raid/
- https://access.redhat.com/knowledge/docs/fr-FR/Red_Hat_Enterprise_Linux/6/html/Migration_Planning_Guide/chap-Migration_Guide-File_Systems.html
Last updated 13 Feb 2013, 13:13 +0200.