OpenID: Authentication Centralization

Introduction
The issue of single sign-on (SSO) has been a longstanding challenge in the IT world. It was primarily a concern for businesses, where users regularly access numerous applications in their daily work (workstations, email, time management tools, remote servers, etc.). You might say that average users also access many such applications for personal use. While this is true, until recently, remembering a few passwords on a personal machine didn’t justify the effort needed to implement an SSO solution. However, with the explosion of internet access and the proliferation of blogs, wikis, forums, and commercial websites, the question of simplifying the management of multiple accounts arises again. This is where OpenID comes in. After a brief overview of single sign-on, we’ll detail OpenID and then explore different possibilities for implementing an OpenID-based solution.
Single Sign-On
The principle of single sign-on is to allow users to authenticate once during their session and manage access to certain personal data (name, first name, email, etc.):
- They authenticate with the authentication server (using username/password, for example).
- All authentication requests from any application are redirected to the authentication server, which authenticates the user to the application. No intervention is required from the user.
- The application can obtain certain personal data about the user from the authentication server, which the user has previously authorized for sharing.
- When the user ends their session, their authentication is revoked.
OpenID
OpenID is a free and decentralized single sign-on solution. It allows you to quickly obtain a digital identity, change or revoke this identity just as quickly. Since the architecture is decentralized, you don’t depend on a single service provider: you can change regularly and easily or even host your own digital identity!
With your OpenID digital identity, you can:
- Connect once and access all your favorite sites without remembering all the username/password combinations previously needed
- Centralize changes to your information (e.g., changing your email address)
- Manage access permissions to your information for each site you visit
Note that we’re not talking about security here. From the perspective of a site requesting authentication, OpenID only confirms that the person wanting to connect is the person whose digital identity is described by the provided URL, and that the information provided by the OpenID server concerns this person. From there, there are two scenarios:
- Either the site has blind trust in the OpenID server and determines that if the user is valid, they can connect to the site
- Or the site requests authentication from the OpenID server but then manages access rights itself
OpenID is just a building block that simplifies authentication. It doesn’t eliminate the need to implement a security policy on sites using this technology.
How OpenID Works
In a single sign-on authentication, and therefore during authentication via OpenID, there are three entities: the user who wishes to authenticate (actually, the browser being used, EU or End User); the site on which the user wishes to authenticate (RP or Relaying Party); the authentication server (OP or OpenID Provider, here the OpenID server).
During this authentication, the following exchanges occur between the three entities: the user enters their OpenID identifier on the site where they wish to authenticate; the site then contacts the server, and they share a secret; the user is redirected to the server which asks them to authenticate (if this is the first access of the browsing session); the user is informed of the data the site wishes to access; the user decides what data they wish to share with the site; the user is then redirected back to the site, with their information encrypted thanks to the shared secret established between the site and the server; the user is authenticated on the site.
The user thus has control over what they wish to share with the site, and this information is transmitted securely from the server to the site.
OpenID Extensions
The OpenID specifications cover the protocol in a global manner. They are specialized through extensions:
- Simple Registration Extension (SREG): it allows a very lightweight profile exchange, suitable for use on most sites, with this lightweight profile containing only the 9 fields identified as recurring for web identifications (nickname, full name, email address, date of birth, language, time zone, gender, country, and postal code).
- Yadis Discovery Protocol: this is a proposal for resource description and discovery (person, document, service) via URLs, which is used in OpenID 2.0 although external to the OpenID project.
- Provider Authentication Policy Extension (PAPE): currently still in draft form, this is an extension allowing the site (RP) to specify to the OpenID server (OP) which security policy should be applied regarding user authentication, and conversely allowing OP to specify to RP which security policy was applied during authentication, in order to strengthen the trust relationships between the different stakeholders.
OpenID from the User’s Perspective
Using OpenID
Using OpenID is really simple. First, you need to choose an OpenID service provider (OpenIDFrance, Verisign, Myopenid, Yahoo, your personal server, etc.) and register with this provider to obtain an OpenID digital identity, materialized by a URL (example: http://www.openidfrance.fr/jean.christophe.lauffer).
You then simply provide this URL as an OpenID identifier on sites allowing authentication via OpenID.
If this is your first connection for this session, you will be redirected to your OpenID service provider’s site to authenticate, then, if the authentication is correct, the site will receive the information necessary for your connection; if this is not your first connection for this session, the site will automatically receive (provided you have authorized this site to receive information about you) the information necessary for your connection.
Finally, you close your browsing session, which erases the data from your authentication session.
Setting up a redirection to a URL of your choice:
  <html>
  <head>
    <link rel="openid.server" href="http://www.openidfrance.fr/index.php" />
    <link
      rel="openid.delegate"
      href="http://www.openidfrance.fr/jean.christophe.lauffer"
    />
  </head>
  <body></body>
</html>
The two lines inserted between the <head> and </head> tags redirect the OpenID request to the server that actually hosts your OpenID identity. Suppose the code above is placed in the file http://www.drylm.org/jc.lauffer. I could then use this new URL instead of the original one provided by OpenIDFrance, while keeping my identity with them.
This way, you benefit from the identity provider’s service, which you don’t have to manage, and you have a personalized OpenID identifier that may better reflect your identity (http://company/identifier), but above all is more easily memorable. Additionally, if you change your OpenID identity provider, you simply change the line in your HTML file and continue to use the same personalized identifier.
There is still one disadvantage, and everyone will judge its importance: without falling into paranoia, are you really sure about what the identity provider does with your personal information?
If this point concerns you, know that thanks to OpenID, you can perfectly well host this information yourself. That’s what we’ll explore in the next section.
Setting Up Your Own Identity Server
Of course, there isn’t just one solution (see the list of known libraries on the OpenID site [5]). Here’s a non-exhaustive list of libraries allowing you to create your own OpenID server:
- C++: opkele [6] (notably used by the OpenID authentication module for Apache)
- PHP: php-openid
- Perl: Net::OpenID
- Python: python-openid
- Ruby: port of the Python library
For our example, we’ll use a standalone server [8] in PHP, very lightweight: phpMyID [9]. phpMyID allows you to quickly set up a personal identity server. You need a web server with PHP installed, on which you can upload files. Let’s set up this type of identity server right away. Fasten your seatbelts, here we go!
Download the latest available version from the phpMyID site [9] and extract the archive. You will then get several files. The ones we’re interested in are:
- MyID.php: the library implementing OpenID’s basic functions
- MyID.config.php: the configuration file for our OpenID server
- README: help file in English. The explanations are much more complete than what I’ll give, refer to it in case of more specific needs or problems.
The identity server installation is done as follows:
- Upload the PHP files to your personal server (for example, I uploaded them to the directory: http://www.drylm.org/jean-christophe/)
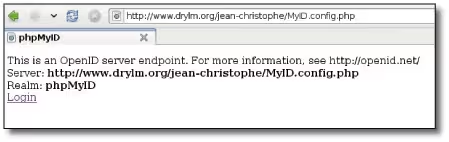
- Load the configuration page to get the domain (“realm”). In my case: http://www.drylm.org/jean-christophe/MyID.config.php. I get the display that you can see in figure 1. The domain (“realm”) here is therefore phpMyID.
- It’s time to set up the username/password pair that will be used to authenticate you on your OpenID server: you need to get an md5 hash from the information identifier, domain (“realm”) obtained in the previous section, and password:
You get a hash (it’s the large hexadecimal number); then modify the MyID.config.php file with the chosen login and the hash obtained:
  **
* User profile
* @name $profile
* @global array $GLOBALS['profile']
*/
$GLOBALS['profile'] = array(
       # Basic Config - Required
       'auth_username' =>      'jean-christophe',
       'auth_password' =>      '58d0a37a9dadec29546e0dce2360dbd7',

);
- Update the SREG (Simple Registration) data in the MyID.config.php file:
  /**
* Simple Registration Extension
* @name $sreg
* @global array $GLOBALS['sreg']
*/
$GLOBALS['sreg'] = array (
      'nickname'          => 'jean-christophe',
      'email'             => 'jean-christophe.lauffer@drylm.org',
      'fullname'          => 'Jean-Christophe LAUFFER',
#     'dob'               => '1979-11-05',
      'gender'            => 'M',
#     'postcode'          => '35135',
      'country'           => 'FR',
      'language'          => 'fr',
      'timezone'          => 'Europe/Paris'
);
Comment out with a # the data you don’t want to share.
- Upload the modified MyID.config.php file to the server again, then reload the configuration page to verify the connection: if you get a similar message, your identity server is correctly configured.
At this point, you have a personal digital identity (in my case http://www.drylm.org/jean-christophe/MyID.config.php) on a personal (very simple) server, which guarantees that your information is not hosted (and especially disclosed) by a third party.
But this URL is not easy to remember. You have two choices: rename the MyID.config.php file to index.php or write an index.php file containing these lines of code:
  <html>
  <head>
   <link rel="openid.server" href="http://www.drylm.org/jean-christophe/MyID.config.php" />
   <link rel="openid.delegate" href="http://www.drylm.org/jean-christophe/MyID.config.php" />
  </head>
  <body>
  </body>
</html>
of course replacing the addresses with your own. You can then use a URL like http://www.drylm.org/jean-christophe which is much easier to remember!
As a site administrator, you typically use either a ready-made solution that can be modified (Drupal, MediaWiki…), which generally offers extensions to manage different authentication methods, or a completely rewritten solution, in which case you’ll need to get your hands dirty. We’ll therefore study two implementation examples to illustrate these possibilities.
OpenID from the Site Administrator’s Perspective
Implementation on Drupal
Drupal is a CMS, a Web content management application. It’s this tool that’s installed on our website. The installation of the OpenID plugin is very simple:
Connect to your site with a user who has administration rights, then go to Administer -> Modules and enable the OpenID module (available in Drupal’s base package, no additional download is needed). Then go to your user’s profile page and you’ll find an OpenId Identities tab. Click on it and add your OpenID authentication URL. Then log out of your session and on the main page of your Drupal installation, you can choose the OpenID authentication mode.
Implementation on Your Own Site
We’re going to build a small example of calling an OpenID server for user authentication using the php-openid library [7]. This example is taken from the example provided with the library. The example contains four files:
These 4 commented files can be downloaded from the Linux Pratique website, at http://www.linux-pratique.com/download/, archive named LP48_openid.tar.gz
- common.php: this file contains the definitions of global functions necessary for dialogue with the OpenID server.
- index.php: this is the main file, which is used to enter the OpenID URL and manage the display of information by inclusion in the other files.
- authentication.php: this file contains the first part of the authentication process:
- creation of a consumer (which will be used to communicate with the server)
- construction of the request that will be sent to the OpenID server in the form of a URL
- redirection to the OpenID server for the user to authenticate with it.
- recovery.php: this file contains the last part of the authentication process:
- creation of a consumer (which will be used to communicate with the server)
- recovery of the response sent by the OpenID server
- analysis of the response
- display of the provided data.
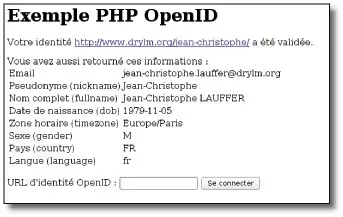
To test this example, whose complete sources you can find on our site [11], simply publish these four files on a web server (it works even locally on your own machine) and enter your OpenID identity URL (Fig. 2)!
Phishing
As with most sensitive data transmitted over the Internet, there is a risk of phishing inherent to the principle of authentication redirection in OpenID. Indeed, nothing prevents a malicious site from redirecting you to a fake page with the aim of stealing your login information. It is therefore up to the user to be vigilant about the trust they place in the sites they connect to. Discussions about possible ways to circumvent this problem are currently ongoing: they are available on the wiki.
This should not dissuade you from using OpenID, but on the contrary encourage you to be very vigilant (this advice is valid in general; not just for OpenID, but you’ve probably been told this before ;-)).
Conclusion
We have just completed an introductory journey to OpenID. Thanks to this article, we hope that single sign-on and authentication via OpenID are no longer just vague terms glimpsed by chance while surfing. Single sign-on is emerging from the business world to become democratized and reach personal users, who are facing a multiplication of accounts, especially on the internet.
We have laid the foundations that will allow you to use OpenID, whether you are a user or a website administrator. We hope we have interested you enough to make you want to look a little more into this technology.
Resources
- http://www.unixgarden.com/index.php/web/decouvrez-openid-un-systeme-d%E2%80%99authentification-decentralise
- OpenID foundation: http://openid.net/
- OpenID France: http://www.openidfrance.fr/
- Specifications of the OpenID format and its extensions: http://openid.net/developers/#specs
- Site dedicated to OpenID developers: http://www.openidsource.org
- List of libraries: http://wiki.openid.net/Bibliothèques/
- opkele: http://kin.klever.net/libopkele/
- php-openid: http://www.openidenabled.com/php-openid/
- List of standalone servers: http://wiki.openid.net/Run_your_own_identity_server_(fr)
- phpMyID site: http://siege.org/projects/phpMyID/
- Drupal site: http://www.drupal.org
- Example sources: http://www.drylm.org/lp/openid
Last updated 30 Nov 2009, 20:23 +0200.