NamedManager: A Nice Web Interface to Manage Bind
![]()
| Software version | 1.5.1 |
| Operating System | Debian 7 |
| Website | Namedmanager Website |
| Last Update | 14/04/2013 |
Introduction
Namedmanager1 is a graphical interface for managing your DNS records. It has been thoughtfully designed to facilitate administration, such as automatically adding PTR records when an A record is created, with a simple checkbox.
The interface can also manage multiple DNS servers and centralize their logs.
Prerequisites
We will need several components. I have chosen:
- Web server: Nginx with SSL + PHP-FPM
- Database: MariaDB
Nginx
For installation on Debian, it’s always simple:
aptitude install nginx
Then we’ll start it:
/etc/init.d/nginx start
SSL
First, let’s generate SSL keys:
  mkdir -p /etc/nginx/ssl
cd /etc/nginx/ssl
openssl req -new -x509 -nodes -out server.crt -keyout server.key
Then we’ll modify our Nginx configuration (adapt it to your needs):
  server {
	listen   443;

        ssl on;
        ssl_certificate /etc/nginx/ssl/server.crt;
        ssl_certificate_key /etc/nginx/ssl/server.key;
        ssl_session_timeout 5m;
        access_log  /var/log/nginx/dns.access.log;

	server_name dns.deimos.fr;
	root /usr/share/nginx/www;
	index index.php;

	location / {
		try_files $uri $uri/ /index.html;
	}

	# pass the PHP scripts to FastCGI server listening on 127.0.0.1:9000
	#
	location ~ \.php$ {
		fastcgi_pass unix:/var/run/php5-fpm.sock;
		fastcgi_index index.php;
		include fastcgi_params;
	}
}
PHP-FPM
aptitude install php5-fpm
MariaDB
To install MariaDB, it’s unfortunately not embedded in Debian, so we’ll add a repository. First of all, install a python tool to get aptkey:
aptitude install python-software-properties
Then let’s add this repository (https://downloads.mariadb.org/mariadb/repositories/):
  apt-key adv --recv-keys --keyserver keyserver.ubuntu.com 0xcbcb082a1bb943db
add-apt-repository 'deb http://mirrors.linsrv.net/mariadb/repo/10.0/debian wheezy main'
We’re now going to change apt pinning to prioritize MariaDB’s repository:
  Package: *
Pin: release o=MariaDB
Pin-Priority: 1000
And now let’s install MariaDB:
  aptitude update
aptitude install mariadb-server
Then we’ll add the last necessary packages:
aptitude install php5-cli php5-mysql
Installation
aptitude install bind9
We’ll need these utilities to make the web interface work:
aptitude install bind9utils php-soap
Let’s download the latest version, then extract it:
  cd /tmp
wget https://projects.jethrocarr.com/p/oss-namedmanager/downloads/get/namedmanager-1.5.1.tar.bz2
tar -xjf namedmanager-1.5.1.tar.bz2
cd namedmanager-1.5.1
We’ll set up the tools for integration with bind:
  mkdir /usr/share/namedmanager
cp -Rf bind /usr/share/namedmanager
cp /usr/share/namedmanager/bind/include/{sample-config.php,config-settings.php}
mkdir /etc/namedmanager
ln -s /usr/share/namedmanager/bind/include/config-settings.php /etc/namedmanager/config-bind.php
Then the crontab:
cp resources/namedmanager-bind.cron /etc/cron.d/namedmanager-bind
We’ll also set up a logpush service that will allow us to centralize logs:
  cp resources/namedmanager_logpush.rcsysinit /etc/init.d/namedmanager_logpush
update-rc.d -f namedmanager_logpush defaults
Finally, we create the necessary files for the proper functioning of the web interface by assigning the correct permissions:
  touch /etc/bind/named.namedmanager.conf
mkdir /etc/bind/zones
chown www-data:bind /etc/bind/named.namedmanager.conf /etc/bind/zones
chmod 775 /etc/bind/named.namedmanager.conf /etc/bind/zones
Configuration
Database
Now, let’s initialize the database:
mysql -uroot -p < sql/version_20121208_install.sql
and set the right permissions (adjust according to your needs):
  GRANT USAGE ON * . * TO 'namedmanager'@'%' IDENTIFIED BY 'password';
GRANT SELECT , INSERT , UPDATE , DELETE , CREATE , DROP , INDEX , ALTER , CREATE TEMPORARY TABLES, LOCK TABLES ON `namedmanager` . * TO 'namedmanager'@'%';
flush privileges;
Web Server
We’ll now take care of the web part. Personally, I have a dedicated machine to manage my DNS on which I don’t want virtualhosts. So I put everything at the root of my server, but you don’t have to do like me either. Then we’ll create the configuration file and put it in /etc:
  cp -Rf htdocs/* /usr/share/nginx/www/
chown -Rf www-data. /usr/share/nginx/www/
cp htdocs/include/sample-config.php /usr/share/nginx/www/include/config-settings.php
ln -s /usr/share/nginx/www/include/config-settings.php /etc/namedmanager/config.php
Edit your configuration to have the correct database information:
  [...]
/*
    Database Configuration
*/
$config["db_host"] = "localhost";           // hostname of the MySQL server
$config["db_name"] = "namedmanager";        // database name
$config["db_user"] = "namedmanager";        // MySQL user
$config["db_pass"] = "password";            // MySQL password (if any)
[...]
Before moving on, it’s time to restart all the services that have been modified:
  service php5-fpm restart
service nginx restart
service cron restart
Bind and API Key
We’ll integrate the NamedManager configuration with Bind:
  // This is the primary configuration file for the BIND DNS server named.
//
// Please read /usr/share/doc/bind9/README.Debian.gz for information on the
// structure of BIND configuration files in Debian, *BEFORE* you customize
// this configuration file.
//
// If you are just adding zones, please do that in /etc/bind/named.conf.local

include "/etc/bind/named.conf.options";
include "/etc/bind/named.conf.local";
include "/etc/bind/named.conf.default-zones";
include "/etc/bind/named.namedmanager.conf";
Then restart Bind.
Let’s generate an API key (you can use the method you want or do like me):
  > date +%s | sha256sum | base64 | head -c 32 ; echo
YmI3ZGRlYWY3NTk4ZDAzMGJmYWE1NDdh
Then edit the following configuration file and adapt it to your needs:
  <?php
/*
   Sample Configuration File
   Copy this file to config-settings.php
   This file should be read-only to the user whom the bind configuration scripts are running as.
*/

/*
   API Configuration
*/
$config["api_url"]          = "https://dns.deimos.fr";              // Application Install Location
$config["api_server_name"]  = "dns.deimos.fr";                     // Name of the DNS server (important: part of the authentication process)
$config["api_auth_key"]     = "YmI3ZGRlYWY3NTk4ZDAzMGJmYWE1NDdh";  // API authentication key

/*
   Log file to find messages from Named. Note that:
   * File should be in syslog format
   * Named Manager uses tail -f to read it, this can break with logrotate - make sure that either "copytruncate" mode is used, or tail processes are killed
*/
$config["log_file"]     = "/var/log/syslog";

/*
   Lock File
   Used to prevent clashes when multiple instances are accidently run.
*/
$config["lock_file"]        = "/var/lock/namedmanager_lock";

/*
   Bind Configuration Files

   Theses files define what files that NamedManager will write to. By design, NamedManager does
   not write directly into the master named configuration file, but instead into a seporate file
   that gets included - which allows custom configuration and zones to be easily added without
   worries of them being over written by NamedManager.
*/
$config["bind"]["version"]      = "9";                  // version of bind (currently only 9 is supported, although others may work)
$config["bind"]["reload"]       = "/usr/sbin/rndc reload";      // command to reload bind config & zonefiles
$config["bind"]["config"]       = "/etc/bind/named.namedmanager.conf";   // configuration file to write bind config too
$config["bind"]["zonefiledir"]      = "/etc/bind/zones";            // directory to write zonefiles too
                                        // note: if using chroot bind, will often be /var/named/chroot/var/named/
$config["bind"]["verify_zone"]      = "/usr/sbin/named-checkzone";      // Used to verify each generated zonefile as OK
$config["bind"]["verify_config"]    = "/usr/sbin/named-checkconf";      // Used to verify generated NamedManager configuration

// force debugging on for all users + scripts
// (note: debugging can be enabled on a per-user basis by an admin via the web interface)
//$_SESSION["user"]["debug"] = "on";
?>
Web Interface
Now, you can access your server via https (mine is: https://dns.deimos.fr) with the following credentials:
- Login: setup
- Password: setup123
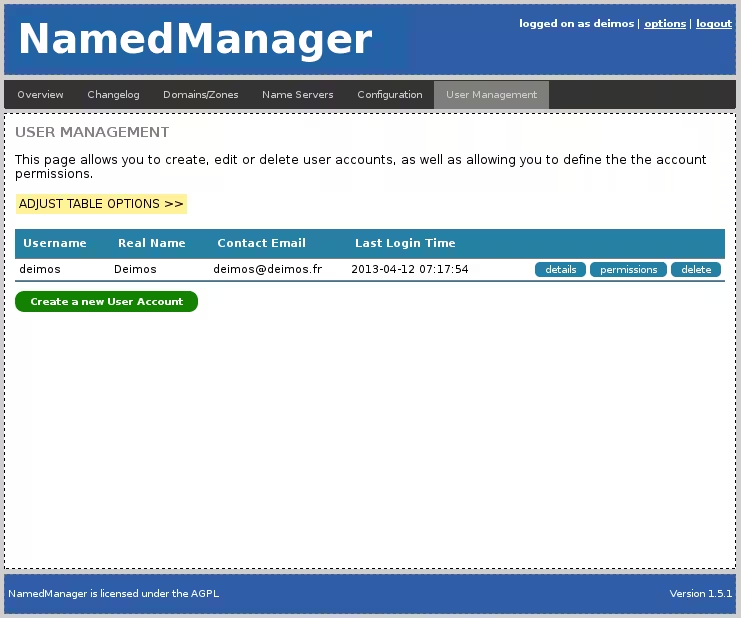
Creating a User
Go to “User Management”, create a new account and give it admin privileges, test it and delete the setup account or change its password. You should then see only your user:
API Key
Go to “Configuration” in the interface to set this key:
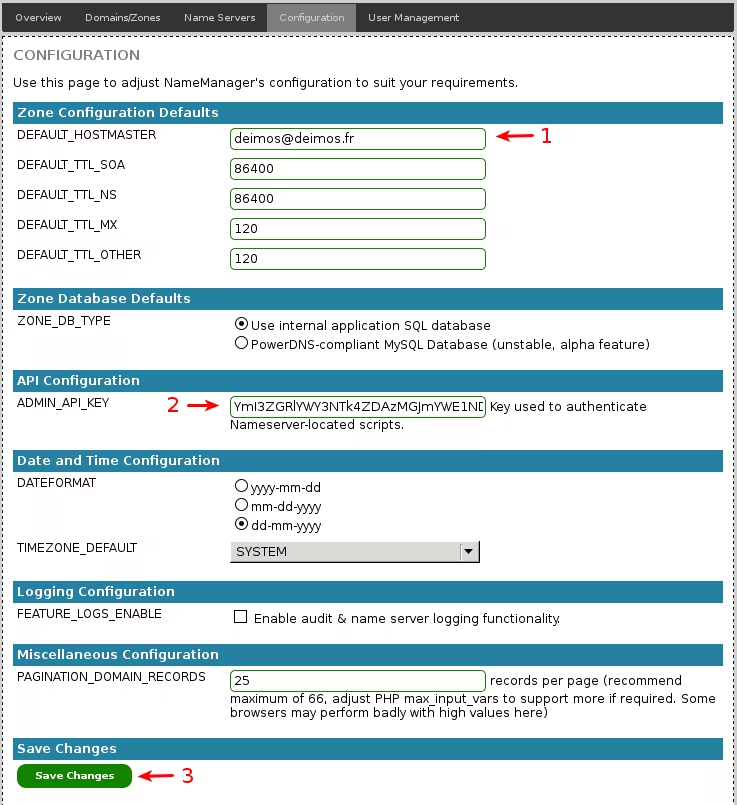
- Set your contact email address
- Enter the previously generated key
- Save the changes
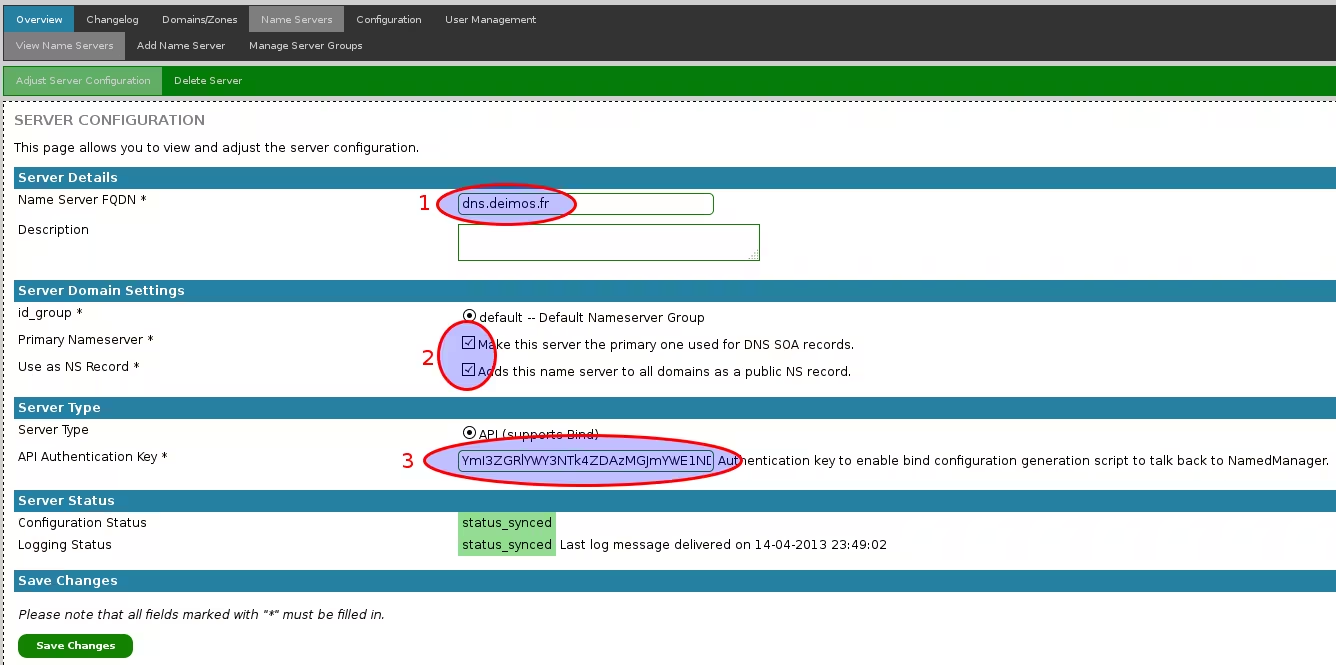
Finalization and Synchronization
It’s now time to add a DNS server from the graphical interface! Do it once by adding the API key etc…
Now add a domain:
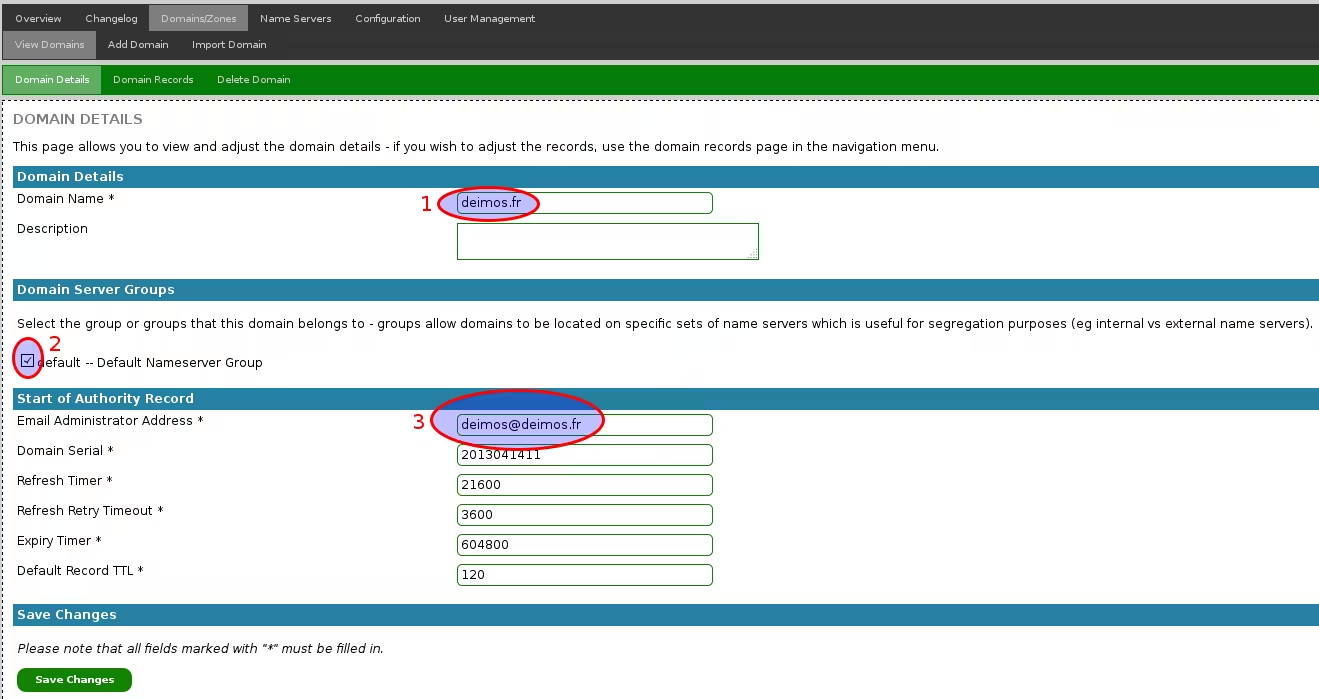
and synchronize everything:
php -q /usr/share/namedmanager/bind/namedmanager_bind_configwriter.php
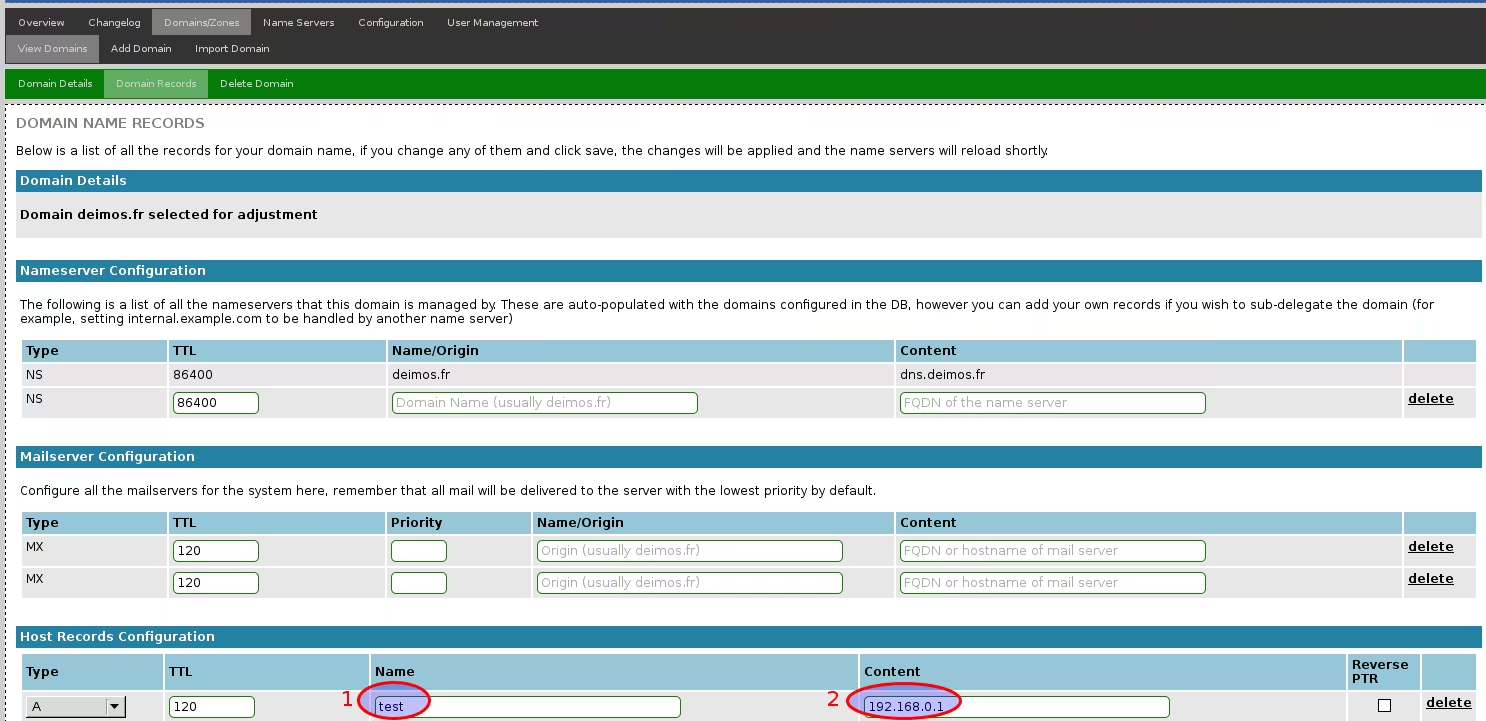
Everything should be working now :-), you can add records:
FAQ
Why Don’t My Changes Work Even After Restarting Bind?
Check your logs! If you have messages like:
  > tail -50 /var/log/syslog
Apr 14 23:10:01 ZG001187 named[6340]: zone 0.168.192.in-addr.arpa/IN: loading from master file 0.168.192.in-addr.arpa.zone failed: file not found
Apr 14 23:10:01 ZG001187 named[6340]: zone 0.168.192.in-addr.arpa/IN: not loaded due to errors.
Apr 14 23:10:01 ZG001187 named[6340]: zone 255.in-addr.arpa/IN: loaded serial 1
Apr 14 23:10:01 ZG001187 named[6340]: zone deimos.fr/IN: loading from master file deimos.fr.zone failed: file not found
Apr 14 23:10:01 ZG001187 named[6340]: zone deimos.fr/IN: not loaded due to errors.
Check your configuration file generated by NamedManager. At the time of writing, I’ve submitted a patch and am waiting for integration, I found myself with this error:
  //
// NamedManager Configuration
//
// This file is automatically generated any manual changes will be lost.
//
zone "deimos.fr" IN {
        type master;
        file "deimos.fr.zone";        allow-update { none; };
};
The complete path of the zone file is missing for it to work properly. To fix this issue, modify line 246 of this file:
                  if ($this->domains)
                {
                        foreach ($this->domains as $domain)
                        {
                                fwrite($fh, "zone \"". $domain["domain_name"] ."\\" IN {\n");
                                fwrite($fh, "\ttype master;\n");
                                fwrite($fh, "\tfile \"". $GLOBALS["config"]["bind"]["zonefiledir"] . $domain["domain_name"] .".zone\";\n");
                                fwrite($fh, "\tallow-update { none; };\n");
                                fwrite($fh, "};\n");
                        }
                }
Then save your domains again through the interface (even without making changes) and run the command executed by cron:
php -q /usr/share/namedmanager/bind/namedmanager_bind_configwriter.php
Now the file /etc/bind/named.namedmanager.conf contains the full path and you can restart bind with your zones properly loaded.
References
Last updated 14 Apr 2013, 22:03 CEST.