Multipath: Configuring Multiple Paths for External Disk Access
Introduction
We will discuss two topics here:
- Device mappers
- Multipathing
We need to understand how device mappers work before tackling multipathing, which is why there will be an explanation of both in this documentation.
In the Linux kernel, the device mapper serves as a generic framework for mapping one block device (“mapping” the device) to another. It is the foundation for LVM2 and EVMS, software RAIDs, or disk encryption; and offers additional features such as file system snapshots. The device mapper works by processing data transferred to it by a virtual block device (provided by itself), and passing the resulting data to another block device.
Multipathing allows you to have multiple paths to access the same data. This aims to increase data access capabilities if the storage equipment allows it (active/active) and to ensure redundancy in case of equipment failure, such as a controller. Here is what a multipath architecture looks like:
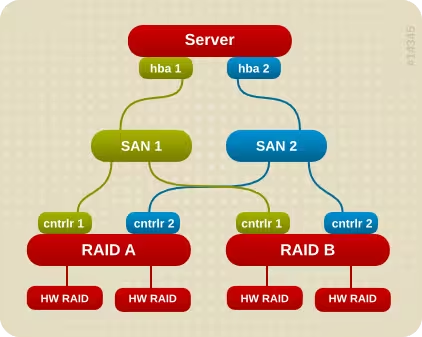
It also works very well with a single SAN.
Device Mapper
Device mappers are rarely used manually. They are generally used by higher layers such as LVM. Nevertheless, we’ll see how to use them.
To add a partition in device mapper:
dmsetup create <device> <map_table>
- device: name of the device to create
- map_table: a file that must contain mapping rules, for example:
  0 409600 linear /dev/sdal 0
409600 2048000 linear /dev/sda2 0
If I want to create a device mapper, I can also do it in a single command line without a file:
echo "0 `blockdev --getsize /dev/sda1` linear /dev/sda1 0" | dmsetup create mynewdm
There are several types of mapping targets:
- linear: continuous allocation
- stripped: segmented allocation between all devices
- error: to generate errors (ideal for development and testing)
- snapshot - copy-on-write device
- snapshot-origin: mapping to an original volume
- zero - sparse block devices (equivalent to /dev/null)
- multipath: multiple routes for connection to a device
To see all available device mappers:
  > dmsetup table
myvg-rootvol: 0 10092544 linear 8:3 2048
To delete a device mapper:
dmsetup remove <disk>
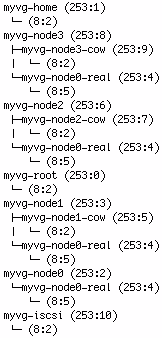
To list all device mappers as a tree:
dmsetup ls --tree
Multipathing
Installation
Multipath is not installed by default, so we need to install a package:
yum install device-mapper-multipath
Then we will load the modules and make the service persistent:
  modprobe dm_multipath
modprobe dm-round-robin
chkconfig multipathd on
Configuration
If you don’t have a configuration file, get one from the documentation:
cp /usr/share/doc/device-mapper-multipath-0.4.9/multipath.conf /etc/
Multipath uses a group notion ranging from 0 to 1024 (from highest to lowest priority). Only one group is active at a time. A group can contain multiple paths.
Let’s proceed with configuring our multipathing service (I’m only showing the essential lines):
  ...
# Blacklist all devices by default. Remove this to enable multipathing
# on the default devices.
#blacklist {
#        devnode "*"
#}
## Use user friendly names, instead of using WWIDs as names.
defaults {
        user_friendly_names yes
}
##
## Here is an example of how to configure some standard options.
##
#
defaults {
        udev_dir                /dev
        polling_interval        10
        selector                "round-robin 0"
        path_grouping_policy    multibus
        getuid_callout          "/lib/udev/scsi_id --whitelisted --device=/dev/%n"
        prio                    alua
        path_checker            readsector0
        rr_min_io               100
        max_fds                 8192
        rr_weight               priorities
        failback                immediate
        no_path_retry           fail
        user_friendly_names     yes
}
blacklist {
       wwid 26353900f02796769
       devnode "^(ram|raw|loop|fd|md|dm-|sr|scd|st)[0-9]*"
       devnode "^hd[a-z]"
}
...
I strongly recommend checking the man pages for the options above.
We can now start our service:
service multipathd start
Usage
Here is the order and tools to use for disk detection, this section is very important:
- Devices: partprobe /dev/
(e.g., sda) - Device-mappers: kpartx -a /dev/
(e.g., dm-1) - Multipath: partprobe /dev/mapper/
(e.g., mpath0)
To see active paths:
multipath -l
To create partitions on a multipathed device mapper, you must do it on the underlying disk (e.g., /dev/sda) and not on the multipathed device mapper! So the procedure is to create your partition with fdisk for example, then detect your new partition:
  partprobe /dev/sda
partprobe /dev/sdb
kpartx -a /dev/mapper/mpath0
FAQ
I still don’t see my new LUNs, how do I refresh them?
It is possible that creating new LUNs/partitions requires a new scan to detect them. We will need this package:
yum install sg3_utils
Then let’s launch the scan:
rescan-scsi-bus.sh
Or alternatively, we can do it directly with /proc:
- If it’s on a SCSI type platform:
echo "- - -" > /sys/class/scsi_host/<HBA>/scan
- If it’s for a Fiber Channel array:
  echo "1" > /sys/class/fc_host/<HBA>/issue_lip
echo "- - -" > /sys/class/scsi_host/<HBA>/scan
I can’t see my new partition correctly, how should I proceed?
Here’s how to proceed when encountering an issue while creating a partition on a multipath. Let’s take this example:
- I don’t see mpath0p2 on one machine, whereas I can see it on other machines:
  > ls /dev/mpath/
mpath0  mpath0p1
- I verify that I can see my partition on both paths (sda2 and sdb2):
  > fdisk -l

Disk /dev/hda: 8589 MB, 8589934592 bytes
255 heads, 63 sectors/track, 1044 cylinders
Units = cylinders of 16065 * 512 = 8225280 bytes

   Device Boot      Start         End      Blocks   Id  System
/dev/hda1   *           1          13      104391   83  Linux
/dev/hda2              14         274     2096482+  8e  Linux LVM
/dev/hda3             275         339      522112+  82  Linux swap / Solaris

Disk /dev/sda: 5368 MB, 5368709120 bytes
166 heads, 62 sectors/track, 1018 cylinders
Units = cylinders of 10292 * 512 = 5269504 bytes

   Device Boot      Start         End      Blocks   Id  System
/dev/sda1               1          10       51429   83  Linux
/dev/sda2              11         770     3910960   8e  Linux LVM

Disk /dev/sdb: 5368 MB, 5368709120 bytes
166 heads, 62 sectors/track, 1018 cylinders
Units = cylinders of 10292 * 512 = 5269504 bytes

   Device Boot      Start         End      Blocks   Id  System
/dev/sdb1               1          10       51429   83  Linux
/dev/sdb2              11         770     3910960   8e  Linux LVM

Disk /dev/dm-1: 5368 MB, 5368709120 bytes
166 heads, 62 sectors/track, 1018 cylinders
Units = cylinders of 10292 * 512 = 5269504 bytes

     Device Boot      Start         End      Blocks   Id  System
/dev/dm-1p1               1          10       51429   83  Linux

Disk /dev/dm-2: 52 MB, 52663296 bytes
255 heads, 63 sectors/track, 6 cylinders
Units = cylinders of 16065 * 512 = 8225280 bytes

Disk /dev/dm-2 doesn't contain a valid partition table
Make sure there are no blacklist options in the configuration preventing you from properly seeing the devices. To do this, we’ll comment out all blacklist parts:
  #blacklist {
#       wwid 26353900f02796769
#       devnode "^(ram|raw|loop|fd|md|dm-|sr|scd|st)[0-9]*"
#       devnode "^hd[a-z]"
#}
- We see that /dev/dm-1p1 is present, but not the 2nd one (at least there’s an error). I check again that there is no presence of my dm-2:
  > ls -l /dev/dm-1
brw-rw---- 1 root root 253, 1 Mar  1 13:42 /dev/dm-1
  > ls -l /dev/mapper/
total 0
crw------- 1 root root  10, 62 Mar  1 13:41 control
brw-rw---- 1 root disk 253,  1 Mar  1 13:42 mpath0
brw-rw---- 1 root root 253,  2 Mar  1 14:06 mpath0p1
brw------- 1 root root 253,  0 Mar  1 13:41 myvg0-mylv0
- We see that “253, 1” corresponds to /dev/dm-1. We’ll do a kpartx and partprobe on both to refresh the paths:
  kpartx -a /dev/dm-1
kpartx -a /dev/dm-2
partprobe /dev/mapper/mpath0
Even if you get errors like:
device-mapper: create ioctl failed: Device or resource busy
It’s not serious, it allows it to refresh the list of device mappers.
- And now it works:
  > ls -l /dev/mapper/
total 0
crw------- 1 root root  10, 62 Mar  1 13:41 control
brw-rw---- 1 root disk 253,  1 Mar  1 13:42 mpath0
brw-rw---- 1 root root 253,  2 Mar  1 14:06 mpath0p1
brw-rw---- 1 root disk 253,  3 Mar  1 14:19 mpath0p2
brw------- 1 root root 253,  0 Mar  1 13:41 myvg0-mylv0
Resources
Last updated 17 Apr 2012, 09:46 CEST.