MCollective: Run Actions in Parallel on Remote Machines
![]()
| Software version | 2.0.0 |
| Operating System | Debian 7 / RedHat 6.3 |
| Website | MCollective Website |
| Last Update | 14/05/2013 |
Introduction
Mcollective, short for “Marionette Collective”, is software written by R.I. Pienaar. The goal is to facilitate the management of numerous machines from a central point. It can be compared to tools like Fabric or Capistrano because it allows you to launch many actions in parallel on remote machines, but it differs on a notable point: it does not rely on SSH. Indeed, the program relies on middleware and provides features that make you not just any admin, but THE ultimate admin.
Why is this? Because a good part of the repetitive and tedious work is handled directly by the program. With the two software mentioned above, you need to know which machines are there and what configuration they carry. In short, you have to keep an up-to-date list. With Mcollective, client discovery is automatic: machines register themselves on a server, and during a request, messages are dispatched to all hosts via the middleware.
Mcollective uses a daemon that runs on each machine. The latter uses agents to perform the various actions expected of it: managing packages, services, or sending messages. Each agent subscribes to a “topic” of the middleware and waits for corresponding messages.
I tried a half Debian 6, half Debian 7 installation to take advantage of ActiveMQ packages, but I don’t recommend it because there are a lot of dependency problems related to the Ruby and gems versions. That’s why I went with Debian 7.
A web interface for MCollective administration has been created: MCOMaster.
Prerequisites
Mcollective uses a queue server, so I’ll suggest two options:
- Stomp server: designed for small installations
- ActiveMQ: a Java powerhouse, but necessary for large installations
Use the one that interests you. Here’s how Mcollective is structured and should work:
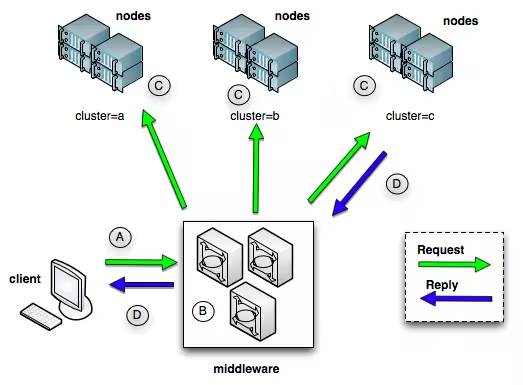
- The client actually corresponds to the machine that acts as the Mcollective server. It is the node that will control the Mcollective servers.
- The Mcollective servers are represented here by nodes in the form of clusters. For a machine to be controlled by the Mcollective client, the server must be installed on it.
- The middleware corresponds to the queue server (ActiveMQ for example).
Middleware
Stomp server
Installation
Installing the Stomp server is easy:
aptitude install stompserver libstomp-ruby
Configuration
And its configuration is simple, modify the host with the IP address of the interface on which it should listen. Or all of them:
  ---
:daemon: true
:working_dir: /var/lib/stompserver
:logdir: /var/log/stompserver
:pidfile: /var/run/stompserver/pid
:storage: /var/lib/stompserver/storage
:etcdir: /etc/stompserver
:queue: memory
:auth: false
:debug: false
:group: stompserver
:user: stompserver
:host: 0.0.0.0
:port: 61613
ActiveMQ
Installation
Let’s start installing ActiveMQ:
aptitude install activemq
Configuration
We’ll configure ActiveMQ. I won’t explain all these lines, I simply took them from the PuppetLab site:
  <beans
  xmlns="http://www.springframework.org/schema/beans"
  xmlns:amq="http://activemq.apache.org/schema/core"
  xmlns:xsi="http://www.w3.org/2001/XMLSchema-instance"
  xsi:schemaLocation="http://www.springframework.org/schema/beans http://www.springframework.org/schema/beans/spring-beans-2.0.xsd
  http://activemq.apache.org/schema/core http://activemq.apache.org/schema/core/activemq-core.xsd
  http://activemq.apache.org/camel/schema/spring http://activemq.apache.org/camel/schema/spring/camel-spring.xsd">

    <bean class="org.springframework.beans.factory.config.PropertyPlaceholderConfigurer">
        <property name="locations">
            <value>file:${activemq.conf}/credentials.properties</value>
        </property>
    </bean>

    <broker xmlns="http://activemq.apache.org/schema/core" brokerName="localhost" useJmx="true" schedulePeriodForDestinationPurge="60000" dataDirectory="/var/lib/activemq/activemq-data">
        <destinationPolicy>
          <policyMap>
            <policyEntries>
              <policyEntry topic=">" producerFlowControl="false"/>
              <policyEntry queue="*.reply.>" gcInactiveDestinations="true" inactiveTimoutBeforeGC="300000" />
            </policyEntries>
          </policyMap>
        </destinationPolicy>

        <managementContext>
            <managementContext createConnector="false"/>
        </managementContext>

        <plugins>
          <statisticsBrokerPlugin/>
          <simpleAuthenticationPlugin>
            <users>
              <authenticationUser username="mcollective" password="marionette" groups="mcollective,everyone"/>
              <authenticationUser username="admin" password="secret" groups="mcollective,admin,everyone"/>
            </users>
          </simpleAuthenticationPlugin>
          <authorizationPlugin>
            <map>
              <authorizationMap>
                <authorizationEntries>
                  <authorizationEntry queue=">" write="admins" read="admins" admin="admins" />
                  <authorizationEntry topic=">" write="admins" read="admins" admin="admins" />
                  <authorizationEntry topic="mcollective.>" write="mcollective" read="mcollective" admin="mcollective" />
                  <authorizationEntry queue="mcollective.>" write="mcollective" read="mcollective" admin="mcollective" />
                  <authorizationEntry topic="ActiveMQ.Advisory.>" read="everyone" write="everyone" admin="everyone"/>
                </authorizationEntries>
              </authorizationMap>
            </map>
          </authorizationPlugin>
        </plugins>

        <systemUsage>
            <systemUsage>
                <memoryUsage>
                    <memoryUsage limit="20 mb"/>
                </memoryUsage>
                <storeUsage>
                    <storeUsage limit="1 gb" name="foo"/>
                </storeUsage>
                <tempUsage>
                    <tempUsage limit="100 mb"/>
                </tempUsage>
            </systemUsage>
        </systemUsage>

        <transportConnectors>
            <transportConnector name="openwire" uri="tcp://0.0.0.0:61616"/>
            <transportConnector name="stomp" uri="stomp://0.0.0.0:61613"/>
        </transportConnectors>
    </broker>
</beans>
This will create a ‘mcollective’ user with the password ‘marionette’ and give full access (read, write, and admin) to “/topic/mcollective.*”. Adapt the password according to your needs.
We’ll insert a file with the default credentials for ActiveMQ:
cp /usr/share/doc/activemq/examples/conf/credentials.properties /etc/activemq/instances-available/main
Next, we’ll add some options to avoid problems when booting ActiveMQ:
  # Time to wait for the server to start, in seconds
STARTTIME=5

# !!! Use a specific data directory for each instance
ACTIVEMQ_BASE="/var/lib/activemq/$INSTANCE"

# Use openjdk-6 as default Java runtime
JAVA_HOME="/usr/lib/jvm/java-6-openjdk/"

# Set some JVM memory options
ACTIVEMQ_OPTS="-Xms512M -Xmx512M -Dorg.apache.activemq.UseDedicatedTaskRunner=true"

# Arguments to launch /usr/bin/activemq
ACTIVEMQ_ARGS="start xbean:activemq.xml"

# ActiveMQ configuration files
ACTIVEMQ_CONF="/etc/activemq/instances-enabled/$INSTANCE"
Then we will enable this configuration and start ActiveMQ:
  ln -s /etc/activemq/instances-available/main /etc/activemq/instances-enabled/main
/etc/init.d/activemq start
MCollective
Prerequisites
Debian
To install MCollective, we’re going to keep it simple and set up the Debian repository:
  wget http://apt.puppetlabs.com/puppetlabs-release-stable.deb
dpkg -i puppetlabs-release-stable.deb
And then, update:
aptitude update
RedHat
Just like with Debian, there is a yum repo on Red Hat, and we’ll install a package that will configure it for us:
rpm -ivh http://yum.puppetlabs.com/el/6/products/x86_64/puppetlabs-release-6-6.noarch.rpm
Server
In this section, we’ll see how to install and configure Mcollective on the server.
Installation
Install mcollective on Debian:
aptitude install mcollective mcollective-client
You’ll be presented with a first option. If there’s Puppet on this machine, it will ask you to remove it; say no, and a second more flexible proposal will be offered. Accept this one.
Configuration
Let’s configure the server part that will allow us to make queries to the server:
  topicprefix = /topic/
main_collective = mcollective
collectives = mcollective
libdir = /usr/share/mcollective/plugins
logger_type = console
loglevel = warn

# Plugins
securityprovider = psk
plugin.psk = unset

connector = stomp
plugin.stomp.host= localhost
plugin.stomp.port= 61613
plugin.stomp.user= mcollective
plugin.stomp.password= marionette

# Facts
factsource = yaml
plugin.yaml = /etc/mcollective/facts.yaml
Then configure the client part, even if it’s the server, this will allow us to perform actions on this machine as well:
  ########################
# GLOCAL CONFIGURATION #
########################

topicprefix = /topic/
main_collective = mcollective
collectives = mcollective
libdir = /usr/share/mcollective/plugins
logfile = /var/log/mcollective.log
loglevel = info
daemonize = 1
classesfile = /var/lib/puppet/classes.txt

###########
# MODULES #
###########

# Security
securityprovider = psk
plugin.psk = unset

# Stomp
connector = stomp
plugin.stomp.host = mcollective.deimos.fr
plugin.stomp.port = 61613
plugin.stomp.user = mcollective
plugin.stomp.password = marionette

# AgentPuppetd
plugin.puppetd.puppetd = /usr/sbin/puppetd
plugin.puppetd.lockfile = /var/lib/puppet/state/puppetdlock
plugin.puppetd.statefile = /var/lib/puppet/state/state.yaml
plugin.puppet.pidfile = /var/run/puppet/agent.pid
plugin.puppetd.splaytime = 100
plugin.puppet.summary = /var/lib/puppet/state/last_run_summary.yaml

#########
# FACTS #
#########

factsource = facter
plugin.yaml = /etc/mcollective/facts.yaml
plugin.facter.facterlib = /var/lib/puppet/lib/facter
fact_cache_time = 300
Now, restart mcollective:
/etc/init.d/mcollective restart
Client
In this section, we’ll see how to install and configure Mcollective on client machines.
Installation
Debian
Install mcollective:
aptitude install mcollective
RedHat
Install mcollective:
yum install mcollective
Configuration
On your clients, simply edit the configuration and put the correct values:
  ########################
# GLOCAL CONFIGURATION #
########################

topicprefix = /topic/
main_collective = mcollective
collectives = mcollective
libdir = /usr/share/mcollective/plugins
logfile = /var/log/mcollective.log
loglevel = info
daemonize = 1
classesfile = /var/lib/puppet/classes.txt

###########
# MODULES #
###########

# Security
securityprovider = psk
plugin.psk = unset

# Stomp
connector = stomp
plugin.stomp.host = mcollective.deimos.fr
plugin.stomp.port = 61613
plugin.stomp.user = mcollective
plugin.stomp.password = marionette

# AgentPuppetd
plugin.puppetd.puppetd = /usr/sbin/puppetd
plugin.puppetd.lockfile = /var/lib/puppet/state/puppetdlock
plugin.puppetd.statefile = /var/lib/puppet/state/state.yaml
plugin.puppet.pidfile = /var/run/puppet/agent.pid
plugin.puppetd.splaytime = 100
plugin.puppet.summary = /var/lib/puppet/state/last_run_summary.yaml

#########
# FACTS #
#########

factsource = facter
plugin.yaml = /etc/mcollective/facts.yaml
plugin.facter.facterlib = /var/lib/puppet/lib/facter
fact_cache_time = 300
Usage
Now let’s move on to the interesting part… using it :-)
Detecting Machines
There is a command to see which hosts are available:
  > mco ping
mcollective.deimos.fr                    time=45.62 ms
server1                                  time=52.32 ms


---- ping statistics ----
2 replies max: 52.32 min: 45.62 avg: 48.97
Getting Help
To get help and see installed modules:
  > mco help
The Marionette Collective version 2.0.0

  controller      Control the mcollective daemon
  facts           Reports on usage for a specific fact
  filemgr         Generic File Manager Client
  find            Find hosts matching criteria
  help            Application list and help
  inventory       General reporting tool for nodes, collectives and subcollectives
  nrpe            Client to the Nagios Remote Plugin Execution system
  package         Install and uninstall software packages
  pgrep           Distributed Process Management
  ping            Ping all nodes
  plugin          MCollective Plugin Application
  rpc             Generic RPC agent client application
  service         Start and stop system services
Getting Statistics
It’s possible to retrieve statistics on your nodes this way:
  > mco controller stats
Determining the amount of hosts matching filter for 2 seconds .... 2

                   mcollective.deimos.fr> total=14, replies=1, valid=14, invalid=0, filtered=12, passed=2
                                 server1> total=14, replies=13, valid=14, invalid=0, filtered=0, passed=14

Finished processing 2 / 2 hosts in 82.81 ms
Inventorying a Node
The purpose of this command is to show us everything we have available on a mcollective node:
  > mco inventory server1
Inventory for server1:

   Server Statistics:
                      Version: 2.0.0
                   Start Time: 2012-08-02 16:00:33 +0200
                  Config File: /etc/mcollective/server.cfg
                  Collectives: mcollective
              Main Collective: mcollective
                   Process ID: 2746
               Total Messages: 27
      Messages Passed Filters: 26
            Messages Filtered: 0
             Expired Messages: 1
                 Replies Sent: 25
         Total Processor Time: 0.7 seconds
                  System Time: 0.49 seconds

   Agents:
      discovery       filemgr         nrpe
      package         process         rpcutil
      service         shellcmd

   Configuration Management Classes:
      [...]
      openssh                        openssh::common
      openssh::redhat                openssh::ssh_keys
      timezone                       timezone::redhat

   Facts:
      architecture => x86_64
      [...]
      virtual => vmware
Reloading All Nodes
If you have just deployed a new agent and want to reload Mcollective without restarting it, it’s possible to do it from the client:
mco controller reload_agents
If you want to do it on just one machine:
mco controller reload_agents -W /machine/
Using RPC Commands
It is possible to use all modules in the form of an RPC command. Here is an example of syntax with the service module:
mco rpc service start service=httpd
Filters
I’ll use examples from the official documentation because they are very explicit:
  # all machines with the service agent
mco ping -A service
mco ping --with-agent service

# all machines with the apache class on them
mco ping -C apache
mco ping --with-class apache

# all machines with a class that match the regular expression
mco ping -C /service/

# all machines in the UK
mco ping -F country=uk
mco ping --with-fact country=uk

# all machines in either UK or USA
mco ping -F "country=/uk|us/"

# just the machines called dev1 or dev2
mco ping -I dev1 -I dev2

# all machines in the domain foo.com
mco ping -I /foo.com$/

# all machines with classes matching /apache/ in the UK
mco ping -W "/apache/ location=uk"
For even more advanced filters, I recommend the official documentation. Here’s an example of a somewhat complex search:
mco service restart httpd -S "((customer=acme and environment=staging) or environment=development) and /apache/"
Modules
Modules allow you to add functionality to Mcollective. For example, the management of services, packages, nrpe plugins…
We’ll see here how to install some of them. To make this article simple and compatible with RedHat/Debian, we’ll use variables for plugin installation and create some missing folders:
  # Red Hat
test -d /usr/libexec/mcollective/mcollective && mco_plugins=/usr/libexec/mcollective/mcollective
# Debian
test -d /usr/share/mcollective/plugins/mcollective && mco_plugins=/usr/share/mcollective/plugins/mcollective
mkdir -p $mco_plugins/{aggregate,specs}
Services
The Service module allows you to use service management: stop, start, restart, enable, disable and status. We’ll need to install one part on the servers and another part on the client.
Server
On all server nodes, add this:
  cd $mco_plugins/agent
wget -O service.rb "https://raw.github.com/puppetlabs/mcollective-plugins/master/agent/service/agent/puppet-service.rb"
Restart Mcollective.
Client
On the client:
  cd $mco_plugins/agent
wget "https://raw.github.com/puppetlabs/mcollective-plugins/master/agent/service/agent/service.ddl"
wget -O service.rb "https://raw.github.com/puppetlabs/mcollective-plugins/master/agent/service/agent/puppet-service.rb"
cd $mco_plugins/application
wget "https://raw.github.com/puppetlabs/mcollective-plugins/master/agent/service/application/service.rb"
Restart Mcollective.
Usage
For usage it’s simple, just look at my request for the ssh service:
  > mco service ssh status
Do you really want to operate on services unfiltered? (y/n): y

 * [ ============================================================> ] 1 / 1

server1                         status=running

---- service summary ----
           Nodes: 1 / 1
        Statuses: started=1
    Elapsed Time: 0.12 s
File Manager Agent
The “File Manager Agent” module allows you to create empty files, delete them or retrieve information about files.
Server
On all server nodes, add this:
  cd $mco_plugins/agent
wget "https://raw.github.com/puppetlabs/mcollective-plugins/master/agent/filemgr/agent/filemgr.rb"
Restart Mcollective.
Client
On the client:
  cd $mco_plugins/agent
wget "https://raw.github.com/puppetlabs/mcollective-plugins/master/agent/filemgr/agent/filemgr.ddl" "https://raw.github.com/puppetlabs/mcollective-plugins/master/agent/filemgr/agent/filemgr.rb"
cd $mco_plugins/application
wget "https://raw.github.com/puppetlabs/mcollective-plugins/master/agent/filemgr/application/filemgr.rb"
Restart Mcollective.
Usage
For usage it’s simple, here’s how to get stats on a file:
  > mco rpc filemgr status file=/etc/puppet/puppet.conf
Determining the amount of hosts matching filter for 2 seconds .... 1

 * [ ============================================================> ] 1 / 1


server1
         Change time: 2012-07-30 15:20:22 +0200
             Present: 1
                Type: file
               Owner: 0
   Modification time: 1343654422
              Status: present
               Group: 0
         Change time: 1343654422
         Access time: 1343828479
         Access time: 2012-08-01 15:41:19 +0200
                Size: 1077
                 MD5: 9b0758440c57ee13abd7e120cab57e84
                Name: /etc/puppet/puppet.conf
   Modification time: 2012-07-30 15:20:22 +0200
                Mode: 100644

Finished processing 1 / 1 hosts in 65.48 ms
NRPE
The “NRPE” module allows you to use NRPE checks defined in your nagios configurations.
Server
On all server nodes, add this:
  cd $mco_plugins/agent
wget "https://raw.github.com/puppetlabs/mcollective-plugins/master/agent/nrpe/agent/nrpe.rb"
Restart Mcollective.
Client
On the client:
  cd $mco_plugins/agent
wget "https://raw.github.com/puppetlabs/mcollective-plugins/master/agent/nrpe/agent/nrpe.ddl" "https://raw.github.com/puppetlabs/mcollective-plugins/master/agent/nrpe/agent/nrpe.rb"
cd $mco_plugins/application
wget "https://raw.github.com/puppetlabs/mcollective-plugins/master/agent/nrpe/application/nrpe.rb"
cd $mco_plugins/aggregate
wget "https://raw.github.com/puppetlabs/mcollective-plugins/master/agent/nrpe/aggregate/nagios_states.rb"
cd /usr/sbin/
wget "https://raw.github.com/puppetlabs/mcollective-plugins/master/agent/nrpe/sbin/check-mc-nrpe"
Restart Mcollective.
Usage
For usage it’s simple, here’s how to get stats on a file:
mco nrpe -W /dev_server/ check_load
Package Agent
The “Package Agent” module allows you to install packages or find out if a package is installed or not.
Server
On all server nodes, add this:
  cd $mco_plugins/agent
wget "https://raw.github.com/puppetlabs/mcollective-plugins/master/agent/package/agent/puppet-package.rb"
Restart Mcollective.
Client
On the client:
  cd $mco_plugins/agent
wget "https://raw.github.com/puppetlabs/mcollective-plugins/master/agent/package/agent/puppet-package.rb" "https://raw.github.com/puppetlabs/mcollective-plugins/master/agent/package/agent/package.ddl"
cd $mco_plugins/application
wget "https://raw.github.com/puppetlabs/mcollective-plugins/master/agent/package/application/package.rb"
cd $mco_plugins/specs
wget "https://raw.github.com/puppetlabs/mcollective-plugins/master/agent/package/spec/package_agent_spec.rb" "https://raw.github.com/puppetlabs/mcollective-plugins/master/agent/package/spec/package_application_spec.rb"
Restart Mcollective.
Usage
Here’s an example of usage:
  > mco package status postfix
Do you really want to operate on packages unfiltered? (y/n): y

 * [ ============================================================> ] 1 / 1

server1                         version = postfix-2.6.6-2.2.el6_1

---- package agent summary ----
           Nodes: 1 / 1
        Versions: 1 * 2.6.6-2.2.el6_1
    Elapsed Time: 0.11 s
FactsFacter
The “FactsFacter” module allows you to use the facts you have in your Puppet.
Server
On all server nodes, add this:
  cd $mco_plugins/facts
wget "https://raw.github.com/puppetlabs/mcollective-plugins/master/facts/facter/facter_facts.rb"
You also need to modify the configuration with the facts information. Add or adapt these lines:
  [...]
# Facts
factsource = facter
plugin.yaml = /etc/mcollective/facts.yaml
plugin.facter.facterlib = /usr/lib/ruby/site_ruby/1.8/facter:/usr/lib/ruby/site_ruby/1.8/facter/util:/var/lib/puppet/lib/facter
fact_cache_time = 300
Restart Mcollective.
Client
On the client:
  cd $mco_plugins/facts
wget "https://raw.github.com/puppetlabs/mcollective-plugins/master/facts/facter/facter_facts.rb"
Restart Mcollective.
Usage
Here’s an example of usage:
  > mco find -W operatingsystem=RedHat
server1
Process Management Agent
The “Agent Process” module allows you to list processes on your machines.
Server
On all server nodes, add this:
  cd $mco_plugins/agent
wget "https://raw.github.com/puppetlabs/mcollective-plugins/master/agent/process/agent/process.rb"
You will also need a ruby sys-proctable library.
Restart Mcollective.
Client
On the client:
  cd $mco_plugins/agent
wget "https://raw.github.com/puppetlabs/mcollective-plugins/master/agent/process/agent/process.rb" "https://raw.github.com/puppetlabs/mcollective-plugins/master/agent/process/agent/process.ddl"
cd $mco_plugins/application
wget "https://raw.github.com/puppetlabs/mcollective-plugins/master/agent/process/application/pgrep.rb"
Restart Mcollective.
Usage
Here’s an example of usage:
  > mco pgrep postfix

 * [ ============================================================> ] 1 / 1

server1
     PID USER        VSZ              COMMAND
    1519 root        75.395 MB        /usr/libexec/postfix/master

   ---- process list stats ----
        Matched hosts: 1
    Matched processes: 1
        Resident Size: 788.000 KB
         Virtual Size: 75.395 MB

Finished processing 1 / 1 hosts in 294.55 ms
Agent Puppetd
The “Agent Puppet” module allows you to control the puppetd daemon and launch puppet client runs. The problem with this one is that it’s not up to date, doesn’t support tags and the noop option. Fortunately, some people have looked into it, so we’ll install this version while waiting for the official version to come out.
Server
On all server nodes, add this:
  cd $mco_plugins/agents
wget "https://gist.github.com/raw/2983382/3cd8ca0764d0f1ab4411a2da3fd8a75262ce2ad9/puppetd.rb"
Restart Mcollective.
Client
On the client:
  cd $mco_plugins/agents
wget "https://gist.github.com/raw/2983382/3cd8ca0764d0f1ab4411a2da3fd8a75262ce2ad9/puppetd.rb" "https://gist.github.com/raw/2983382/f07e0d95378d1d46bd479ba9a734349432ecac0f/puppetd.ddl"
cd $mco_plugins/application
wget -O puppetd.rb "https://gist.github.com/raw/2983382/5a95d65d1c027444abcfb4fbe0e5f85d772acdf9/puppetd_application.rb"
Restart Mcollective.
Usage
Here’s an example of usage:
  > mco puppetd -W /server1/ -f --tags mcollective --noop runonce
2012-08-08 10:38:37 +0200> Running with custom tags given: mcollective

 * [ ============================================================> ] 1 / 1


Finished processing 1 / 1 hosts in 1023.46 ms
- -f: allows forcing synchronization immediately instead of waiting for a random time interval
- –tags: allows defining a particular tag to synchronize
- –noop: allows simulation
If we want to run it on multiple machines in parallel (2 simultaneously):
> mco puppetd runall 2
Shell
The “Shell” module allows you to run any shell command on all your machines.
Server
On all server nodes, add this:
  cd $mco_plugins/agents
wget "https://raw.github.com/phobos182/mcollective-plugins/master/agent/shell/shell.rb"
Restart Mcollective.
Client
On the client:
  cd $mco_plugins/agents
wget "https://raw.github.com/phobos182/mcollective-plugins/master/agent/shell/shell.rb" "https://raw.github.com/phobos182/mcollective-plugins/master/agent/shell/shell.ddl"
cd $mco_plugins/application
wget "https://raw.github.com/phobos182/mcollective-plugins/master/agent/shell/application/shell.rb"
Restart Mcollective.
Usage
Here’s an example of usage:
  > mco shell '/etc/init.d/postfix restart'
Do you really want to send this command unfiltered? (y/n): y
Determining the amount of hosts matching filter for 2 seconds .... 1

 * [ ============================================================> ] 1 / 1

[ch-bmf-srv-poc-5] exit=0: Shutting down postfix: [  OK  ]
Starting postfix: [  OK  ]
 ...
FAQ
Debugging ActiveMQ
Sometimes we may have problems when setting up ActiveMQ. To get more information on the return, here’s how to manually start ActiveMQ:
/usr/bin/activemq console xbean:/etc/activemq/instances-enabled/main/activemq.xml
Caught TERM; calling stop
If you encounter this type of error message in Puppet Dashboard when launching Puppet runs from Mcollective, you need to work on the puppet manifest, to comment this line:
  [...]
    service {
        'puppet-srv' :
            name => 'puppet',
            # Let this line commented if you're using Puppet Dashboard
            #ensure => stopped,
            enable => false
    }
[...]
`load’: no such file to load
If you have this kind of message when starting MCollective:
  /usr/lib/ruby/1.8/mcollective/pluginmanager.rb:169:in `load': no such file to load -- mcollective/facts/facter_facts.rb (LoadError)
	from /usr/lib/ruby/1.8/mcollective/pluginmanager.rb:169:in `loadclass'
	from /usr/lib/ruby/1.8/mcollective/config.rb:137:in `loadconfig'
	from /usr/sbin/mcollectived:29
It’s because the path of the libraries is wrong1. Fix this in the MCollective server configuration file:
  [...]
# libdir = /usr/libexec/mcollective
libdir = /usr/share/mcollective/plugins
[...]
References
http://www.unixgarden.com/index.php/gnu-linux-magazine/mcollective-l-administration-systeme-massive http://docs.puppetlabs.com/mcollective
Last updated 14 May 2013, 14:08 CEST.