Process Latency and Kernel Timing
| Software version | Kernel 2.6.32+ |
| Operating System | Red Hat 6.3 Debian 7 |
| Website | Kernel Website |
| Last Update | 05/01/2014 |
The Clocks
There are several clocks that allow you to obtain or manipulate time operations:
- RTC (Real Time Clock): this is the BIOS battery that keeps the date and time on a machine when it is turned off. You can get information about it in the
/proc/driver/rtcfile. - TSC (Time Stamp Counter): this is a counter that is set to the same frequency as the CPU, even if it oscillates. The kernel uses the TSC with the RTC to calculate the date and time.
- PIC (Programmable Interrupt Counter): also known as PIT (Programmable Interval Timer) which allows to send interrupts to the kernel after a certain time has passed. It is generally used for process scheduling.
- APIC (Advanced Programmable Interrupt Controller): It also operates on the CPU clock and allows tracking of running processes and sends local interruptions to this processor.
On a 2.6 kernel, the frequency of the PIC is 1MHz or 1 tick/ms (also called jiffy). This interval can be adjusted during kernel compilation or in boot parameters (for some distributions). A shorter tick value will give better resolution times, however, applications may run slightly slower.
The boot parameter is:
GRUB_CMDLINE_LINUX_DEFAULT="quiet tick_divider=<value>"
The interesting values are:
- 2 = 500 Hz
- 4 = 250 Hz
- 5 = 200 Hz
- 8 = 125 Hz
- 10 = 100 Hz
The advantage is the reduction of CPU overhead, but the scheduler is less fair with interactive processes.
Managing CPU Speed
In Red Hat, there’s a tool to control the CPU clock speed. To do this, install the “cpuspeed” daemon and configure it in /etc/sysconfig/cpuspeed:
  # /etc/sysconfig/cpuspeed
#
# This configuration file controls the behavior of both the
# cpuspeed daemon and various cpufreq modules.
# For the vast majority of users, there shouldn't be any need to
# alter the contents of this file at all. By and large, frequency
# scaling should Just Work(tm) with the defaults.

### DRIVER ###
# Your CPUFreq driver module
# Note that many drivers are now built-in, rather than built as modules,
# so its usually best not to specify one.
# default value: empty (try to auto-detect/use built-in)
DRIVER=

### GOVERNOR ###
# Which scaling governor to use
# Details on scaling governors for your cpu(s) can be found in
# cpu-freq/governors.txt, part of the kernel-doc package
# NOTES:
# - The GOVERNOR parameter is only valid on centrino, powernow-k8 (amd64)
#   and acpi-cpufreq platforms, other platforms that support frequency
#   scaling always use the 'userspace' governor.
# - Using the 'userspace' governor will trigger the cpuspeed daemon to run,
#   which provides said user-space frequency scaling.
# default value: empty (defaults to ondemand on centrino, powernow-k8,
#                       and acpi-cpufreq systems, userspace on others)
GOVERNOR=

### FREQUENCIES ###
# NOTE: valid max/min frequencies for your cpu(s) can be found in
# /sys/devices/system/cpu/cpu*/cpufreq/scaling_available_frequencies
# on systems that support frequency scaling (though only after the
# appropriate drivers have been loaded via the cpuspeed initscript).
# maximum speed to scale up to
# default value: empty (use cpu reported maximum)
MAX_SPEED=
# minimum speed to scale down to
# default value: empty (use cpu reported minimum)
MIN_SPEED=

### SCALING THRESHOLDS ###
# Busy percentage threshold over which to scale up to max frequency
# default value: empty (use governor default)
UP_THRESHOLD=
# Busy percentage threshold under which to scale frequency down
# default value: empty (use governor default)
DOWN_THRESHOLD=

### NICE PROCESS HANDLING ###
# Let background (nice) processes speed up the cpu
# default value: 0 (background process usage can speed up cpu)
# alternate value: 1 (background processes will be ignored)
IGNORE_NICE=0


#####################################################
########## HISTORICAL CPUSPEED CONFIG BITS ##########
#####################################################
VMAJOR=1
VMINOR=1

# Add your favorite options here
#OPTS="$OPTS -s 0 -i 10 -r"

# uncomment and modify this to check the state of the AC adapter
#OPTS="$OPTS -a /proc/acpi/ac_adapter/*/state"

# uncomment and modify this to check the system temperature
#OPTS="$OPTS -t /proc/acpi/thermal_zone/*/temperature 75"
You can get the current information like this:
cpuspeed ---help 2>&1 | more
It’s possible to see the possible assignable values:
  cat /sys/devices/system/cpu/cpu0/cpufreq/scaling_available_frequencies
3166000 2667000 2333000 2000000
So 3.16Ghz, 2.66Ghz, 2.33Ghz or 2Ghz.
And finally the governor shows the algorithm used. For example, here we use “on demand”, which changes the processor speed on the fly according to demand:
  > cat /sys/devices/system/cpu/cpu0/cpufreq/scaling_available_governors
ondemand performance
If you want the best performance, disable this daemon. The drawback is of course the power consumption (think of the environment). You should know that if you need very low latencies, it is strongly recommended to disable this daemon.
IRQ Balancing
Make sure that this information is correctly compiled in the kernel:
  > grep -e VOLUNTARY -e BKL /boot/config-2.6.32-279.2.1.el6.x86_64 | grep -v '#'
CONFIG_PREEMPT_VOLUNTARY=y
CONFIG_BKL=y
These options are designed to allow the kernel to preempt and schedule certain processes. The gain will be felt at the level of latency (especially network). For example, the kernel can handle disk IO operations and simultaneously receive interrupts from the network card. The handler doing disk IOs can be preempted in favor of the network card interrupt which would improve network latency.
It is nevertheless possible to disable IRQ balancing via a boot parameter:
GRUB_CMDLINE_LINUX_DEFAULT="quiet noapic"
If IRQs are unevenly distributed across CPUs, the result can be inconsistent performance when interrupt handlers preempt processes that are on the CPU.
To see interrupts on interrupts:
  > cat /proc/interrupts
           CPU0       CPU1
  0:        121         38   IO-APIC-edge      timer
  1:          3          0   IO-APIC-edge      i8042
  7:          0          0   IO-APIC-edge      parport0
  8:          1          0   IO-APIC-edge      rtc0
  9:          0          0   IO-APIC-fasteoi   acpi
 12:          2          2   IO-APIC-edge      i8042
 16:       9138       9221   IO-APIC-fasteoi   uhci_hcd:usb2
 17:     119477     120478   IO-APIC-fasteoi   uhci_hcd:usb4, uhci_hcd:usb7
 18:     235767     237579   IO-APIC-fasteoi   ata_generic, ata_piix, ata_piix, uhci_hcd:usb8
 22:     627101     627432   IO-APIC-fasteoi   ehci_hcd:usb1, uhci_hcd:usb5
 23:          0          0   IO-APIC-fasteoi   ehci_hcd:usb3, uhci_hcd:usb6
 40:    4752698          0  HPET_MSI-edge      hpet2
 41:          0    4481502  HPET_MSI-edge      hpet3
 47:     704766     717489   PCI-MSI-edge      eth0
 48:        722        764   PCI-MSI-edge      snd_hda_intel
 49:    1462373    1492905   PCI-MSI-edge      i915
NMI:       3001       2977   Non-maskable interrupts
LOC:        754        731   Local timer interrupts
SPU:          0          0   Spurious interrupts
PMI:       3001       2977   Performance monitoring interrupts
IWI:          0          0   IRQ work interrupts
RES:    9186852    9208409   Rescheduling interrupts
CAL:        607        596   Function call interrupts
TLB:     447954     362994   TLB shootdowns
TRM:          0          0   Thermal event interrupts
THR:          0          0   Threshold APIC interrupts
MCE:          0          0   Machine check exceptions
MCP:         82         82   Machine check polls
ERR:          0
MIS:          0
Interceptions allow exploiting cache affinity for CPU and equalizing the number of CPU visits. To give an IRQ affinity to a CPU to improve performance by making the best use of cache affinity, you need to specify the bitmap of a core in hexadecimal. For example:
echo <cpu_mask> > /proc/irq/<interrupt_number>/smp_affinity
This will place this IRQ at the head of the active queue and preserve certain CPUs from being used for IRQ assignments. It is possible to configure this permanently in Red Hat in /etc/sysconfig/irqbalance. For those who want, it is possible to disable IRQ balancing:
chkconfig irqbalance off
For more information on IRQ affinities: http://kernel.org/doc/Documentation/IRQ-affinity.txt[^1]
Enabling/Disabling CPUs On-the-fly
It is possible to enable or disable CPUs on-the-fly! It’s actually very easy. First verify that your kernel allows this kind of thing:
  CONFIG_HOTPLUG
CONFIG_SMP
CONFIG_HOTPLUG_CPU
CONFIG_ACPI_HOTPLUG_CPU
Get the list of processors:
  > grep processor /proc/cpuinfo
processor	: 0
processor	: 1
Then check your interrupts:
  > cat /proc/interrupts
           CPU0       CPU1
  0:        109         36   IO-APIC-edge      timer
  1:          3          0   IO-APIC-edge      i8042
  7:          0          0   IO-APIC-edge      parport0
  8:          1          0   IO-APIC-edge      rtc0
  9:          0          0   IO-APIC-fasteoi   acpi
 12:          1          3   IO-APIC-edge      i8042
 16:      13500      13486   IO-APIC-fasteoi   uhci_hcd:usb3
 17:     122633     122322   IO-APIC-fasteoi   uhci_hcd:usb4, uhci_hcd:usb7
 18:     157011     157338   IO-APIC-fasteoi   ata_piix, ata_piix, uhci_hcd:usb8, ata_generic
 22:     365980     365602   IO-APIC-fasteoi   ehci_hcd:usb1, uhci_hcd:usb5
 23:          0          0   IO-APIC-fasteoi   ehci_hcd:usb2, uhci_hcd:usb6
 40:    3995517          0  HPET_MSI-edge      hpet2
 41:          0    4003499  HPET_MSI-edge      hpet3
 47:     188227     196024   PCI-MSI-edge      eth0
 48:        472        468   PCI-MSI-edge      snd_hda_intel
 49:    1079730    1075353   PCI-MSI-edge      i915
NMI:       2169       2188   Non-maskable interrupts
LOC:        756        733   Local timer interrupts
SPU:          0          0   Spurious interrupts
PMI:       2169       2188   Performance monitoring interrupts
IWI:          0          0   IRQ work interrupts
RES:    7945496    7982861   Rescheduling interrupts
CAL:        586        482   Function call interrupts
TLB:     397248     414104   TLB shootdowns
TRM:          0          0   Thermal event interrupts
THR:          0          0   Threshold APIC interrupts
MCE:          0          0   Machine check exceptions
MCP:         68         68   Machine check polls
ERR:          0
MIS:          0
To disable CPU 1:
echo 0 > /sys/devices/system/cpu/cpu1/online
We can see that there is only CPU 0 left:
  > cat /proc/interrupts
           CPU0
  0:        109   IO-APIC-edge      timer
  1:          3   IO-APIC-edge      i8042
  7:          0   IO-APIC-edge      parport0
  8:          1   IO-APIC-edge      rtc0
  9:          0   IO-APIC-fasteoi   acpi
 12:          1   IO-APIC-edge      i8042
 16:      13606   IO-APIC-fasteoi   uhci_hcd:usb3
 17:     123361   IO-APIC-fasteoi   uhci_hcd:usb4, uhci_hcd:usb7
 18:     157302   IO-APIC-fasteoi   ata_piix, ata_piix, uhci_hcd:usb8, ata_generic
 22:     366042   IO-APIC-fasteoi   ehci_hcd:usb1, uhci_hcd:usb5
 23:          0   IO-APIC-fasteoi   ehci_hcd:usb2, uhci_hcd:usb6
 40:    4010597  HPET_MSI-edge      hpet2
 41:          1  HPET_MSI-edge
 47:     188715   PCI-MSI-edge      eth0
 48:        472   PCI-MSI-edge      snd_hda_intel
 49:    1085415   PCI-MSI-edge      i915
NMI:       2177   Non-maskable interrupts
LOC:        756   Local timer interrupts
SPU:          0   Spurious interrupts
PMI:       2177   Performance monitoring interrupts
IWI:          0   IRQ work interrupts
RES:    7981178   Rescheduling interrupts
CAL:        587   Function call interrupts
TLB:     397336   TLB shootdowns
TRM:          0   Thermal event interrupts
THR:          0   Threshold APIC interrupts
MCE:          0   Machine check exceptions
MCP:         68   Machine check polls
ERR:          0
MIS:          0
Then reactivate CPU 1:
echo 1 > /sys/devices/system/cpu/cpu1/online
And everything gets back in place correctly :-). You should know that some CPUs cannot be disabled like the boot CPU.
Balancing CPU Utilization
Each core has its own run queue. For HyperThreaded processors, the logical processor uses the same run queue as the physical core. By default, there is a certain affinity and the tasks that occur on a CPU come back to it more or less automatically if other associated ones were going to see another CPU. Knowing that each CPU has its own cache, it’s better that way. However, if one core is more loaded than another, the scheduler looks at the run queues every 100ms (or 1ms if the core does nothing) and decides to rebalance the load. The problem arises in the case where this balancing system is done too often, we can experience latency to avoid caches miss (everything depends on the applications)! You then have to choose what you want the most. To see the list of programs and their associated core:
  > ps axo comm,psr
COMMAND         PSR
init              1
kthreadd          0
ksoftirqd/0       0
migration/0       0
watchdog/0        0
migration/1       1
ksoftirqd/1       1
watchdog/1        1
cpuset            0
khelper           1
kdevtmpfs         1
netns             1
sync_supers       1
bdi-default       0
kintegrityd       0
kblockd           1
khungtaskd        1
kswapd0           0
You can also see a process moving from one core to another:
watch -n2 'ps axo comm,pid,psr | grep <process>'
taskset
If you want to assign specific CPUs to certain processes, it’s possible! The first step is to know the CPU bitmap. To give you an idea of how to get them:
  > awk '/processor/{printf("CPU %s address : 0x0000000%s\n"), $3, $3}' /proc/cpuinfo ; echo 'All CPU       : xXFFFFFFFF'
CPU 0 address : 0x00000000
CPU 1 address : 0x00000001
CPU 2 address : 0x00000002
CPU 3 address : 0x00000003
All CPU       : xXFFFFFFFF
Then we will use the taskset command to assign a specific CPU to a PID:
taskset -p 0x00000001 <PID>
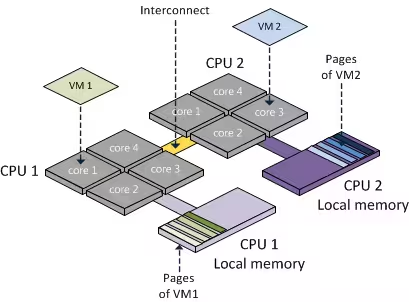
You should know that Numa processors have RAM directly mapped with CPUs to increase performance. This doesn’t change the fact that other processors can use memory that is not associated with them. Here is a small overview of Numa:
You can also specify parameters at the grub level to isolate CPUs (isolcpus):
  # grub.conf generated by anaconda
#
# Note that you do not have to rerun grub after making changes to this file
# NOTICE:  You have a /boot partition.  This means that
#          all kernel and initrd paths are relative to /boot/, eg.
#          root (hd0,0)
#          kernel /vmlinuz-version ro root=/dev/mapper/vgos-root
#          initrd /initrd-[generic-]version.img
#boot=/dev/sda
default=0
timeout=5
splashimage=(hd0,0)/grub/splash.xpm.gz
hiddenmenu
title Red Hat Enterprise Linux Server (2.6.32-279.2.1.el6.x86_64)
	root (hd0,0)
	kernel /vmlinuz-2.6.32-279.2.1.el6.x86_64 ro root=/dev/mapper/vgos-root rd_NO_LUKS  KEYBOARDTYPE=pc KEYTABLE=fr LANG=en_US.UTF-8 rd_LVM_LV=vgos/root rd_NO_MD rd_LVM_LV=vgos/swap SYSFONT=latarcyrheb-sun16 crashkernel=128M biosdevname=0 rd_NO_DM isolcpus=0
	initrd /initramfs-2.6.32-279.2.1.el6.x86_64.img
CPU pinning is now possible on this CPU. We’ll therefore have a smaller run queue and improved response times for tasks assigned to this CPU.
For more information: http://kernel.org/doc/Documentation/kernel-parameters.txt[^3]
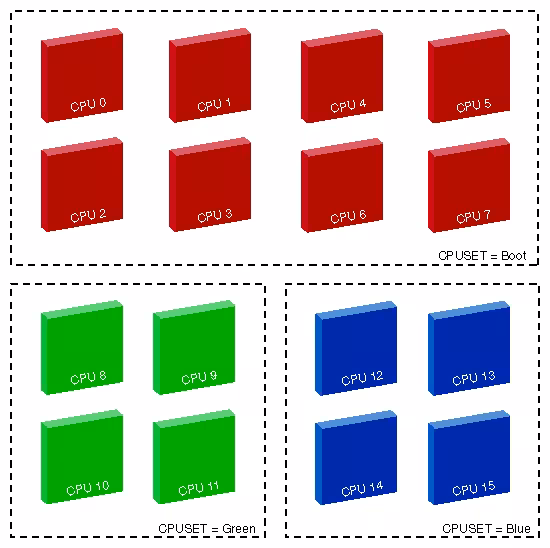
cpuset/cgroup
cpuset is a more advanced version of taskset that provides a more elegant, flexible and scalable method for controlling runqueues and latency on tasks. A cpuset is a group of CPUs (scheduler domain/cgroups) on which we will be able to balance tasks:
To ensure that these features are present in the kernel:
  > grep -i cpuset /proc/filesystems /boot/config-`uname -r`
/proc/filesystems:nodev	cpuset
/boot/config-3.2.0-3-amd64:CONFIG_CPUSETS=y
/boot/config-3.2.0-3-amd64:CONFIG_PROC_PID_CPUSET=y
The implementation of cpuset in the kernel is quite small and has no impact on the process scheduler. It uses a new VFS that does not introduce new system calls. This cpuset VFS can be mounted anywhere on the system. We will, for example, mount this in /mnt/cpuserts. Just create folders to make assignments to other CPUs. A CPU can belong to multiple cpusets.
Prerequisites
Set up cgroups mounting at boot:
cgroup /sys/fs/cgroup cgroup defaults 0 0
In order to have all options enabled, you also need to modify the Grub options:
GRUB_CMDLINE_LINUX_DEFAULT="quiet cgroup_enable=memory swapaccount=1"
Then update Grub:
update-grub
Reboot afterwards.
Creation
Creating a cgroup is very simple:
mkdir /sys/fs/cgroup/mycgroup1
Assigning a CPU and its Memory to a cgroup
We will assign a CPU and its memory to our new cgroup (here, CPU 0):
  echo 0 > /sys/fs/cgroup/mycgroup1/cpuset.cpus
echo 0 > /sys/fs/cgroup/mycgroup1/cpuset.mems
You can send multiple processors by separating them with commas, all enclosed in quotes.
Dedicating a CPU to a cgroup
To dedicate a CPU solely to certain processes:
echo 0 > /sys/fs/cgroup/mycgroup1/cpuset.cpus
Adding a Process to a cgroup
To add a process, it’s very simple, just send its PID to the tasks file:
echo <PID> > /sys/fs/cgroup/mycgroup1/cpuset.tasks
Or if you have multiple processes with the same name:
  for pid in $(pidof apache2); do
    echo $pid > /sys/fs/cgroup/mycgroup1/cpuset.tasks
done
Detaching a Process from a cgroup
It is possible to detach a process by attaching it to another cgroup or the machine’s cgroup:
echo <PID> > /sys/fs/cgroup/tasks
Deleting a cgroup
To delete a cgroup is very simple, just delete the folder in question:
rm -Rf /sys/fs/cgroup/mycgroup1/cpuset.
Monitoring Pressure on a cpuset
It is possible to monitor the pressure on cpusets by activating like this:
echo 1 > /sys/fs/cgroup/memory_pressure_enabled
With this option, the kernel will start tracking the memory usage of cpusets. You can then retrieve the statistics in each cgroup:
cat /sys/fs/cgroup/<cgroup>/memory_pressure
You will find an execution average or the speed at which pages frames are freed.
Miscellaneous
Here are various tips:
- To know which cgroup the PID is attached to:
cat /proc/<pid>/cpuset
- To know which resource a PID can be scheduled to:
cat /proc/<pid>/status | grep allowed
- To know if a CPU can belong to multiple cgroups:
  > cat /sys/fs/cgroup/cpu_exclusive
1
- Automatic deletion of the cgroup when no task is active on it:
echo 1 > /sys/fs/cgroup/mycgroup1/cpuset.notify_on_release
Cgroups with cgconfig
To have cgroups working with cgconfig, be sure you’ve enabled cgroups in your fstab. Then install the daemon:
aptitude install cgroup-bin daemon
It will check all new running processes and affect them to a correct cgroup if a rule exists.
Unfortunately, it’s not well packaged yet on Debian so we need to adjust some things:
  cd /etc/init.d
cp skeleton cgconfig
cp skeleton cgred
chmod 755 cgconfig cgred
sed -i 's/skeleton/cgconfig/' cgconfig
sed -i 's/skeleton/cgred/' cgred
update-rc.d cgconfig defaults
update-rc.d cgred defaults
cd /usr/share/doc/cgroup-bin/examples/
cp cgred.conf /etc/default/
cp cgconfig.conf cgrules.conf /etc/
gzip -d cgconfig.gz
cp cgconfig cgred /etc/init.d/
cd /etc/init.d/
sed -i 's/sysconfig/defaults/' cgred cgconfig
sed -i 's/\/etc\/rc.d\/init.d\/functions/\/lib\/init\/vars.sh/' cgred
sed -i 's/--check/--name/' cgred
sed -i 's/killproc.*/kill $(cat $pidfile)/' cgred
sed -i 's/touch "$lockfile"/test -d \/var\/lock\/subsys || mkdir \/var\/lock\/subsys\n\t&/' cgconfig
chmod 755 cgconfig cgred
You now have your configuration files and all services installed correctly. Edit the configuration file:
  #
#  Copyright IBM Corporation. 2007
#
#  Authors:     Balbir Singh <balbir@linux.vnet.ibm.com>
#  This program is free software; you can redistribute it and/or modify it
#  under the terms of version 2.1 of the GNU Lesser General Public License
#  as published by the Free Software Foundation.
#
#  This program is distributed in the hope that it would be useful, but
#  WITHOUT ANY WARRANTY; without even the implied warranty of
#  MERCHANTABILITY or FITNESS FOR A PARTICULAR PURPOSE.
#
group mariadb_cgroup {
    perm {
        admin {
            uid = tomcat;
        }
        task {
            uid = tomcat;
        }
    }

        cpuset {
                cpuset.mems = 0;
                cpuset.cpus = "1,2";
                cpuset.cpu_exclusive = 1;
        }
}
Here is an example for tomcat user, where I want to have 2 dedicated CPUs. Then you need to change the cgrules config:
tomcat cpu tomcat_cgroup/
This indicates that tomcat user will change cpu settings and the cgroup folder is tomcat_cgroup (/sys/fs/cgroup/tomcat_cgroup). Now restart it:
  /etc/init.d/cgred stop
/etc/init.d/cgconfig stop
umount /sys/fs/cgroup 2>/dev/null
rmdir /sys/fs/cgroup/* /sys/fs/cgroup 2>/dev/null
mount /sys/fs/cgroup
/etc/init.d/cgconfig start
/etc/init.d/cgred start
Restart your tomcat service and it will automatically be placed in the cgroup :-)
References
Last updated 05 Jan 2014, 04:42 +0200.