LDAP: Installation and Configuration of an LDAP Directory
![]()
| Software version | 2.4.23+ |
| Operating System | Debian 6 |
| Website | OpenLDAP Website |
| Last Update | 28/03/2013 |
Introduction
Lightweight Directory Access Protocol (LDAP) is a protocol that allows querying and modification of directory services. This protocol is based on TCP/IP. An LDAP directory typically follows the X.500 model defined by ITU-T: it is a tree structure where each node consists of attributes associated with their values.
The naming of the elements that make up the tree (root, branches, leaves) often reflects the political, geographical, or organizational model of the represented structure. The current trend is to use DNS naming for the basic elements of the directory (root and first branches). Deeper branches of the directory can represent people, organizational units, groups, etc.
             dc=fr
             |
         dc=example
        /          \
  ou=people     ou=groups
Installation
To install OpenLDAP:
apt-get install ldap-server ldap-client
This will install:
- ldap-utils
- slapd
- libiodbc2
- libldap-2.3-0
Configuration
slapd.conf
Recent Method
Here is the recent method1 to configure your OpenLDAP (well… the beginning):
dpkg-reconfigure -plow slapd
Then follow the instructions.
Old Method
First, we need to generate an encrypted password because we will need to put it in the configuration file. We have the choice to put it in clear text as well, but for security reasons, it will be encrypted:
  # slappasswd
New password:
Re-enter new password:
{SSHA}5y67xJ/t7esuGKUD7TQPcgykd8xiYMO2
Copy the last line {SSHA}5y67x… which corresponds to the encrypted password. Here the password is admin.
Edit the file /etc/ldap/slapd.conf:
  # The following line allows the use of LDAP V2 standard
allow bind_v2

# The following line gives the root of the LDAP base
suffix "dc=deimos,dc=fr"

# The following line that must be added manually gives the administrator login (admin with the reminder of the root).
# This line and the next one are mandatory to have root access to the base from an external program (ex: PHP)
rootdn "cn=admin,dc=deimos,dc=fr"

# Paste the password we generated earlier:
# Admin password for OpenLDAP
rootpw {SSHA}5y67xJ/t7esuGKUD7TQPcgykd8xiYMO2

# Setting up write access to the database. You must indicate the correct login and the root of the database:
access to attrs=userPassword,shadowLastChange
       by dn="cn=admin,dc=deimos,dc=fr" write
       by anonymous auth
       by self write
       by * none

# Setting up read-only access to the database. You must indicate the correct login and the root of the database:
access to *
       by dn="cn=admin,dc=deimos,dc=fr" write
       by * read
Now, to apply the configuration, we will restart the server:
/etc/init.d/slapd restart
LDIF
This file format is used for imports/exports between multiple databases or to modify or add data to a database.
WARNING: It is mandatory to encode the data in UTF-8. If an error is encountered during import, it is abandoned at the point where it occurred.
Import a Schema
Here is the structure of an LDIF file:
  dn: <distinguished name
   objectClass: <object class
   objectClass: <object class
   ...
   <attribute type:<attribute value
   <attribute type:<attribute value
   ...
Here is an example of an LDIF file “AjoutRacine.ldif” to create the root of the LDAP tree:
  dn: dc=deimos,dc=fr
objectClass: dcObject
objectClass: organization
o: deimos Corporation
dc: deimos
Command to add the root:
ldapadd -x -D "cn=admin,dc=deimos,dc=fr" -w admin -f AjoutRacine.ldif
You can also avoid writing the password in clear text by requesting a prompt:
ldapadd -x -D "cn=admin,dc=deimos,dc=fr" -W -f AjoutRacine.ldif
Here is an example of an LDIF file “AjoutFiche.ldif” to create a new record:
  dn: cn=Pierre MAVRO,dc=deimos,dc=fr
objectClass: inetOrgPerson
cn: Pierre MAVRO
givenName: Pierre
sn: MAVRO
Some fields from slapcat should not appear or you’ll get the 19 error2. We’ll use sed to clean up:
  /^creatorsName:/d
/^createTimestamp:/d
/^modifiersName:/d
/^modifyTimestamp:/d
/^structuralObjectClass:/d
/^entryUUID:/d
/^entryCSN:/d
Then we’ll apply this sed to our entire ldif:
sed -f sed_ldif import_unclear.ldif > import_clear.ldif
Now we can import the LDIF:
ldapadd -h localhost -x -W -D "cn=admin,dc=deimos,dc=fr" -c -f import_clear.ldif
Import Records
Command to add the record:
ldapadd -x -D "cn=admin,dc=deimos,dc=fr" -w admin -f AjoutFiche.ldif
Modify Records
The modification commands have the following syntax:
  dn: distinguished name
 changetype  {{TYPE}}
 change operation identifier
 list of attributes...
 ...
-
 change operation identifier
 list of attributes
 ...
TYPE can have one of the following values:
- add (adding an entry),
- delete (deletion),
- modrdn (modification of the RDN),
- modify (modification: add, replace, delete of an attribute)
The file “ModifFiche.ldif” below allows to add the phone number:
  dn: cn=Père Noël,dc=deimos,dc=fr
changetype: modify
add: telephonenumber
telephonenumber: 08 36 65 65 65
Command to modify the record:
ldapadd -x -D "cn=admin,dc=deimos,dc=fr" -w admin -f ModifFiche.ldif
Delete Records
The file “SuppFiche.ldif” below allows you to delete a record:
  dn: cn=Pierre MAVRO,dc=deimos,dc=fr
changetype: delete
Command to delete the record:
ldapadd -x -D "cn=admin,dc=deimos,dc=fr" -w admin -f SuppFiche.ldif
Search Records
Search for records containing an objectclass attribute (so all) from the root:
ldapsearch -x -b "dc=deimos,dc=fr" "objectclass=*"
Search for records containing a cn attribute in the deimos branch:
ldapsearch -x -b "o=deimos Corporation,dc=deimos,dc=fr" "cn=*"
Search for records where the dc attribute ends with gray from the root:
ldapsearch -x -b "dc=deimos,dc=fr" "dc=*gray"
Backup of an LDAP Database
The following command generates a .LDIF file containing the complete database (without the schema or configuration):
slapcat -l DumpLDAP.ldif -b "dc=deimos,dc=fr"
To backup schema and configuration3:
slapcat -b cn=config -l config.ldif
To backup only the schema:
slapcat -b cn=schema -l config.ldif
Restore an LDAP Database
To restore a configuration, here’s how to proceed4:
  /etc/init.d/slapd stop
rm -rf /etc/ldap/slapd.d/*
su - openldap -c "slapadd -F /etc/ldap/slapd.d -b cn=config -l config.ldif"
/etc/init.d/slapd start
PHP Scripts
- Example of a PHP script to connect to the LDAP server:
  $server="localhost";
$port="389";
$dn="dc=deimos,dc=fr";
$rootdn="cn=admin,$dn";
$rootpw="admin";

$ds=ldap_connect($server,$port);
ldap_set_option($ds, LDAP_OPT_PROTOCOL_VERSION, 3);
$r=ldap_bind($ds,$rootdn,$rootpw)
        or die ("Cannot connect to server! \n");
echo "Authentication on the OpenLDAP server -> OK \n\n";
- Example of a PHP script to search for records:
  $sr=ldap_search($ds,$dn,"(objectclass=*)");
if ($sr) {
        $info=ldap_get_entries($ds,$sr);
        echo $info["count"]." records in OpenLDAP \n";
        for ($i=0;$i<=$info["count"];$i++) {
                echo "$i - ".$info[$i]["dn"]." \n";
        }
}
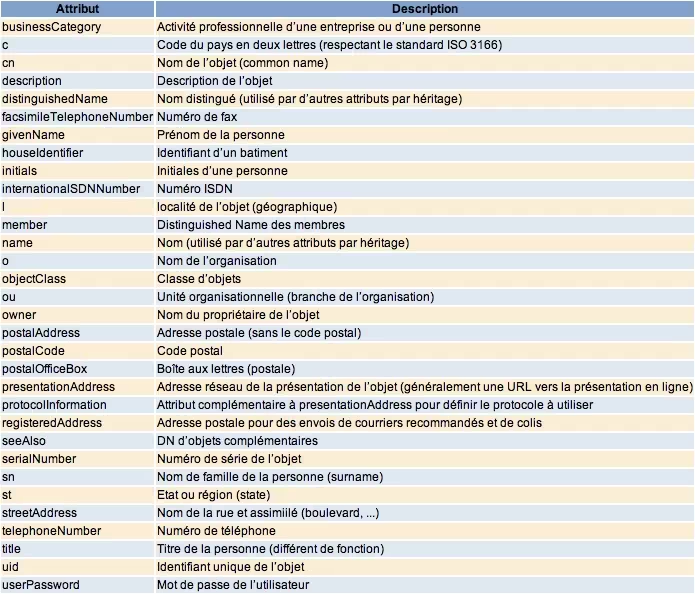
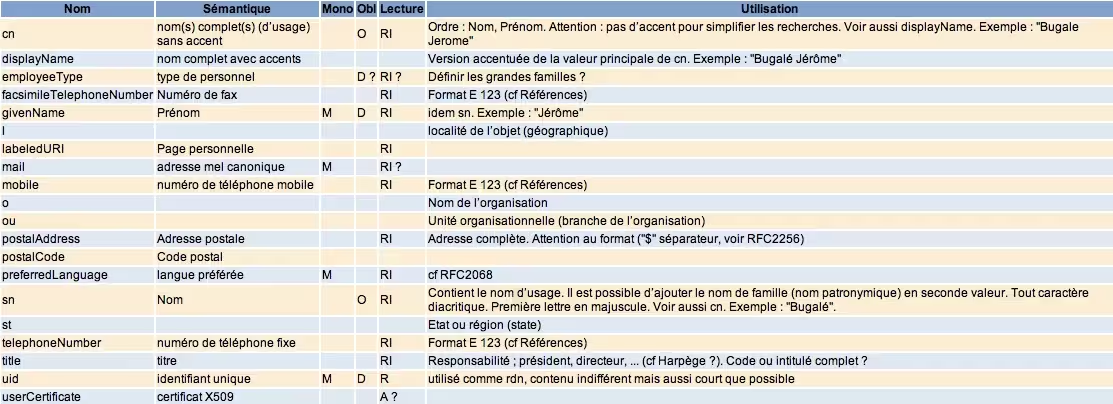
Partial List of Attributes
Organization Class
inetOrgPerson Class
Clients
Installation
Debian
To be able to connect to the OpenLDAP directory, we will need several things:
aptitude install libnss-ldapd libpam-smbpass libpam-mount
Red Hat
On Red Hat, there’s not much to install:
yum install nss-pam-ldapd
Configuration
In general, unix clients can authenticate using information contained in the LDAP directory via PAM and NSS. It is therefore sufficient to install and configure these components on the different systems.
Debian
You have the choice of installing libpam-ldapd or libpam-ldap. libpam-ldapd is newer and avoids some bugs seen in libpam-ldap. It’s up to you to decide what you want :-)
libpam-ldapd
If you opt for libnss-ldapd, then you just have to install this and answer the questions.
aptitude install libnss-ldapd
libpam-ldap
If you have chosen to install libpam-ldap instead of libpam-ldapd, you will have to do this manually.
By default, Debian creates two different configuration files for libpam-ldap and libnss-ldap. This is unnecessary since these two files will contain the same thing. You need to delete the libpam-ldap configuration files and create links from those of libnss-ldap to those of libpam-ldap:
  rm /etc/pam_ldap.*
ln -s /etc/libnss-ldap.conf /etc/pam_ldap.conf
ln -s /etc/libnss-ldap.secret /etc/pam_ldap.secret
Edit /etc/libnss-ldap.conf and put in it (it should only contain these lines):
  uri ldap://ldap.mydomain.local/
base dc=openldap,dc=mydomain,dc=local
ldap_version 3
rootbinddn cn=admin,dc=openldap,dc=mydomain,dc=local
scope sub
nss_paged_results yes
pagesize 1000
nss_base_passwd dc=openldap,dc=mydomain,dc=local?sub?&(&(objectClass=posixAccount)(!(objectClass=computer)))
nss_base_shadow dc=openldap,dc=mydomain,dc=local?sub
In /etc/libnss-ldap.secret, indicate the password of the user indicated on the rootdn line of the file /etc/libnss-ldap.conf.
You then need to modify the /etc/nsswitch.conf file to indicate that the search will be done, among other things, in the ldap directory for the different services. This gives for example:
  passwd:         files ldap
group:          files ldap
shadow:         files ldap

hosts:          files dns
networks:       files

protocols:      db files
services:       db files
ethers:         db files
rpc:            db files

netgroup:       nis
libpam-ldapd and libpam-ldap
Finally, you need to modify the pam chains so that they allow authentication via the ldap directory. This is done by copying the different files /etc/pam.d/common-* to /etc/pam.d/common-*-ldap:
  cd /etc/pam.d
cp common-account{,-ldap}
cp common-auth{,-ldap}
cp common-pammount{,-ldap}
cp common-password{,-ldap}
cp common-session{,-ldap}
Edit the different files /etc/pam.d/common-*-ldap to have:
/etc/pam.d/common-account-ldap:
  account sufficient      pam_ldap.so
account sufficient      pam_unix.so use_first_pass
account required        pam_deny.so
/etc/pam.d/common-auth-ldap
  auth    required        pam_nologin.so
auth    sufficient      pam_unix.so nullok_secure
auth    optional        pam_mount.so debug use_first_pass
auth    optional        pam_smbpass.so migrate use_first_pass
auth    sufficient      pam_ldap.so use_first_pass
auth    required        pam_deny.so
/etc/pam.d/common-password-ldap
  password   required   pam_smbpass.so migrate
password   sufficient pam_ldap.so try_first_pass
password   sufficient pam_unix.so try_first_pass nullok obscure min=4 max=8 md5
password   required   pam_deny.so
/etc/pam.d/common-session-ldap
  session required        pam_unix.so
session required        pam_ldap.so
session required        pam_mkhomedir.so skel=/etc/skel/ umask=0022
session optional        pam_mount.so
/etc/pam.d/common-session
  session required        pam_mkhomedir.so skel=/etc/skel/ umask=0022
session sufficient      pam_ldap.so
session required        pam_unix.so
Once these common-*-ldap files are created, we can edit the files of the different services for which we want to authorize authentication by ldap… If for example we want to allow users contained in the LDAP directory to connect via ssh to the machine, we edit the file /etc/pam.d/ssh and replace the common-qqc with common-qqc-ldap.
For automounting partitions according to the user, edit the file /etc/security/pam_mount.conf:
volume * cifs 192.168.0.30 &$ /media/windows/& sfu - -
If you still cannot connect, restart the nscd service:
/etc/init.d/nscd restart
The following command should work correctly:
getent passwd mon_user
Allow a Specific LDAP Group
One of the common methods is to allow only one or certain groups from LDAP to access a machine. For this, the groups must have a posixGroup attribute called login.
Debian
Install libpam-modules if it’s not already done:
aptitude install libpam-modules
Then add this line to the file /etc/pam.d/common-auth:
  ...
auth required    pam_access.so
Red Hat
Install this package:
yum install pam-devel
And add this line on the service you want (sshd for example), the restriction:
  auth       include      password-auth
account    required     pam_access.so
account    required     pam_nologin.so
Configuration
This will allow us to use the file /etc/security/access.conf. And here’s the kind of line to add:
  ...
# disallow all except people in the login group and root
-:ALL EXCEPT root (sysadmin):ALL EXCEPT LOCAL
This allows to disable all accounts except:
- root
- The sysadmin group (not the user thanks to the parentheses)
- LOCAL: local users
Red Hat
There are 2 methods. The first uses a Red Hat script that will do everything for us, while the second is the manual solution.
Method 1
To configure PAM with LDAP, use this command and adapt it to your needs:
authconfig --enableldap --enableldapauth --ldapserver=ldap://openldap-server.deimos.fr:389 --ldapbasedn="dc=openldap,dc=deimos,dc=fr" --enableldaptls --ldaploadcacer=http://serveur-web/deimosfr.crt --enablemkhomedir --update
- –ldapserver: enter the address of your web server
- –ldapbasedn: the DN of your server
- –enableldaptls: if you use secure LDAP connections
- –ldaploadcacer: the certificate to use (if you have no way to retrieve it this way, look at the procedure a little below)
or a version without ssl/tls:
authconfig --enableldap --enableldapauth --disablenis --disableshadow --enablecache --passalgo=sha512 --disableldaptls --disableldapstarttls --disablesssdauth --enablemkhomedir --enablepamaccess --enablecachecreds --enableforcelegacy --disablefingerprint --ldapserver=192.168.0.1 --ldapbasedn=dc=openldap,dc=deimos,dc=fr --updateall
To retrieve the ssl certificate requested above, here is a solution:
  > openssl s_client -connect openldap-server.deimos.fr:636
CONNECTED(00000003)
depth=0 C = FR, ST = IDF, L = Paris, O = DEIMOS, CN = openldap-server.deimos.fr, emailAddress = xxx@mycompany.com
verify error:num=18:self signed certificate
verify return:1
depth=0 C = FR, ST = IDF, L = Paris, O = DEIMOS, CN = openldap-server.deimos.fr, emailAddress = xxx@mycompany.com
verify return:1
---
Certificate chain
 0 s:/C=FR/ST=IDF/L=Paris/O=DEIMOS/CN=openldap-server.deimos.fr/emailAddress=xxx@mycompany.com
   i:/C=FR/ST=IDF/L=Paris/O=DEIMOS/CN=openldap-server.deimos.fr/emailAddress=xxx@mycompany.com
---
Server certificate
-----BEGIN CERTIFICATE-----
MIIDpTCCAw6gAwIBAgIJAJJUJLhNM1/XMA0GCSqGSIb3DQEBBQUAMIGUMQswCQYD
VQQGEwJGUjEMMAoGA1UECBMDSURGMQ4wDAYDVQQHEwVQYXJpczEPMA0GA1UEChMG
VUxMSU5LMREwDwYDVQQLEwh1bHN5c25ldDEcMBoGA1UEAxMTdGFzbWFuaWEMdWxs
aW5rLmxhbjElMCMGCSqGSIb3DQEJARYWaW503XJuYWwtaXRAdWxsaW5rLmNvbTAe
Fw0xMTEyMDUxMjQzMzVaFw0yMTEyMDIxMjQzMzVaMIGUMQswCQYDVQQGEwJGUjEM
MAoGA1UECBMDSURGMR4wDAYDVQQHEwVQYXJpczEPMA0GA1UEChMGVUxMSU5LMREw
DwYDVQQLEwh1bHN5c25ldDEcMBoGA1UEAxMTdGFzbWFuaWEudWxsaW5rLmxhbjEl
MCMGCSqGSIb3DQEJARYWaW50ZXJuYWwtaXRAdWxsaW5rLmNvbTCBnzANBgkqhkiG
9w0BAQEFAAOBjQAwgYkCgYEA4QoXFn39LhMW7mlA9r3NOX6iTHCCSlZjVQi0mQ5k
BVysN8KMFfC0E4vOeG1Z11AYwW7xCOb4Pl+LgfgfdgfgfdJIn92LX0meJcsgWKOh
qVAsZNkWn2ss8oDw3t5NEOjKFZ5BKVR2fL4Yj23DmFOAwew5PR5xhxGV5LJ9VErS
Ks0CAwEAAaOB/DCB+TAdBgNVHQ4EFgQUn5Ig2hFtROXcG3vxux7izNqcUd4wgckG
A1UdIwSBwTCBvoAUn5Ig2hFtROXcG3vxux7izNqcUd6hgZqkgZcwgZQxCzAJBgNV
BAYTAkZSMQwwCgYDVQQIEwNJREYxDjAMBgNVBAcTBVBhcmlzMQ8wDQYDVQQKEwZV
TExJTksxETAPBgNVBAsTCHVsc3lzbmV0MRwwGgYDVQQDExN0YXNtYW5pYS51bGxp
bmsubGFuMSUwIwYJKoZIhvcNAQkBFhZpbnRlcm5hbC1pdEB1bGxpbmsuY29tggkA
klQkuE0zX9cwDAYCVR0TBAUwAwEB/zANBgkqhkiG9w0BAQUFAAOBgQAbjjAbcBez
dKyq+Tlf3/DURW0BJhHKyY7UW7L39m/KZRIB2lbgFjslrAL4yNnFgipJ6aKlJFfV
BYEu7MhKH2pJZBYFpzuHOdKvDq+Kmn/wGvxeOvzh1GzQPGhQv4cClm2PJNMh/jrK
ZWNzqyLWYtWAoLu6N6gMER1Bd1Z5uzHl3A==
-----END CERTIFICATE-----
subject=/C=FR/ST=IDF/L=Paris/O=DEIMOS/CN=openldap-server.deimos.fr/emailAddress=xxx@mycompany.com
issuer=/C=FR/ST=IDF/L=Paris/O=DEIMOS/CN=openldap-server.deimos.fr/emailAddress=xxx@mycompany.com
---
No client certificate CA names sent
---
SSL handshake has read 1291 bytes and written 311 bytes
---
New, TLSv1/SSLv3, Cipher is AES256-SHA
Server public key is 1024 bit
Secure Renegotiation IS NOT supported
Compression: NONE
Expansion: NONE
SSL-Session:
    Protocol  : TLSv1
    Cipher    : AES256-SHA
    Session-ID: 91E6398F6DE9FBDC1B7EBDF890FE818B09EB79555C9FC1CF64EDC284F7A23B2A
    Session-ID-ctx:
    Master-Key: 51408932336792F4E8F5339BD12F312005022A4B20E6A5FBC56239BC0DD514344449531973B9A8395B1E799196D8F411
    Key-Arg   : None
    Krb5 Principal: None
    PSK identity: None
    PSK identity hint: None
    Start Time: 1327491823
    Timeout   : 300 (sec)
    Verify return code: 18 (self signed certificate)
---
In case the certificate is retrieved manually, copy it into /etc/openldap/cacerts/ldap.crt, then run the following command:
cacertdir_rehash /etc/openldap/cacerts
Method 2
Modify /etc/ldap.conf. This file is the equivalent of /etc/libnss_pam.conf on Debian. You can therefore put the same thing in it.
Modify the file /etc/pam.d/system_auth: it’s the equivalent of the different common-* under debian. This gives for example:
  auth        required      /lib/security/$ISA/pam_env.so
auth        sufficient    /lib/security/$ISA/pam_unix.so likeauth nullok
auth        sufficient    /lib/security/$ISA/pam_ldap.so use_first_pass
auth        required      /lib/security/$ISA/pam_deny.so

account     sufficient    /lib/security/$ISA/pam_unix.so
account     sufficient    /lib/security/$ISA/pam_ldap.so
account     sufficient    /lib/security/$ISA/pam_succeed_if.so uid < 100 quiet
account     required      /lib/security/$ISA/pam_permit.so

password    requisite     /lib/security/$ISA/pam_cracklib.so retry=3
password    sufficient    /lib/security/$ISA/pam_unix.so nullok use_authtok md5 shadow
password    required      /lib/security/$ISA/pam_deny.so

session     optional      /lib/security/$ISA/pam_mkhomedir.so skel=/etc/skel/ umask=0077
session     required      /lib/security/$ISA/pam_limits.so
session     required      /lib/security/$ISA/pam_unix.so
As on Debian, you also need to modify the /etc/nsswitch.conf file.
Force a Shell at Login
If you have pam authentication via LDAP, it is possible to force a particular shell at login. It will override the information sent by NSS and replace it with the desired shell. We will use lshell here for all people connecting via LDAP:
nss_override_attribute_value loginShell /usr/bin/lshell
Solaris
- Configure the file
/etc/pam.conf:
For each line:
service auth required pam_unix_auth.so.1
replace “required” with “sufficient” and add behind the line:
service auth sufficient pam_ldap.so.1 try_first_pass
Which should give something like this:
  #
#ident  "@(#)pam.conf   1.28    04/04/21 SMI"
#
# Copyright 2004 Sun Microsystems, Inc.  All rights reserved.
# Use is subject to license terms.
#
# PAM configuration
#
# Unless explicitly defined, all services use the modules
# defined in the "other" section.
#
# Modules are defined with relative pathnames, i.e., they are
# relative to /usr/lib/security/$ISA. Absolute path names, as
# present in this file in previous releases are still acceptable.
#
# Authentication management
#
# login service (explicit because of pam_dial_auth)
#
login   auth requisite          pam_authtok_get.so.1
login   auth required           pam_dhkeys.so.1
login   auth required           pam_unix_cred.so.1
login   auth sufficient         pam_ldap.so.1 try_first_pass
login   auth sufficient         pam_unix_auth.so.1
login   auth required           pam_dial_auth.so.1
#
# rlogin service (explicit because of pam_rhost_auth)
#
rlogin  auth sufficient         pam_rhosts_auth.so.1
rlogin  auth requisite          pam_authtok_get.so.1
rlogin  auth required           pam_dhkeys.so.1
rlogin  auth required           pam_unix_cred.so.1
rlogin  auth sufficient         pam_ldap.so.1 try_first_pass
rlogin  auth sufficient         pam_unix_auth.so.1
#
# Kerberized rlogin service
#
krlogin auth required           pam_unix_cred.so.1
krlogin auth binding            pam_krb5.so.1
krlogin auth sufficient         pam_ldap.so.1
krlogin auth sufficient         pam_unix_auth.so.1
#
# rsh service (explicit because of pam_rhost_auth,
# and pam_unix_auth for meaningful pam_setcred)
#
rsh     auth sufficient         pam_rhosts_auth.so.1
rsh     auth required           pam_unix_cred.so.1
#
# Kerberized rsh service
#
krsh    auth required           pam_unix_cred.so.1
krsh    auth binding            pam_krb5.so.1
krsh    auth sufficient         pam_ldap.so.1
krsh    auth sufficient         pam_unix_auth.so.1
#
# Kerberized telnet service
#
ktelnet auth required           pam_unix_cred.so.1
ktelnet auth binding            pam_krb5.so.1
ktelnet auth sufficient         pam_ldap.so.1
ktelnet auth sufficient         pam_unix_auth.so.1
#
# PPP service (explicit because of pam_dial_auth)
#
ppp     auth requisite          pam_authtok_get.so.1
ppp     auth required           pam_dhkeys.so.1
ppp     auth required           pam_unix_cred.so.1
ppp     auth sufficient         pam_ldap.so.1
ppp     auth sufficient         pam_unix_auth.so.1
ppp     auth required           pam_dial_auth.so.1
#
# Default definitions for Authentication management
# Used when service name is not explicitly mentioned for authentication
#
other   auth requisite          pam_authtok_get.so.1
other   auth required           pam_dhkeys.so.1
other   auth required           pam_unix_cred.so.1
other   auth sufficient         pam_ldap.so.1
other   auth sufficient         pam_unix_auth.so.1
#
# passwd command (explicit because of a different authentication module)
#
passwd  auth required           pam_passwd_auth.so.1
#
# cron service (explicit because of non-usage of pam_roles.so.1)
#
cron    account required        pam_unix_account.so.1
#
# Default definition for Account management
# Used when service name is not explicitly mentioned for account management
#
other   account requisite       pam_roles.so.1
other   account required        pam_unix_account.so.1
#
# Default definition for Session management
# Used when service name is not explicitly mentioned for session management
#
other   session required        pam_unix_session.so.1
#
# Default definition for  Password management
# Used when service name is not explicitly mentioned for password management
#
other   password required       pam_dhkeys.so.1
other   password requisite      pam_authtok_get.so.1
other   password requisite      pam_authtok_check.so.1
other   password required       pam_authtok_store.so.1
#
# Support for Kerberos V5 authentication and example configurations can
# be found in the pam_krb5(5) man page under the "EXAMPLES" section.
#
- Configure the file
/etc/nsswitch.ldap
Leave “ldap” only where it’s useful: for the moment on the passwd: and group: lines.
For the rest, put the content of the file /etc/nsswitch.dns.
Which gives:
  #
# Copyright 2006 Sun Microsystems, Inc.  All rights reserved.
# Use is subject to license terms.
#

#
# /etc/nsswitch.dns:
#
# An example file that could be copied over to /etc/nsswitch.conf; it uses
# DNS for hosts lookups, otherwise it does not use any other naming service.
#
# "hosts:" and "services:" in this file are used only if the
# /etc/netconfig file has a "-" for nametoaddr_libs of "inet" transports.

# DNS service expects that an instance of svc:/network/dns/client be
# enabled and online.

passwd:     files ldap
group:      files ldap

# You must also set up the /etc/resolv.conf file for DNS name
# server lookup.  See resolv.conf(4).
hosts:      files dns

# Note that IPv4 addresses are searched for in all of the ipnodes databases
# before searching the hosts databases.
ipnodes:   files dns

networks:   files
protocols:  files
rpc:        files
ethers:     files
netmasks:   files
bootparams: files
publickey:  files
# At present there isn't a 'files' backend for netgroup;  the system will
#   figure it out pretty quickly, and won't use netgroups at all.
netgroup:   files
automount:  files
aliases:    files
services:   files
printers:       user files

auth_attr:  files
prof_attr:  files
project:    files

tnrhtp:     files
tnrhdb:     files
Once this is done, we will be able to set up the configuration. Warning: if you are in a cluster environment, adapt to the initial conf!:
cp /etc/nsswitch.ldap /etc/nsswitch.conf
- Launch the ldap client configuration
Just type the command:
ldapclient manual -v -a authenticationMethod=simple -a proxyDN=cn=admin,dc=openldap,dc=mydomain,dc=local -aproxyPassword=bidon -a defaultSearchBase=dc=openldap,dc=mydomain,dc=local -a defaultServerList=ldap.mydomain.local -a serviceSearchDescriptor=passwd:dc=openldap,dc=mydomain,dc=local?sub -a serviceSearchDescriptor=shadow:dc=openldap,dc=mydomain,dc=local?sub -a serviceSearchDescriptor=group:dc=openldap,dc=mydomain,dc=local?sub -a serviceAuthenticationMethod=pam_ldap:simple<=
Warning: it seems that the ldapclient command is buggy and requires the proxyDN and proxyPassword parameters even if they are unused! (and even if they contain anything)
- Pay attention to the home directory, you need to configure
/etc/auto_home(http://www.solaris-fr.org/home/docs/base/utilisateurs). Which gives for me:
  #
# Copyright 2003 Sun Microsystems, Inc.  All rights reserved.
# Use is subject to license terms.
#
# ident "@(#)auto_home  1.6     03/04/28 SMI"
#
# Home directory map for automounter
#
+auto_home
* localhost:/export/home/&
In case you would like to automatically create the home directory, you need to port the pam_mkhomedir from linux:
- http://mega.ist.utl.pt/~filipe/pam_mkhomedir-sol/?C=D;O=A
- http://www.keutel.de/pam_mkhomedir/index.html
A good idea would also be to automatically mount the home from an nfs server.
User accounts in the LDAP directory must have the “shadowAccount” class in their objectClass list to be taken into account by solaris.
FAQ
How to debug?
There is a very efficient way to debug:
slapd -d 17
ldap_bind: Invalid credentials (49)
Clearly there is a problem with your login and password! Check everything and be careful if the password is encrypted or not.
ldap_add: Naming violation (64)
If you have a message like this, when creating the root:
  adding new entry "dc=deimos,dc=fr"
ldap_add: Naming violation (64)
       additional info: value of naming attribute 'dc' is not present in entry
This means that you have a problem at the “dc” level. Indeed, if your “dn” contains 2 arguments as here (deimos and fr for deimos.fr), then you must indicate for your “dc” the first argument of your “dn”. Ex:
dc=deimos,dc=fr
my dc is then deimos in my ldif import file.
operation not permitted during recovery
Following a brutal shutdown of the server, the ldap server did not restart. Here is the message I had at startup in debug mode:
  # slapd -d 1
bdb_db_open: dbenv_open(/var/lib/ldap)
bdb(dc=mondomaine,dc=com): operation not permitted during recovery
bdb_db_open: db_open(/var/lib/ldap) failed: Invalid argument (22)
backend_startup: bi_db_open failed! (22)
bdb_db_destroy: close failed: Invalid argument (22)
slapd stopped.
In fact, it was the ldap database that was corrupted and to fix this problem, I simply re-indexed it with these commands:
  /etc/init.d/slapd stop
slapindex
/etc/init.d/slapd start
Purge Logs
It happened to me to run out of space on one of my disks because of logs taking too much space. To automatically flush the logs, 2 methods exist: auto and manual.
Automatic Method
Just insert this in this file /var/lib/ldap/DB_CONFIG:
set_flags DB_LOG_AUTOREMOVE
Manual Method
The ldap server must be stopped. But first, we will need to install this:
apt-get install db4.2-util
Stop the ldap server now.
To list the logs that can be deleted, use this command:
  cd /var/lib/ldap/
db4.2_archive
To delete the logs that can be deleted:
  cd /var/lib/ldap/
db4.2_archive -d
To purge to the maximum:
db4.2_checkpoint -1
Empty the Cache
It can happen to have several users who vanish following an unfortunate faulty synchronization. For example, a slapcat will show you the ldap users and groups, but not the getent command.
All this is due to the cache. To fix the problem, we need to empty it. The nscd command:
  $ nscd -g
nscd configuration:

         0  server debug level
"/dev/null"  is server log file


CACHE: passwd

         CONFIG:
         enabled: yes
         per user cache: no
         avoid name service: no
         check file: yes
         check file interval: 0
         positive ttl: 600
         negative ttl: 5
         keep hot count: 20
         hint size: 2048
         max entries: 0 (unlimited)

         STATISTICS:
         positive hits: 28
         negative hits: 0
         positive misses: 5
         negative misses: 0
         total entries: 5
         queries queued: 0
         queries dropped: 0
         cache invalidations: 0
         cache hit rate:       84,8


CACHE: group

         CONFIG:
         enabled: yes
         per user cache: no
         avoid name service: no
         check file: yes
         check file interval: 0
         positive ttl: 3600
         negative ttl: 5
         keep hot count: 20
         hint size: 2048
         max entries: 0 (unlimited)
...
The list of available caches can be given via a help on the command:
          Supported caches:
          audit_user, auth_attr, bootparams, ethers
          exec_attr, group, hosts, ipnodes, netmasks
          networks, passwd, printers, prof_attr, project
          protocols, rpc, services, tnrhtp, tnrhdb
          user_attr
If you want to empty for example the groups cache, just do:
nscd -i group
You can restart the service if you want to flush everything.
err -30978. Restore from backup
When we have this kind of message, it’s often panic:
  ...
send_ldap_result: conn=-1 op=0 p=0
backend_startup_one: starting "dc=openldap,dc=mycompany,dc=lan"
bdb_db_open: unclean shutdown detected; attempting recovery.
bdb_db_open: dbenv_open(/var/lib/ldap/mycompany)
bdb(dc=openldap,dc=deimos,dc=fr): Log sequence error: page LSN 319 5223075; previous LSN 319 10485269
bdb(dc=openldap,dc=deimos,dc=fr): Recovery function for LSN 320 480 failed on forward pass
bdb(dc=openldap,dc=deimos,dc=fr): PANIC: Invalid argument
bdb(dc=openldap,dc=deimos,dc=fr): PANIC: fatal region error detected; run recovery
bdb(dc=openldap,dc=deimos,dc=fr): PANIC: fatal region error detected; run recovery
bdb(dc=openldap,dc=deimos,dc=fr): PANIC: fatal region error detected; run recovery
bdb_db_open: Database cannot be recovered, err -30978. Restore from backup!
====> bdb_cache_release_all
bdb(dc=openldap,dc=mycompany,dc=lan): DB_ENV->lock_id_free interface requires an environment configured for the locking subsystem
bdb(dc=openldap,dc=mycompany,dc=lan): txn_checkpoint interface requires an environment configured for the transaction subsystem
bdb_db_close: txn_checkpoint failed: Invalid argument (22)
backend_startup_one: bi_db_open failed! (-30978)
slapd shutdown: initiated
====> bdb_cache_release_all
====> bdb_cache_release_all
bdb_db_close: alock_close failed
slapd destroy: freeing system resources.
slapd stopped.
connections_destroy: nothing to destroy.
To fix all this, we have the db_recover command. Adapt it according to your version:
db4.2_recover
You may still encounter issues after that. For my part, the slapcat command works. We can therefore extract the content to make a ldif, start with an empty base and reinject this ldif (I haven’t tested, but in theory, it should work). To start with an empty base, here’s how to do it:
- Make sure the ldap server is turned off
- Backup your old base /var/lib/ldap
- Create all your database folders with a logs folder inside (ex: /var/lib/ldap/base/logs)
- Go to /var/lib/ldap and run the db_recover command
- Go to each base and run the db_recover command
- Start the ldap server
- Reinject the ldif and it should be good :-)
LDAP search descriptors and ‘user_attr’
If you have this type of error message:
[ID 293258 user.warning] libsldap: Status: 4 Mesg: Service search descriptor for service 'passwd' contains filter, which can not be used for service 'user_attr'.
It’s simply that you are missing 2 lines in your ldap client configuration file:
  #
# Do not edit this file manually; your changes will be lost.Please use ldapclient (1M) instead.
#
NS_LDAP_FILE_VERSION= 2.0
NS_LDAP_SERVERS= ldap-1, ldap-2
NS_LDAP_SEARCH_BASEDN= dc=openldap,dc=mycompany,dc=lan
NS_LDAP_AUTH= simple
NS_LDAP_CACHETTL= 0
NS_LDAP_SERVICE_SEARCH_DESC= passwd:dc=openldap,dc=mycompany,dc=lan?sub?&(&(objectClass=posixAccount)(!(objectClass=computer)))
NS_LDAP_SERVICE_SEARCH_DESC= shadow:dc=openldap,dc=mycompany,dc=lan?sub
NS_LDAP_SERVICE_SEARCH_DESC= group:dc=openldap,dc=mycompany,dc=lan?sub
NS_LDAP_SERVICE_SEARCH_DESC= user_attr:dc=openldap,dc=mycompany,dc=lan?sub?&(acctActive=yes)
NS_LDAP_SERVICE_SEARCH_DESC= audit_user:dc=openldap,dc=mycompany,dc=lan?sub?&(acctACtive=yes)
NS_LDAP_SERVICE_AUTH_METHOD= pam_ldap:simple
Then kill the nscd service so that it reboots.
ldap_add: No such object (32)
If you have this kind of error when importing a LDIF into an LDAP instance:
ldap_add: No such object (32)
It’s simply that the additions (users for example) don’t have their entries ready to be inserted. I’ll explain: if a user of this type:
dn: uid=pmavro,o=test,ou=person,dc=deimos,dc=fr
The Organization test and the OU person must exist before being able to import. And unfortunately, if the creation of these entries are not present in the tree structure, then the import will fail.
ldap_add: Constraint violation (19)
If you have this kind of error when importing a LDIF into an LDAP instance:
ldap_add: Constraint violation (19)
It means that there is information in your LDIF that should not be present. To fix this, you will need to delete fields, as explained here.
<= bdb_equality_candidates: (uid) not indexed
If you encounter this kind of message:
<= bdb_equality_candidates: (uid) not indexed
It means that there are non-indexed fields when an application tries to access them. To fix this, we need to add (the UID in our case) to the index. We will therefore edit this file and add the uid in our case:
  dn: olcDatabase={1}hdb
objectClass: olcDatabaseConfig
objectClass: olcHdbConfig
olcDatabase: {1}hdb
olcDbDirectory: /var/lib/ldap
olcSuffix: dc=deimos,dc=fr
olcAccess: {0}to attrs=userPassword,shadowLastChange by self write by anonymou
 s auth by dn="cn=admin,dc=deimos,dc=fr" write by * none
olcAccess: {1}to dn.base="" by * read
olcAccess: {2}to * by self write by dn="cn=admin,dc=deimos,dc=fr" write by *
  read
olcLastMod: TRUE
olcRootDN: cn=admin,dc=deimos,dc=fr
olcRootPW:: e1NTSEF9aGxQb1pZMlgrOER0RHZhVW5DQ2dJSlFrUDQ4dGc2QUE=
olcDbCheckpoint: 512 30
olcDbConfig: {0}set_cachesize 0 2097152 0
olcDbConfig: {1}set_lk_max_objects 1500
olcDbConfig: {2}set_lk_max_locks 1500
olcDbConfig: {3}set_lk_max_lockers 1500
olcDbIndex: uid,objectClass eq
structuralObjectClass: olcHdbConfig
entryUUID: 06862874-a659-1031-8d45-07546bbf1905
creatorsName: cn=admin,cn=config
createTimestamp: 20121009123142Z
entryCSN: 20121009123142.557766Z#000000#000#000000
modifiersName: cn=admin,cn=config
modifyTimestamp: 20121009123142Z
Then we need to restart LDAP and run a cold indexing command:
  /etc/init.d/slapd stop
su - openldap -c slapindex openldap
/etc/init.d/slapd start
References
Documentation on Operation
Documentation for Setup
OpenLDAP Installation on Debian
Documentation on Fedora Core 7
Linagora OpenLDAP Training
Linagora Training on LDAP Protocol
Linagora Training on OpenLDAP Optimization
Last updated 28 Mar 2013, 10:30 +0200.