Installation and Configuration of a Centreon Server
Introduction
Centreon is one of the most flexible and powerful GPL-licensed monitoring software solutions. It’s built on top of the OpenSource Nagios technology.
Designed for a wide range of users, it’s perfectly suited for measuring system, network, and application indicators. Centreon brings together essential functions for managing monitoring of critical infrastructures. Being modular, it adapts to your needs and allows you to extend its functionality further.
For my part, I chose to move from Nagios 3 to Centreon to get graphics and reporting capabilities.
The installation below is performed on Debian Lenny 64 bits.
Installation
LAMP
For the installation, we’ll first install the prerequisites, namely a web server, mail server, and SQL (Apache2+PHP, postfix, mysql) as well as the necessary libraries to create graphs (rrdtool):
  aptitude install sudo sysutils mailx lsb-release postfix build-essential apache2 apache2-mpm-prefork php5 php5-mysql php-pear php5-ldap php5-snmp php5-gd mysql-server-5.0 libmysqlclient15-dev rrdtool \
librrds-perl libconfig-inifiles-perl libcrypt-des-perl libdigest-hmac-perl libdigest-sha1-perl libgd-gd2-perl snmp snmpd libnet-snmp-perl libsnmp-perl libgd2-xpm libgd2-xpm-dev libpng12-dev
Nagios 3
Next, we’ll install nagios3 and the plugins:
aptitude install nagios3 nagios3-common nagios3-doc nagios-plugins nagios-plugins-basic nagios-plugins-standard nagios-images dnsutils fping
Let’s create the nagcmd group, then add nagios and nagcmd to www-data (apache2):
  groupadd nagcmd
usermod -G nagios,nagcmd nagios
usermod -G nagios,nagcmd www-data
NDOutils
Let’s install NDOutils:
aptitude install ndoutils-nagios3-mysql ndoutils-common dbconfig-common
Let’s activate it by setting the following value to 1:
ENABLE_NDOUTILS=1
Then restart the service:
/etc/init.d/ndoutils restart
Centreon
Finally, we arrive at Centreon! Let’s download the latest version, decompress it, then start the installation:
  cd ~
wget "http://download.centreon.com/index.php?id=105"
tar -xzf centreon-2.0.2.tar.gz
cd centreon-2.0.2
./install.sh -i
And that’s it… the installation has started!!! So, here are the steps one by one (we’ll follow the method step by step in case you have differences):
###############################################################################
# #
# Centreon (www.centreon.com) #
# Thanks for using Centreon #
# #
# v2.0.2 #
# #
# infos@oreon-project.org #
# #
# Make sure you have installed and configured #
# sudo - sed - php - apache - rrdtool - mysql #
# #
###############################################################################
------------------------------------------------------------------------
Checking all needed binaries
------------------------------------------------------------------------
rm OK
cp OK
mv OK
/bin/chmod OK
/bin/chown OK
echo OK
more OK
mkdir OK
find OK
/bin/grep OK
/bin/cat OK
/bin/sed OK
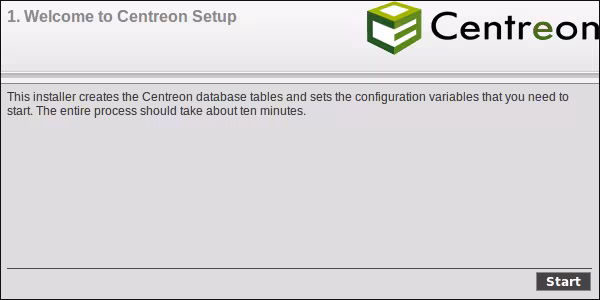
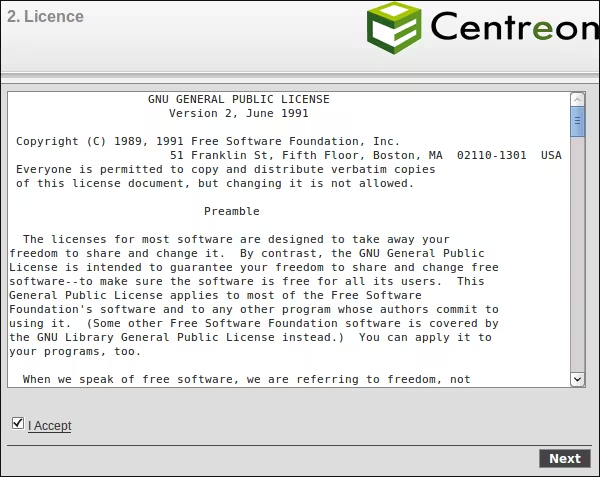
You will now read Centreon Licence.
Press enter to continue.
Press enter, then accept (or not) the GNU license:
  		    GNU GENERAL PUBLIC LICENSE
		       Version 2, June 1991

 Copyright (C) 1989, 1991 Free Software Foundation, Inc.
                       51 Franklin St, Fifth Floor, Boston, MA  02110-1301  USA
 Everyone is permitted to copy and distribute verbatim copies
 of this license document, but changing it is not allowed.

			    Preamble

  The licenses for most software are designed to take away your
....
q

Do you accept GPL license?
[y/n], default to [n]:
Enter y.
  ------------------------------------------------------------------------
	Please choose what you want to install
------------------------------------------------------------------------

Do you want to install: Centreon Web Front
[y/n], default to [n]:
Well, the frontend is important, it’s actually the main reason we’re installing it:
  ------------------------------------------------------------------------
	Please choose what you want to install
------------------------------------------------------------------------

Do you want to install: Centreon Web Front
[y/n], default to [n]:
So enter y.
  Do you want to install: Centreon CentCore
[y/n], default to [n]:
For my part, I’ll say yes (y). But you should decide based on your needs. CentCore allows you to have satellites in datacenters or branches, for example, to avoid false alerts in case of line loss between your server and agents (like NRPE or NCSA).
To summarize, if you’re going to deploy a large architecture, I recommend it; otherwise, leave it as no.
Next for Nagios plugins, of course we’ll install them:
  Do you want to install: Centreon Nagios Plugins
[y/n], default to [n]:
So enter y.
  Do you want to install: Centreon Snmp Traps process
[y/n], default to [n]:
Again, if you need to receive SNMP traps from your equipment (like Cisco, Alcatel, Brocade, etc.), then activate this; otherwise, it’s not necessary. For me, I need it so I enter y.
  Where is your Centreon directory?
default to [/usr/local/centreon]

Do you want me to create this directory? [/usr/local/centreon]
[y/n], default to [n]:
If the folder suits you, enter y; otherwise, create it and modify the path. I’ll keep it (so y).
  Path /usr/local/centreon                                   OK

Where is your Centreon log directory
default to [/usr/local/centreon/log]
Now, let’s create a proper log directory at /var/log/centreon:
  > /var/log/centreon

Do you want me to create this directory? [/var/log/centreon]
[y/n], default to [n]:
> y
Path /var/log/centreon                                     OK
Now, the configuration files. The default location is just fine:
  Where is your Centreon etc directory
default to [/etc/centreon]
That’s perfect, so press ’enter'.
  Do you want me to create this directory? [/etc/centreon]
[y/n], default to [n]:
> y

Path /etc/centreon                                         OK
And yes, it will create it (y).
PS: If you’re getting tired, you can take a break; it’s still a bit long.
  Where is your Centreon generation_files directory?
default to [/usr/local/centreon]

Path /usr/local/centreon                                   OK
This looks good to me (enter).
  Where is your Centreon variable library directory?
default to [/var/lib/centreon]
>

Directory /var/lib/centreon does not exists.               CRITICAL

Where is your Centreon variable library directory?
default to [/var/lib/centreon]
>

Do you want me to create this directory? [/var/lib/centreon]
[y/n], default to [n]:
> y

Path /var/lib/centreon                                     OK
We validate again.
  Where is the RRD perl module installed [RRDs.pm]
default to [/usr/lib/perl5/RRDs.pm]

Path /usr/lib/perl5                                        OK
/usr/bin/rrdtool                                           OK
/usr/bin/mail                                              OK
Great, the paths are correct, we validate. And for PEAR?
  Where is PEAR [PEAR.php]
default to [/usr/share/php/PEAR.php]

Path /usr/share/php                                        OK
Great, it’s correct again… we’re lucky! Shall we continue?
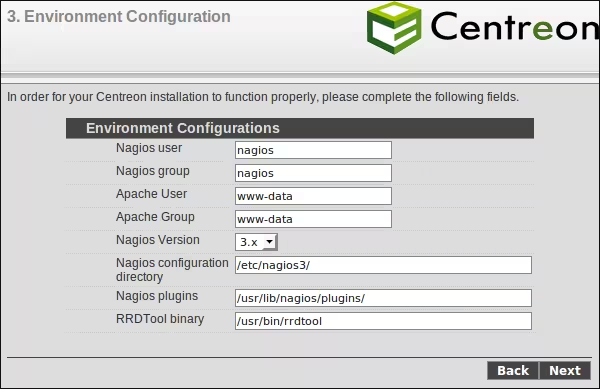
  Where is installed Nagios?
default to [/usr/local/nagios]
This is wrong! Since we installed nagios via Debian repositories, not via source, the path is incorrect. The correct path is /usr/share/nagios3:
  /usr/share/nagios3

Path /usr/share/nagios3                                    OK

Where is your nagios config directory
default to [/usr/local/nagios/etc]
Here we’ll enter /etc/nagios3:
  Where is your nagios config directory
default to [/usr/local/nagios/etc]
/etc/nagios3

Path /etc/nagios3                                          OK
Let’s enter /var/log/nagios3 here, which will contain the nagios.log file:
  Where is your Nagios var directory?
default to [/usr/local/nagios/var]
/var/log/nagios3

Path /var                                                  OK
The directory below is supposed to contain all the plugins. We’ll enter /usr/lib/nagios/plugins:
  Where is your Nagios plugins (libexec) directory?
default to [/usr/local/nagios/libexec]
/usr/lib/nagios/plugins

Path /lib                                                  OK
/usr/sbin/nagios3                                          OK
Now, the location of the logos that we’ll change to /usr/share/nagios3/htdocs/images/logos:
  Where is your Nagios image directory?
default to [/usr/local/nagios/share/images/logos]
/usr/share/nagios3/htdocs/images/logos

Path /usr/share/nagios3/htdocs/images/logos                OK
/usr/sbin/nagios3stats                                     OK
p1_file: /usr/lib/nagios3/p1.pl                           OK
/usr/bin/php                                               OK
/usr/bin/perl                                              OK
For CentPlugins, we’ll leave everything at default and let it create the directory:
  Where is your CentPlugins Traps binary
default to [/usr/local/centreon/bin]

Do you want me to create this directory? [/usr/local/centreon/bin]
[y/n], default to [n]:

Path /usr/local/centreon/bin                               OK
Finding Apache group:                                     www-data
Finding Apache user:                                      www-data
Finding Nagios user:                                      nagios
Finding Nagios group:                                     nagios
For the ndo library, it’s /usr/lib/ndoutils/ndomod-mysql-3x.o:
  Where is your NDO ndomod binary?
default to [/usr/sbin/ndomod.o]
/usr/lib/ndoutils/ndomod-mysql-3x.o

/usr/lib/ndoutils/ndomod-mysql-3x.o                        OK
Now, for sudo configuration, everything is good by default, we don’t touch anything, it does everything automatically:
  ------------------------------------------------------------------------
	Configure Sudo
------------------------------------------------------------------------

Where is sudo configuration file
default to [/etc/sudoers]

/etc/sudoers                                               OK
Nagios init script                                         OK
Your sudo is not configured

Do you want me to configure your sudo? (WARNING)
[y/n], default to [n]:
> y
Configuring Sudo                                           OK
Now comes the time for Apache. It offers to make the configuration for us (great):
  ------------------------------------------------------------------------
	Configure Apache server
------------------------------------------------------------------------

Do you want to add Centreon Apache sub configuration file?
[y/n], default to [n]:
So enter y, to reload the configuration and finally check the modules (y):
Do you want to reload your Apache?
[y/n], default to [n]:
Reloading Apache service OK
Preparing Centreon temporary files
Change right on /var/log/centreon OK
Change right on /etc/centreon OK
Change right on /usr/share/nagios3/htdocs/images/logos OK
Install nagios documentation OK
Change macros for insertBaseConf.sql OK
Change macros for php files
Change macros for php files OK
Change right on /etc/nagios3 OK
Copy CentWeb in system directory
Install CentWeb (web front of centreon) OK
Install libraries OK
Change macros for centreon.cron OK
Install Centreon cron.d file OK
Change macros for archiveDayLog OK
Change macros for centAcl.php OK
Install cron directory OK
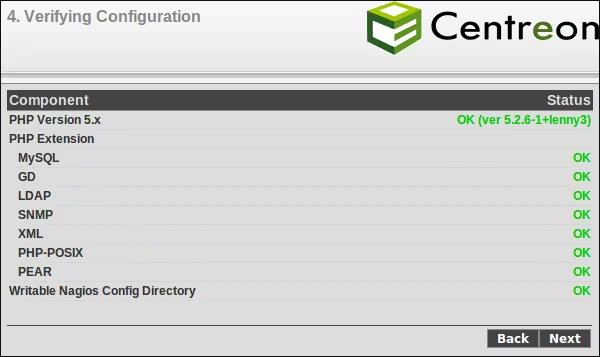
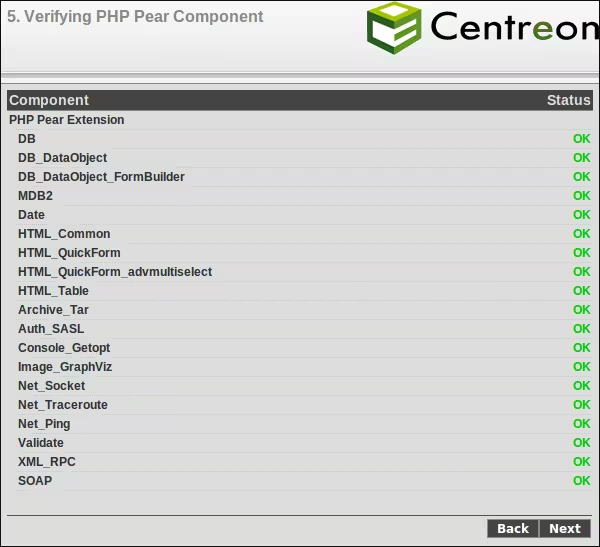
Pear Modules
Check PEAR modules
PEAR 1.5.0 1.7.1 OK
DB 1.7.6 NOK
DB_DataObject 1.8.4 NOK
DB_DataObject_FormBuilder 1.0.0RC4 NOK
MDB2 2.0.0 NOK
Date 1.4.6 NOK
HTML_Common 1.2.2 NOK
HTML_QuickForm 3.2.5 NOK
HTML_QuickForm_advmultiselect 1.1.0 NOK
HTML_Table 1.6.1 NOK
Archive_Tar 1.1 1.3.2 OK
Auth_SASL 1.0.1 NOK
Console_Getopt 1.2 1.2.3 OK
Net_SMTP 1.2.8 NOK
Net_Socket 1.0.1 NOK
Net_Traceroute 0.21 NOK
Net_Ping 2.4.1 NOK
Validate 0.6.2 NOK
XML_RPC 1.4.5 NOK
SOAP 0.10.1 NOK
Log 1.9.11 NOK
Since there are not many PHP modules (PEAR) installed, and since it’s helpful, we’ll tell it to install and upgrade the missing modules (y):
  Do you want me to install/upgrade your PEAR modules
[y/n], default to [y]:

Upgrading PEAR modules
Installing PEAR modules
DB                              1.7.6       1.7.13         OK
DB_DataObject                   1.8.4       1.8.10         OK
DB_DataObject_FormBuilder       1.0.0RC4    1.0.0RC7       OK
MDB2                            2.0.0       2.4.1          OK
HTML_QuickForm_advmultiselect   1.1.0       1.5.1          OK
HTML_Table                      1.6.1       1.8.2          OK
Auth_SASL                       1.0.1       1.0.2          OK
Net_SMTP                        1.2.8       1.3.2          OK
Net_Traceroute                  0.21        0.21.1         OK
Net_Ping                        2.4.1       2.4.4          OK
Validate                        0.6.2       0.8.2          OK
XML_RPC                         1.4.5       1.5.1          OK
SOAP                            0.10.1      0.12.0         OK
Log                             1.9.11      1.11.4         OK
Check PEAR modules
PEAR                            1.5.0       1.7.1          OK
DB                              1.7.6       1.7.13         OK
DB_DataObject                   1.8.4       1.8.10         OK
DB_DataObject_FormBuilder       1.0.0RC4    1.0.0RC7       OK
MDB2                            2.0.0       2.4.1          OK
Date                            1.4.6       1.4.7          OK
HTML_Common                     1.2.2       1.2.5          OK
HTML_QuickForm                  3.2.5       3.2.11         OK
HTML_QuickForm_advmultiselect   1.1.0       1.5.1          OK
HTML_Table                      1.6.1       1.8.2          OK
Archive_Tar                     1.1         1.3.2          OK
Auth_SASL                       1.0.1       1.0.2          OK
Console_Getopt                  1.2         1.2.3          OK
Net_SMTP                        1.2.8       1.3.2          OK
Net_Socket                      1.0.1       1.0.9          OK
Net_Traceroute                  0.21        0.21.1         OK
Net_Ping                        2.4.1       2.4.4          OK
Validate                        0.6.2       0.8.2          OK
XML_RPC                         1.4.5       1.5.1          OK
SOAP                            0.10.1      0.12.0         OK
Log                             1.9.11      1.11.4         OK
All PEAR modules                                           OK
------------------------------------------------------------------------
		Centreon Post Install
------------------------------------------------------------------------

Create /usr/local/centreon/www/install/install.conf.php    OK
Create /etc/centreon/instCentWeb.conf                      OK
Now, CentStorage will be installed and is called ODS (Oreon Data Storage). It allows us to archive RRD graphs in MySQL.
  ------------------------------------------------------------------------
	Start CentStorage Installation
------------------------------------------------------------------------

Where is your Centreon Run Dir directory?
default to [/var/run/centreon]
We’ll let it create everything (y):
  Do you want me to create this directory? [/var/run/centreon]
[y/n], default to [n]:

Path /var/run/centreon                                     OK
We’ll leave everything as is (as usual).
  Where is your CentStorage binary directory
default to [/usr/local/centreon/bin]

Path /usr/local/centreon/bin                               OK
Again, we don’t change anything.
  Where is your CentStorage RRD directory
default to [/var/lib/centreon]

Path /var/lib/centreon                                     OK
Finding Nagios group:                                     nagios
Finding Nagios user:                                      nagios
Preparing Centreon temporary files
/tmp/centreon-setup exists, it will be moved...
install www/install/createTablesCentstorage.sql            OK
Creating Centreon Directory '/var/lib/centreon/status'     OK
Creating Centreon Directory '/var/lib/centreon/metrics'    OK
Change macros for centstorage binary                       OK
Install CentStorage binary                                 OK
Install library for centstorage                            OK
Change right: /var/run/centreon                           OK
Change macros for centstorage init script                  OK
All that’s left is to install the runlevel scripts, so y as usual:
  Do you want me to install CentStorage init script?
[y/n], default to [n]:

CentStorage init script installed                          OK

Do you want me to install CentStorage run level?
[y/n], default to [n]:

update-rc.d: warning: /etc/init.d/centstorage missing LSB information
update-rc.d: see <http://wiki.debian.org/LSBInitScripts>
 Adding system startup for /etc/init.d/centstorage ...
   /etc/rc0.d/K30centstorage -> ../init.d/centstorage
   /etc/rc1.d/K30centstorage -> ../init.d/centstorage
   /etc/rc6.d/K30centstorage -> ../init.d/centstorage
   /etc/rc2.d/S40centstorage -> ../init.d/centstorage
   /etc/rc3.d/S40centstorage -> ../init.d/centstorage
   /etc/rc4.d/S40centstorage -> ../init.d/centstorage
   /etc/rc5.d/S40centstorage -> ../init.d/centstorage
Change macros for logAnalyser                              OK
Install logAnalyser                                        OK
Change macros for nagiosPerfTrace                          OK
Install nagiosPerfTrace                                    OK
Change macros for centstorage.cron                         OK
Install CentStorage cron                                   OK
Create /etc/centreon/instCentStorage.conf                  OK
Now we’re approaching the end with the installation of CentCore:
  ------------------------------------------------------------------------
	Start CentCore Installation
------------------------------------------------------------------------

Where is your CentCore binary directory
default to [/usr/local/centreon/bin]
We’ll leave the default, which is fine:
  Path /usr/local/centreon/bin                               OK
/usr/bin/ssh                                               OK
/usr/bin/scp                                               OK
Finding Nagios group:                                     nagios
Finding Nagios user:                                      nagios
Preparing Centreon temporary files
/tmp/centreon-setup exists, it will be moved...
Change CentCore Macro                                      OK
Copy CentCore in binary directory                          OK
Change right: /var/run/centreon                           OK
Change right: /var/lib/centreon                           OK
Replace CentCore init script Macro                         OK
And then we’ll let it create the runlevel scripts again (y):
  Do you want me to install CentCore init script?
[y/n], default to [n]:

CentCore init script installed                             OK

Do you want me to install CentCore run level?
[y/n], default to [n]:

update-rc.d: warning: /etc/init.d/centcore missing LSB information
update-rc.d: see <http://wiki.debian.org/LSBInitScripts>
 Adding system startup for /etc/init.d/centcore ...
   /etc/rc0.d/K30centcore -> ../init.d/centcore
   /etc/rc1.d/K30centcore -> ../init.d/centcore
   /etc/rc6.d/K30centcore -> ../init.d/centcore
   /etc/rc2.d/S40centcore -> ../init.d/centcore
   /etc/rc3.d/S40centcore -> ../init.d/centcore
   /etc/rc4.d/S40centcore -> ../init.d/centcore
   /etc/rc5.d/S40centcore -> ../init.d/centcore
Create /etc/centreon/instCentCore.conf                     OK
Let’s move on to CentPlugins. The default folder is also good (y):
  ------------------------------------------------------------------------
	Start CentPlugins Installation
------------------------------------------------------------------------

Where is your CentPlugins lib directory
default to [/var/lib/centreon/centplugins]
And it will create all that like a champ (y):
  Do you want me to create this directory? [/var/lib/centreon/centplugins]
[y/n], default to [n]:

Path /var/lib/centreon/centplugins                         OK
Finding Nagios user:                                      nagios
Finding Nagios group:                                     nagios
Preparing Centreon temporary files
/tmp/centreon-setup exists, it will be moved...
Change macros for CentPlugins                              OK
Installing the plugins                                     OK
Change right on centreon.conf                              OK
CentPlugins is installed
For those who wanted SNMP traps, SNMP must be installed, then validate everything else (y):
  ------------------------------------------------------------------------
	Start CentPlugins Traps Installation
------------------------------------------------------------------------

Where is your SNMP configuration directory
default to [/etc/snmp]

/etc/snmp                                                  OK

Where is your SNMPTT binaries directory
default to [/usr/local/centreon/bin/]

/usr/local/centreon/bin/                                   OK
Finding Nagios group:                                     nagios
Finding Apache user:                                      www-data
Preparing Centreon temporary files
/tmp/centreon-setup exists, it will be moved...
Change macros for CentPluginsTraps                         OK
Installing the plugins Trap binaries                       OK
Backup all your snmp files                                 OK
Change macros for snmptrapd.conf                           OK
Change macros for snmptt.ini                               OK
Install: snmptrapd.conf                                   OK
Install: snmp.conf                                        OK
Install: snmptt.ini                                       OK
Install: snmptt                                           OK
Install: snmpttconvertmib                                 OK
Create /etc/centreon/instCentPlugins.conf                  OK
###############################################################################
#                                                                             #
#      Go to the URL: http://your-server/centreon/                         #
#                   	to finish the setup                                     #
#                                                                             #
#                    Report bugs at http://trac.centreon.com                #
#                                                                             #
#                           Thanks for using Centreon.                        #
#                             -----------------------                         #
#                        Contact: infos@centreon.com                         #
#                            http://www.centreon.com                        #
#                                                                             #
###############################################################################
Done!!! We thought it would never end! If their script could do auto-detection, we would save time. And if it was packaged, it would be even better! But well, it’s their livelihood! It’s already free; we shouldn’t complain too much!
Let’s restart the Apache service and proceed:
/etc/init.d/apache2 restart
Configuration
Centreon
We can now move on to the graphical interface! First, let’s set the correct permissions on the nagios3 folder:
  chown -Rf nagios:www-data /etc/nagios3
chmod -Rf 775 /etc/nagios3
Now, let’s connect to http://your-server/centreon and start the installation:
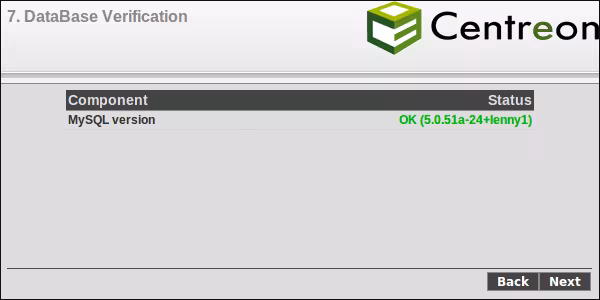
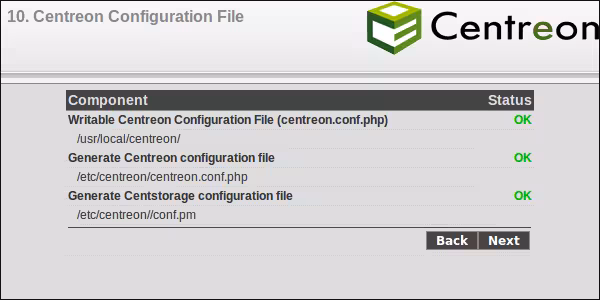
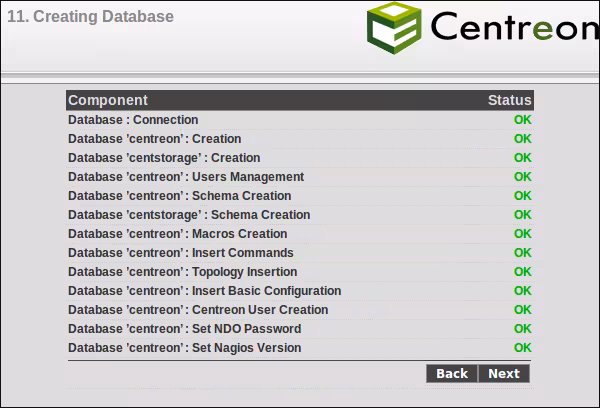
Everything should be good so far.
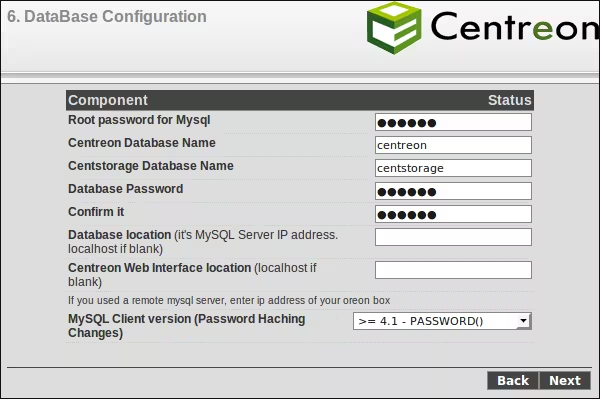
Adjust the values for your database.
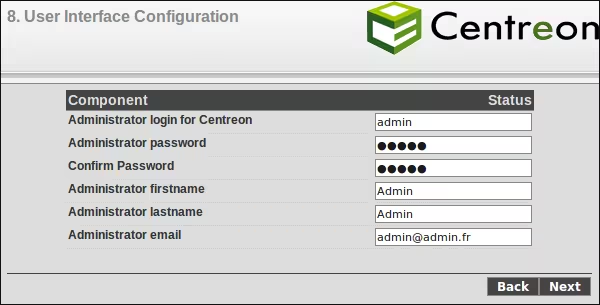
Specify the user who will be the Centreon admin.
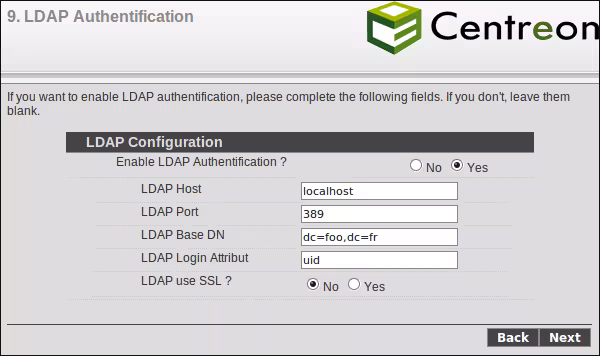
For my part, I chose to have my users connect via LDAP, so I configure my OpenLDAP parameters below.
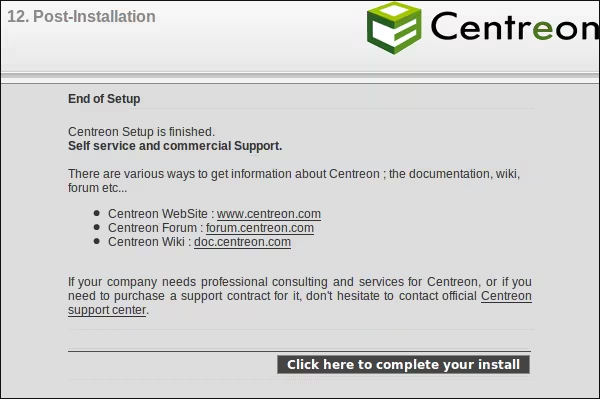
All is good, the installation is complete :-)
Nagios
Now, let’s move on to configuration. Go to Configuration -> Nagios -> nagios.cfg and modify the following lines:
  Log file: /var/log/nagios3/nagios.log
Downtime File: /var/cache/nagios3/downtime.log
Comment File: /var/cache/nagios3/comment.log
Temp File: /var/cache/nagios3/nagios.tmp
Lock File: /var/cache/nagios3/nagios.lock
Status File: /var/log/nagios3/status.log
External Command File: /var/lib/nagios3/rw/nagios.cmd
Go to Configuration -> Nagios -> nagios.cfg -> Data and modify the following lines:
Service Performance Data File: /usr/lib/nagios/plugins/process-service-perfdata
Go to Configuration -> Nagios -> cgi -> Cgi.cfg and modify the following lines:
  URL HTML Path: /nagios3
Nagios Process Check Command: /usr/lib/nagios/plugins/check_nagios /var/log/nagios3/status.log 5 '/usr/sbin/nagios3'
Save and then run this command:
chown nagios. /usr/lib/nagios/plugins/process-service-perfdata
ndo2db
- First, let’s set the basic parameters. Take your beautiful graphical interface and go to: Configuration -> Centreon -> ndo2db.cfg -> Main, then modify this:
  Socket Type: unix
Socket Name: /var/cache/nagios3/ndo.sock
- Now go to Configuration -> Centreon -> ndo2db.cfg -> Main -> Database and adapt it to your configuration. For my part, I had to change the following fields:
  Database Name: ndoutils
User: ndoutils
Password: password
Set the password you want and save. Then do the same for this user at the SQL level:
mysql -uroot -p
  SET PASSWORD FOR 'ndoutils'@'localhost' = PASSWORD('password');
FLUSH PRIVILEGES;
ndomod
Let’s go to Configuration -> Centreon -> ndo2db.cfg and modify these parameters:
  Instance Name: default
Interface Type: unixsocket
Output: /var/cache/nagios3/ndo.sock
Buffer File: /var/cache/nagios3/ndomod.tmp
Then save and restart the service:
/etc/init.d/ndoutils restart
CentStorage
Now we need to configure CentStorage which will allow us to create beautiful graphs. To do this, go to Administration -> Options -> CentStorage -> Options, then modify the following:
  Perfdata: /usr/lib/nagios/plugins/process-service-perfdata
Drop file: /var/lib/centreon/service-perfdata.tmp
Nagios current log file to parse: /var/log/nagios3/nagios.log
We’ll also set permissions on the logs directory, otherwise centstorage won’t be able to create its logs:
chown -Rf nagios. /var/log/centreon
Then let’s restart CentStorage:
/etc/init.d/centstorage restart
Languages
PhpSysInfo
For those who don’t know, PhpSysInfo is integrated into Centreon (they’re right, why reinvent the wheel). To make some nice tweaks, here’s the config file:
  $default_template='aq';
$loadbar = true;
This gives us an aqua theme (like Mac OS X) and a system load bar, which is nice. You can also configure other info about disk temperature, etc… I invite you to check out the official documentation.
Enabling the Nagios Web Interface
We’ll enable this interface for 2 reasons:
- Basic file permissions
- Having a backup interface
Let’s create the file (unless it already exists) /etc/nagios3/htpasswd.users by directly adding a nagios user to it. For this, we’ll use the htpasswd command:
htpasswd -c /etc/nagios3/htpasswd.users nagiosadmin
Set a password. If you need to add other users, do the same without the “-c”, for example:
htpasswd /etc/nagios3/htpasswd.users deimos
Then reload your Apache config. Next, you’ll need to modify the Centreon configuration by going to Configuration -> Nagios -> cgi, and replacing nagiosadmin with the nagios user. Then reload your Nagios config from Centreon.
FAQ
Connection Error to NDO DataBase!
This is due to the packaged installation of Debian! It’s not much to fix.
Look above, the answer is there.
movement KO
If you have these types of errors when loading your Nagios config from Centreon, it’s either a permission problem or an NDOutils problem. Make sure you’ve followed the procedure described above.
Warning: File ‘/var/lib/centreon/service-perfdata’ could not be opened - service performance data will not be written to file!
If this happens in the nagios logs, don’t panic, just reset the permissions:
chown nagios. /var/lib/centreon/service-perfdata
Then restart nagios!
DB Error
You might have a message like this in the centAcl.log file:
DB Error: DELETE FROM `centreon_acl` WHERE `group_id` = '14' [nativecode=1146 ** Table 'ndoutils.centreon_acl' doesn't exist]
This means the ‘centreon_acl’ table is missing. Let’s create it:
mysql -uroot -p
  use ndoutils;
CREATE TABLE IF NOT EXISTS `centreon_acl` (
`id` int(11) NOT NULL auto_increment,
`host_name` varchar(255) default NULL,
`service_description` varchar(255) default NULL,
`group_id` int(11) default NULL,
PRIMARY KEY (`id`),
KEY `host_name` (`host_name`),
KEY `service_description` (`service_description`),
KEY `group_id` (`group_id`)
) ENGINE=InnoDB DEFAULT CHARSET=utf8;
quit;
I don’t have graphs, no errors
A small reboot would be good. I know we’re not on Windows, but there are so many services around Centreon that a small reboot would help all these services start correctly and reset certain things.
From Centreon my Nagios export works without errors, yet I don’t see my new services appearing
This is due to the CGI user not matching. It’s true that a test is missing here that could validate the permissions. In the meantime, it’s quite blocking; I advise you to check out enabling the Nagios web interface to solve your problem.
References
http://en.doc.centreon.com/Main_Page/fr
http://forum.centreon.com/showthread.php?p=48384#post48384
Last updated 23 Aug 2009, 07:37 CEST.