Managing SSL Certificates Signed by a Certificate Authority
![]()
| Operating System | Debian 7 |
| Website | StartSSL Website |
| Last Update | 17/02/2015 |
| Others | Nginx 1.2.1 Lighttpd 1.4.31 |
Introduction
You may need SSL certificates for your company or for personal needs on your website. The drawback of self-generated and self-signed certificates is that the first time you visit your site, you’ll get a warning message.
To avoid this warning and to have a nice little padlock on your browser indicating that you’re protected, you typically need to pay a certification authority a lot of money to get a valid SSL certificate.
However, there are kind companies that offer free or inexpensive certificates for your domain name that are properly signed :-). We’ll look at how to do this with StartCom.
Certificate Generation
Before you start, create your account and go to the private key step on StartCom.
Here, I’ll present several servers:
Feel free to adapt to your configuration if you need to switch these.
Lighttpd
We’ll see here how to set up certificates with Lighttpd. First, let’s create the essentials:
  cd /etc/lighttpd
mkdir ssl
cd ssl
Next, we’ll generate the RSA private key and secure it:
  openssl genrsa -out server.key 4096
chmod 400 server.key
Copy the content of this key to the website so it can generate the rest. Then we’ll create the CSR:
openssl req -new -nodes -key server.key -out server.csr
For the common name part, enter your default site (ex: www.deimos.fr).
Then download the StartCom certificates:
  wget http://www.startssl.com/certs/ca.pem
wget http://www.startssl.com/certs/sub.class1.server.ca.crt
wget http://www.startssl.com/certs/sub.class1.server.ca.pem
Nginx
We’ll see here how to set up certificates with Nginx. First, let’s create the essentials:
  cd /etc/nginx
mkdir ssl
cd ssl
Next, we’ll generate the RSA private key and secure it:
  openssl genrsa -out server.key 4096
chmod 400 server.key
Copy the content of this key to the website so it can generate the rest. Then we’ll create the CSR:
openssl req -new -nodes -key server.key -out server.csr
For the common name part, enter your default site (ex: www.deimos.fr).
Then download the StartCom certificates:
  wget http://www.startssl.com/certs/ca.pem
wget http://www.startssl.com/certs/sub.class2.server.ca.crt
wget http://www.startssl.com/certs/sub.class2.server.ca.pem
Certificate Signing
Now we’ll generate a certificate on the StartSSL website. To begin, create your domain with the Validation Wizard:
Choose Domain Name Validation:

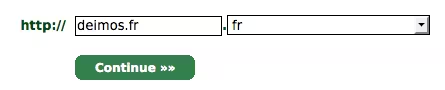
Then create the domain you want:
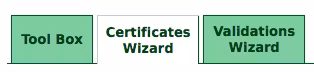
Finish creating the domain and click on Certificates Wizard:
Then select “Web Server SSL/TLS Certificate” as that’s what we need:

Skip this part since we’ve generated our own certificate:
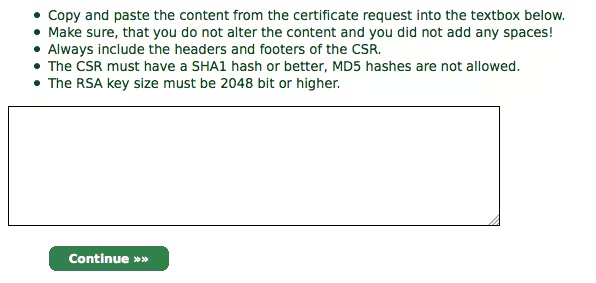
And paste the contents of the server.csr file into the text area:
Complete the process, then create a server.crt file with the SSL certificate content that will be provided.
Configuration
Lighttpd
Next, we’ll create a PEM certificate from those we’ve generated along with a CRT file:
  cat server.key server.crt > server.pem
cat ca.pem sub.class1.server.ca.pem > ca-certs.crt
Then we’ll configure our Lighttpd server to use our new keys (/etc/lighttpd/conf-enabled/10-ssl.conf):
  ## lighttpd support for SSLv2 and SSLv3
##
## Documentation: /usr/share/doc/lighttpd-doc/ssl.txt
##  http://www.lighttpd.net/documentation/ssl.html

#### SSL engine
$SERVER["socket"] == "0.0.0.0:443" {
                  ssl.engine                  = "enable"
                  ssl.pemfile                 = "/etc/lighttpd/ssl/server.pem"
                  ssl.ca-file                 = "/etc/lighttpd/ssl/ca-certs.crt"
}
Don’t forget to restart your Lighttpd server for the parameters to take effect :-)
Nginx
For Nginx, it’s a bit different from Lighttpd. We’ll create the unified certificate like this:
cat ssl.crt sub.class2.server.ca.pem ca.pem > /etc/nginx/ssl/server-unified.crt
Then configure Nginx (/etc/nginx/sites-enabled/www.deimos.fr):
  [...]
ssl on;
ssl_certificate /etc/nginx/ssl/server-unified.crt;
ssl_certificate_key /etc/nginx/ssl/server.key;
[...]
Then restart Nginx for the certificates to work.
Resources
Last updated 17 Feb 2015, 03:58 +0200.