Apache SSO Authentication on AD Backend via Kerberos
![]()
| Software version | 5 |
| Operating System | Red Hat 6 and Debian 6 |
| Last Update | 29/10/2012 |
Introduction
The purpose of this article is to explain how to implement strong SSO (Single Sign-On) authentication for a web application hosted on a local network Linux server with Apache via Kerberos on Windows 2003/2008 Server. Clients will be Windows or Linux machines participating in the AD (Active Directory) domain using a web browser.1
We can summarize the operation as follows: a user opens a session on the domain and navigates to a protected http page on the Intranet network. Usually, a box is displayed inviting the user to enter their username and password, even though they are already known to AD, since they entered the same information to connect to their Windows account. The purpose of Single Sign-On is to authenticate the user without them having to re-enter the same information multiple times.
Kerberos works with a system of tokens, which we will call ’tickets’. Authentication takes place in several steps:
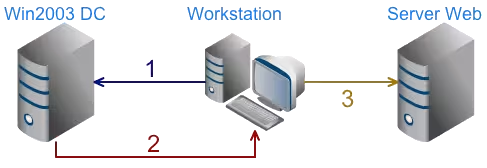
- The client workstation requests a ticket from the Kerberos server (here the Win2003 DC)
- The KDC returns a ticket, since the client is already identified on the network
- The client workstation formulates the request to the Web server including the ticket
Several advantages of this method:
- The user identifies themselves only once and can then transparently access different services
- The username and password are never transmitted over the network
Prerequisites
For the rest of the article, I will assume that you have the following elements:
- A 2003 Server configured as a domain controller with DNS service enabled, and at least one user account (dc-1.local.domain)
- A Linux server with Apache configured, capable of serving pages (lx-1.local.domain)
- An XP or 2003 client registered on the domain, capable of opening a session with a domain account (pc-1.local.domain)
In addition to being sensitive to naming, Kerberos is sensitive to any time lag between different machines. To overcome this problem, I advise you to use an NTP service.
Finally, you need to choose a Kerberos realm, for example LOCAL.DOMAIN. Note that the realm is written in all uppercase. It is not necessarily the domain name, and there can be several realms on a network with a single domain. However, the realm is written in uppercase, for example LOCAL.DOMAIN.
Installation
Windows Server
Install the support tools2.
Linux Server
We will install the following packages:
aptitude install krb5-clients krb5-config krb5-user libkrb53 libapache2-mod-auth-kerb
Configuration
Windows Active Directory
For each service to Kerberize, the following operations are to be planned to generate a Service Principal:
- Creation of a user account for each service. I advise you to choose a name that allows you to identify the service concerned, for example intranet-1 in the Active Directory.
- Generation of a KeyTab. This file is used to authenticate the Kerberized server (here the Web server) to the KDC:
ktpass -princ HTTP/lx-1.local.domain@LOCAL.DOMAIN -crypto DES-CBC-MD5 -ptype KRB5_NT_PRINCIPAL -mapuser intranet-1 -pass azerty -out C:\temp\keytab.txt
Copy the generated file to the Linux server in /etc/krb5.keytab.
Linux Server
Start by securing the keytab copied previously:
  chown www-data:root /etc/krb5.keytab
chmod 640 /etc/krb5.keytab
Configure DNS:
  # /etc/resolv.conf
search local.domain
nameserver 192.168.22.1
Verify that modauthkerb is activated:
a2enmod auth_kerb
Create a .htaccess or edit apache2.conf to secure the site:
  # .htaccess
<Files "*">
        <Limit GET POST>
                AuthName "Kerberos Login"
                AuthType Kerberos
                Krb5Keytab /etc/krb5.keytab
                KrbAuthRealms LOCAL.DOMAIN
                KrbMethodNegotiate On
                KrbMethodK5Passwd Off
                KrbVerifyKDC off
                Require valid-user
        </Limit>
</Files>
Reload your Apache server
I remind you that the realm is written in uppercase. In this example, we activate the SSO mode via Negotiate and disable password authentication; if automatic authentication is impossible, a 401 Authorization Required error page will be displayed.
The last file to configure is /etc/krb5.conf:
  # /etc/krb5.conf
[libdefaults]
        ticket_lifetime = 24000
        default_realm = LOCAL.DOMAIN
        dns_lookup_realm = true
        dns_lookup_kdc = false
        default_keytab_name = FILE:/etc/krb5.keytab

[realms]
        LOCAL.DOMAIN = {
                kdc = dc-1.local.domain
                admin_server = dc-1.local.domain
}

[domain_realm]
        .local.domain = LOCAL.DOMAIN
        local.domain = LOCAL.DOMAIN

[appdefaults]
        pam = {
                debug = false
                ticket_lifetime = 36000
                renew_lifetime = 36000
                forwardable = true
                krb4_convert = false
        }
Validation
At this stage, you should normally have a functional configuration. However, we will perform some checks because there are many possible configuration errors.
- Connection test:
kinit <username>@LOCAL.DOMAIN
Enter the user’s password; there should be no error.
The klist command allows you to check the status of tickets:
  > klist
Ticket cache: FILE:/tmp/krb5cc_0
Default principal: <username>@LOCAL.DOMAIN

Valid starting     Expires            Service principal
08/12/09 11:42:08 08/12/09 18:22:08 krbtgt/LOCAL.DOMAIN@LOCAL.DOMAIN


Kerberos 4 ticket cache: /tmp/tkt0
klist: You have no tickets cached
- If all is well, then check your service authentication:
  > kvno HTTP/lx-1.local.domain@LOCAL.DOMAIN
HTTP/lx-1.local.domain@LOCAL.DOMAIN: kvno = 28
There should be no error, but here are some classic error messages and their meaning:
kvno: No credentials cache found while getting client principal name
You don’t have a valid ticket: run the command:
  > kinit <username>
kvno: Server not found in Kerberos database while getting credentials for HTTP/lx-1.local.domain@LOCAL.DOMAIN
Several possibilities here:
- You have poorly generated your keytab; try regenerating it
- You have assigned the same SPN to multiple users (see pitfalls)
Finally, this keytab test should not return an error:
kinit -k -t /etc/krb5.keytab HTTP/lx-1.local.domain@LOCAL.DOMAIN
Web Browser
Internet Explorer
- In the advanced options, check that Windows Authentication is enabled: “Enable Integrated Windows Authentication”
- Then add the secured site to the Local intranet zone: http://lx-1.local.domain
Accept the changes, and navigate to http://lx-1.local.domain: the site appears without password authentication.
Firefox
Launch Firefox and type about:config in the address bar, then filter with the word auth. Modify network.negotiate-auth.trusted-uris and network.negotiate-auth.delegation-uris with the domain value “local.domain”.
FAQ
Service Name on Multiple Accounts
If you have created multiple accounts for experimentation, it’s not impossible that the same service name or SPN is associated with multiple accounts, which is not possible. An account must be unique for each Kerberized service (intranet-1, intranet-2…) and the same service name (HTTP/lx-1.local.domain@LOCAL.DOMAIN) cannot be associated with multiple accounts. If you have used ktpass to associate the same SPN with multiple accounts, use setspn to fix it:
  C:\Program Files\Support Tools>setspn
Usage: setspn [switches data] computername
Where "computername" can be the name or domain\name

Switches:
-R = reset HOST ServicePrincipalName
    Usage: setspn -R computername
-A = add arbitrary SPN
    Usage: setspn -A SPN computername
-D = delete arbitrary SPN
    Usage: setspn -D SPN computername
-L = list registered SPNs
    Usage: setspn [-L] computername
Examples:
setspn -R daserver1
It will register SPN "HOST/daserver1" and "HOST/{DNS of daserver1}"
setspn -A http/daserver daserver1
It will register SPN "http/daserver" for computer "daserver1"
setspn -D http/daserver daserver1
It will delete SPN "http/daserver" for computer "daserver1"
To list the SPNs associated with a user, use the “-L” option, to remove, use the “-D” option, for example:
setspn -D HTTP/lx-1.local.domain lx-1
Choosing the Username
The username is free, however, the name must not already be used as a computer name or as a domain controller.
References
Last updated 29 Oct 2012, 07:46 +0200.